When you are working on a micro-service architecture using Docker Containers, you create multiple Docker Containers to create and test different components of your application. Now, some of those components might require sharing files and directories. If you copy the same files in all the Containers separately, it might lead to an unnecessary increase in the Image size, and also, changing a file in one Container will not create the corresponding change in the same file in other Containers.

Hence, you required a shared directory or volume that you can mount on multiple Docker Containers, and all of them have shared access to a particular file or directory. Docker allows you to mount shared volumes in multiple Containers. In this article, we will mount a volume to different Containers and check whether the changes in the file are shared among all the Containers or not.
Volumes
Volumes in docker are the preferred way to deploy a stateful set application in the form of containers. You can manage and persist the docker data outside of the docker life cycle. Volumes are completely managed by docker, unlike the bind mounts. Docker volumes will allow you to share the data between the docker containers and the docker host. They are two types of volumes in the docker. You store the data in Docker.
- Named volumes.
- Bind volumes.
Create and manage volumes
To know more about Docker commands refer to the Docker – Instruction Commands.
Display all the existing Docker Volumes
To display all the existing Docker Volumes, you can use the list command as follows.
sudo docker volume ls

Creating a Volume
To create a new Docker Volume, you can use the Volume Create Command.
sudo docker volume create geeksforgeeks
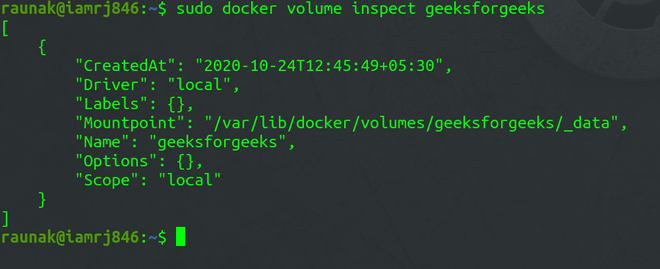
Inspecting Docker Volumes
To get the details of the Volumes you have created, you can use the Volume Inspect Command.
sudo docker volume inspect geeksforgeeks
Mounting Docker Volumes
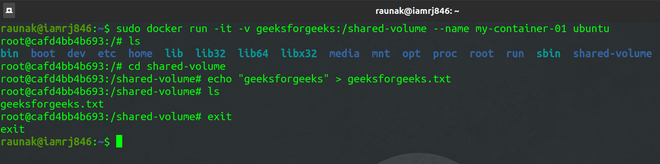
After creating the Volume, the next step is to mount the Volume to Docker Containers. We will create a Docker Container with the Ubuntu base Image which you will mention in Dockerfile and mount the geeksforgeeks Volume to that Container using the -v flag. You can install the Linux package by using the Dockerfile.
sudo docker run -it -v geeksforgeeks:/shared-volume --name my-container-01 ubuntu
The above command mounts the geeksforgeeks volume to a directory called shared-volume inside the Docker Container named my-container-01.

Create a file inside the Docker Volume
Inside the bash of the Container, create a new file and add some content.
ls
cd /shared-volume
echo “GeeksforGeeks” > geeksforgeeks.txt
ls
exit
Create another Container and Mount the Volume
Create another Docker Container called my-container-02 geeks for geeks inside the Container.
sudo docker run -it -v geeksforgeeks:/shared-volume --name my-container-02 ubuntu

If you go to the shared-volume directory and list the files, you will find the geeksforgeeks.txt file that you had created in the same volume but mounted in my-container-01 earlier and it also has the same content inside it. This is so because the volume is shared among the two Containers.
Remove a volume
Before removing the volume you should make sure you have taken the backup of the volume because it is going to delete permanently the data stored in it. By using the following command you can remove the docker volume. To know more commands in Docker refer to Docker Commands.
docker volume rm volume_name_or_id
In the place of volume_name_ or _id, you should use your volume name and volume id.
Start a Container With a Volume
Before starting a container with the help of volume you should create volume first. After that, you use the following command to create a container. Before creating a container you need a Docker image.
docker run -d –name mongo -v mongovol:/data/db -e MONGO_INITDB_ROOT_USERNAME=devdb -e MONGO_INITDB_ROOT_PASSWORD=devdb123
“-v mongovol:/data/db” represents the name of the volume and “/data/db” represents the directory with which the volume is going to be mounted “-e” represents the environmental variable which is written by the developers them selfs it can “user name and password”.
Use a Volume With Docker Compose
While writing the docker-compose file you can mount the volume which is created to store the data as shown following.
services:
  frontend:
    image: node:lts
    volumes:
      - mongovol:/data/db
volumes:
  mongovol:
In the above compose file you can see the column “volumes” In that area you should mention the name of the volume and directory or the path of the volume you should mention.
Populate a Volume Using a Container
You can populate the volume by following the below steps.
Step 1: Create a docker volume.
docker volume create my_volume
Step 2: Create a container to populate the volume.
docker run -d --name mongo -v mongovol:/data/db
-e MONGO_INITDB_ROOT_USERNAME=devdb MONGO_INITDB_ROOT_PASSWORD=devdb123
Step 3: Verify the populated volume.
docker run --rm -v mongovol:/data/db busybox ls /data/db
Share Data Between Machines
When you deploy a fault tolerance application you need to give permission to the multiple replicas of the same service to the same files for that you can use some services like S3, NFS, and so on as shown in the following figure.
Use a volume driver
You can create the docker volumes by using the following command before creating a container. If you want to create a volume while creating the container you achieve that by using the volume drivers in the docker. You can create a volume by using a volume driver as shown in the following.
docker volume create –driver vieux/sshfs <name of the vlome you want to create>
Create a Service Which Creates an NFS Volume
You can create an NFS volume while creating the service as mentioned below.
version: '3'
services:
  nfs-server:
    image: tomact:latest
    container_name: nfs_container
    volumes:
      - /data:/nfs_share

  nfs-client:
    image: busybox
    container_name: nfs_client
    command: tail -f /dev/null
    volumes:
      - nfs-data:/data

volumes:
  nfs-data:
    driver_opts:
      type: nfs
Conclusion
To conclude, in this article, we discussed how to create and inspect a Volume and mount it to multiple Docker Containers. This proves to be very helpful when you want shared access to files and directories among multiple Docker Containers.
Docker Containers – FAQ’s
1. Where To Mount Docker Volumes?
Mount the Docker Volumes to the Docker containers which you want to maintain the state of application.
2. Can You Mount A Volume During Docker Build?
Yes, you can mount the Docker volume during the building of Docker Image.
Like Article
Suggest improvement
Share your thoughts in the comments
Please Login to comment...