Mahotas – Element Structure for Eroding Image
Last Updated :
29 Jul, 2021
In this article, we will see how we can set the element structure for erode of the image in mahotas. Erosion (usually represented by ?) is one of two fundamental operations (the other being dilation) in morphological image processing from which all other morphological operations are based. It was originally defined for binary images, later being extended to grayscale images, and subsequently to complete lattices. In order to erode the image we use mahotas.morph.erode method.
In this tutorial, we will use “luispedro” image, below is the command to load it.
mahotas.demos.load('luispedro')
Below is the luispedro image

Below is the default structure of the element for erosion, which a 1 cross
np.array([
        [0, 1, 0],
        [1, 1, 1],
        [0, 1, 0]],
        bool)
Below is the implementation
Python3
import mahotas
import mahotas.demos
from pylab import gray, imshow, show
import numpy as np
luispedro = mahotas.demos.load('luispedro')
luispedro = luispedro.max(2)
T_otsu = mahotas.otsu(luispedro)
img = luispedro > T_otsu
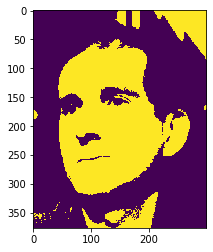
print("Image threshold using Otsu Method")
imshow(img)
show()
es = np.array([
[1, 1, 1],
[1, 1, 1],
[1, 1, 1]], bool)
new_img = mahotas.morph.erode(img, es)
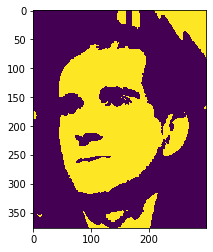
print("Eroded Image")
imshow(new_img)
show()
|
Output :
Image threshold using Otsu Method
Eroded Image
Another example
Python3
import mahotas
import numpy as np
import matplotlib.pyplot as plt
import os
img = mahotas.imread('dog_image.png')
img = img[:, :, 0]
T_otsu = mahotas.otsu(img)
img = img > T_otsu
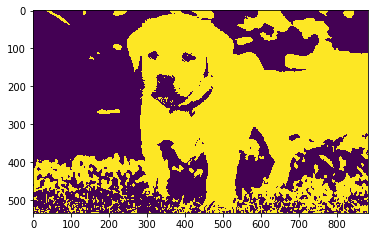
print("Image threshold using Otsu Method")
imshow(img)
show()
es = np.array([
[0, 0, 0],
[0, 1, 0],
[0, 0, 0]], bool)
new_img = mahotas.morph.erode(img, es)
print("Eroded Image")
imshow(new_img)
show()
|
Output :
Image threshold using Otsu Method
Eroded Image

Like Article
Suggest improvement
Share your thoughts in the comments
Please Login to comment...