LiveData in Android Architecture Components
Last Updated :
21 Sep, 2021
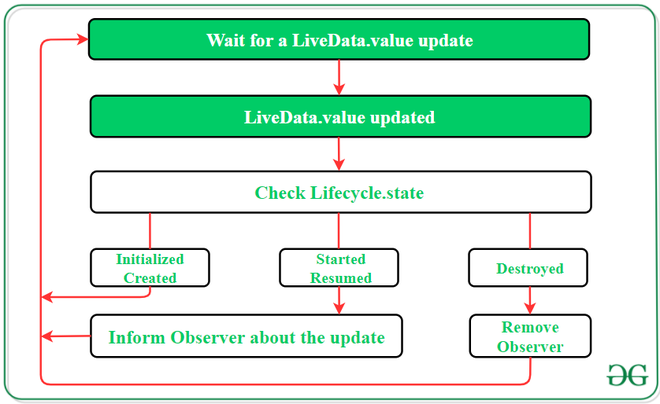
LiveData is one of the android architecture components. LiveData is an observable data holder class. What is the meaning of observable here the observable means live data can be observed by other components like activity and fragments (Ui Controller). The most important thing about LiveData is it has the knowledge about the Life cycle of its observers like activity or fragment. That means Live data only updates the app components like Activity or Fragments which are in active life cycle state. LiveData notifies the observer(Activity or Fragment) which are in Started or Resumed life cycle state. Inactive observers registered to watch LiveData objects aren’t notified about changes. Here inactive observers mean which are not in the state of Started or Resumed. One can register an observer paired with an object that implements the LifecycleOwner interface which we will see in our example. This relationship allows the observer to be removed when the state of the corresponding Lifecycle object changes to DESTROYED.
This component is an observable data holder class i.e, the contained value can be observed. LiveData is a lifecycle-aware component and thus it performs its functions according to the lifecycle state of other application components. Further, if the observer’s lifecycle state is active i.e., either STARTED or RESUMED, only then LiveData updates the app component. LiveData always checks the observer’s state before making any update to ensure that the observer must be active to receive it. If the observer’s lifecycle state is destroyed, LiveData is capable to remove it, and thus it avoids memory leaks. It makes the task of data synchronization easier.
It is necessary to implement onActive and onInactive methods by LiveData:
class LocationLiveData(context: Context)
: LiveData<Location>(), AnkoLogger, LocationListener {
private val locationManager: LocationManager =
context.getSystemService(Context.LOCATION_SERVICE) as LocationManager
override fun onActive() {
info(“onActive”)
locationManager.requestLocationUpdates(LocationManager.GPS_PROVIDER, 0, 0f, this)
}
override fun onInactive() {
info(“onInactive”)
locationManager.removeUpdates(this)
}
// ….
}
In order to observe a LiveData Component observer(LifecycleOwner, Observer<T>) method is called:
fun observeLocation() {
val location = LocationLiveData(this)
location.observe(this,
Observer { location ->
info(“location: $location”)
})
}
}
Implementation in Android App
In this example we will just create a simple counter app, that just counts 5 seconds, you can do anything using LiveData but for now let’s build this small app.
Step 1: Add these dependencies in your build.gradle file
def lifecycle_version = “2.3.0”
// ViewModel
implementation “androidx.lifecycle:lifecycle-viewmodel-ktx:$lifecycle_version”
// LiveData
implementation “androidx.lifecycle:lifecycle-livedata-ktx:$lifecycle_version”
implementation “androidx.lifecycle:lifecycle-runtime-ktx:$lifecycle_version”
implementation “androidx.core:core-ktx:1.3.2”
Step 2: Working with the activity_main.xml file
Navigate to the app > res > layout > activity_main.xml and add the below code to that file. Below is the code for the activity_main.xml file.
XML
<?xml version="1.0" encoding="utf-8"?>
<androidx.constraintlayout.widget.ConstraintLayout
android:layout_width="match_parent"
android:layout_height="match_parent"
tools:context=".MainActivity">
<TextView
android:id="@+id/textView"
android:layout_width="wrap_content"
android:layout_height="wrap_content"
android:text="0"
android:textSize="25sp"
app:layout_constraintBottom_toBottomOf="parent"
app:layout_constraintEnd_toEndOf="parent"
app:layout_constraintStart_toStartOf="parent"
app:layout_constraintTop_toTopOf="parent" />
</androidx.constraintlayout.widget.ConstraintLayout>
|
Step 3: Create a Kotlin class file MainActivityViewModel.kt. Our MainActivity class file extends the ViewModel class.
Refer to this article: How to Create Classes in Android Studio?
Kotlin
import androidx.lifecycle.ViewModel
class MainActivityViewModel:ViewModel() {
private val _seconds = MutableLiveData<Int>()
private val _finished = MutableLiveData<Boolean>()
fun seconds():LiveData<Int>{
return _seconds
}
fun finished():LiveData<Boolean>{
return _finished
}
fun startCounter(){
object : CountDownTimer(5000, 100) {
override fun onTick(millisUntilFinished: Long) {
val time = millisUntilFinished / 1000
_seconds.value = time.toInt()
}
override fun onFinish() {
_finished.value = true
}
}.start()
}
}
|
Note: Here we are using MutableLiveData right. but the question is why? because there is already LiveData is available, MutableLiveData extends LiveData class and two functions setValue() and postValue() are publicly available for use.
Step 4: Working with the MainActivity.kt file
Go to the MainActivity.kt file and refer to the following code. Below is the code for the MainActivity.kt file.
Kotlin
class MainActivity : AppCompatActivity() {
override fun onCreate(savedInstanceState: Bundle?) {
super.onCreate(savedInstanceState)
setContentView(R.layout.activity_main)
val viewModel = ViewModelProvider(this).get(MainActivityViewModel::class.java)
viewModel.startCounter()
viewModel.seconds().observe(this, Observer {
textView.text = it.toString()
})
viewModel.finished().observe(this, Observer {
if(it){
textView.text = "Finished"
}
})
}
}
|
Note: Here inside Observe() “this” is the Life cycle owner as we discussed above to observe the value, we should pass the Lifecycle Owner. Here this means MainActivity which is the observer here.
Output:
Advantages of Using LiveData
- No need to update UI every time: LiveData follows the observer pattern. LiveData notifies Observer objects when there is any change occurs.
- No memory leaks: Observers are bound to Lifecycle objects and clean up after themselves when their associated lifecycle is destroyed.
- No more manual lifecycle handling: UI components just observe relevant data and don’t stop or resume observation. LiveData automatically manages all of this since it’s aware of the relevant lifecycle status changes while observing.
- Proper configuration changes: If an activity or fragment is recreated due to a configuration change, like device rotation, it immediately receives the latest available data.
Like Article
Suggest improvement
Share your thoughts in the comments
Please Login to comment...