In Linux Virtualization – Chroot Jail article, we discussed about kernel namespaces and process jailing. To understand this article, you may not need to read the earlier one, but I strongly suggest that you go through it once before diving into resource throttling. It should help tremendously in understanding what’s going on.
What are cgroups?
cgroups (abbreviated from control groups) is a Linux kernel feature that limits, accounts for, and isolates the resource usage (CPU, memory, disk I/O, network, etc.) of a collection of processes.
This feature was originally developed by 2 engineers from Google, under the name “process containers” but later merged in the Linux kernel mainline with name “cgroups”.
Why is it required?
One of the design goals of cgroups is to provide a unified interface to many different use cases, from controlling single processes (by using nice, for example) to whole operating system-level virtualization. In simple words, cgroups provides:
- Resource limiting: Groups can be set to not exceed a configured memory limit, which also includes the file system cache.
- Prioritization – Some groups may get a larger share of CPU utilization or disk I/O throughput.
- Accounting – measures a group’s resource usage, which may be used, for example, for billing purposes.
- Control – freezing groups of processes, their checkpointing and restarting.
How are they used, directly or indirectly?
Control groups can be used in multiple ways:
- By accessing the cgroup virtual file system manually.
- By creating and managing groups on the fly using tools like cgcreate, cgexec, and cgclassify (from libcgroup).
- Through the “rules engine daemon” that can automatically move processes of certain users, groups, or commands to cgroups as specified in its configuration.
- Indirectly through other software that uses cgroups, such as Docker, Linux Containers (LXC) virtualization, libvirt, systemd, Open Grid Scheduler/Grid Engine, and Google’s lmctfy.
You might be surprised but this silent daemon makes up a substantial part of your online experience as quite a bunch of websites use containers/virtualization to host multiple servers or websites, including NetFlix, heroku and reddit.
Installing cgroups: Some Linux versions come pre-installed with cgroups. To check if they are already installed/mounted, check the output of:
$ mount | grep "^cgroup"
If you see files mounted on /sys/fs/cgroup/ then you can jump to the next topic directly to skip the installation part.
The 2nd command installs the cgroup-tools which makes it easier to control and monitor control groups. We would be using the commands from the same in this tutorial. We will use the iotop utility to monitor disk I/O rates.
$ sudo apt-get install cgroup-bin cgroup-lite libcgroup1 cgroup-lite
$ sudo apt-get install cgroup-tools
$ sudo apt-get install iotop
If you installed the cgroups but cannot see them mounted at /sys/fs/cgroup, then use these commands,
$ mount -t tmpfs cgroup_root /sys/fs/cgroup
$ mkdir /sys/fs/cgroup/blkio
$ mount -t cgroup -o blkio none /sys/fs/cgroup/blkio
Example 1: We will create a disk-controlled group so that we may run any process with a finite amount of disk read/writes available. i.e. we want to throttle reads and writes done by a process or a group of processes.
Step 1: To create a cgroup simply create a directory in /sys/fs/cgroup or if you have a cgroup-tools setup, then we can use them, in the appropriate directory for the subsystem. The kernel automatically fills the cgroup’s directory with the settings file nodes. Though, it’s recommended to use the cgroup-tools API,
# Switch to root for the rest of the commands
$ sudo su
$ cgcreate -g blkio:myapp  OR  mkdir /sys/fs/cgroup/blkio/myapp
This command will create a sub-group “myapp” under the “blkio” system. The Block I/O (blkio) subsystem controls and monitors access to I/O on block devices by tasks in cgroups. Writing values to these files provides controlled access to various resources. You can check if your group is created, by running the command, lscgroup, which lists all the control groups.
$ lscgroup | grep blkio:/myapp
blkio:/myapp
Important: These files are not normal files on disk. These are pseudo files and are used directly by the kernel to read and modify the configuration. Do not open them in a text editor and try to save them. Always use the “echo” command to write to them.
Before diving into easy stuff, let’s look at the directory structure of the newly created group. Here are some of the important files that we will need for this tutorial to understand how cgroup works. (Most important ones are highlighted in the image)

Step 2: We create 2 terminal and place them one below the other. Become root user in both the terminals. In the top-terminal we run the iotop utility to monitor the disk I/O,
$ sudo su
$ iotop -o
While on the below terminal, we create a temporary file of 512 MB using the “dd” command
$ sudo su
$ dd if=/dev/zero of=~/test_if bs=1M count=512
In the dd command, “if” represents the input file, “of” is the output file, “bs” is the block size and “count” is the no of times it writes the block. Once the command finishes, ~/temp_if is created with size 512 MB. You can see the realtime I/O rates on the top-terminal window.
Step 3: Now for our next experiment, we need to make sure that we have flushed all the file system buffers to disk and dropped all the caches so that they do not interfere with our results.
$ free -m
$ sync
$ echo 3 > /proc/sys/vm/drop_caches
$ free -m
Now, you should see a increase in the available RAM and reduced cache size.
Step 3: Now to setup throttling limits, we use the following commands. Say, we would like to set a read/write limit of 5 MB for a process. From the kernel documentation, you’ll find that, blkio.throttle.read_bps_device and blkio.throttle.write_bps_device accept entries of the format,
<major>:<minor> <rates_per_second>
where, major and minor are the values for a particular device, which we want to rate limit. rates_per_second is the maximum rate that can be achieved by the process of that group.
Getting the major and minor numbers is easy. The machine i am working on only has one disk /dev/sda so on running the command, ls -l /dev/sda* I can get the major, minor numbers.
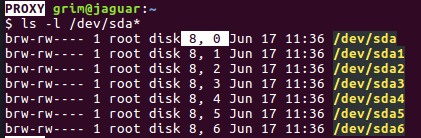
The highlighted values are the major and minor numbers for my /dev/sda disk.
Now, we write the following values to limit the read rate to 5 Mb/sec
$ echo "8:0 5242880" > /sys/fs/cgroup/blkio/myapp/blkio.throttle.read_bps_device
$ cat /sys/fs/cgroup/blkip/myapp/blkio.throttle.read_bps_device
Before running the controlled process, we must get an idea of the read speed without any throttling. Read the file that we created earlier, by running this command in the bottom-terminal.
$ dd if=~/test_if of=/dev/null
Step 5: You can see the real-time read rates in the top-terminal. After the file creation completes, you can also see the average rate, which is displayed by the dd command. Flush data to disk and drop all the caches, as shown earlier to avoid any ambiguity in the results.
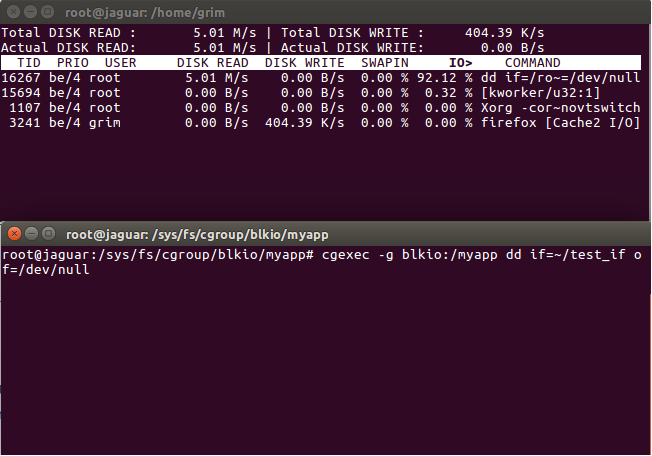
To run this command under the throttling, we use cgexec
$ cgexec -g blkio:/myapp dd if=~/test_if of=/dev/null
where we provide the : name to the -g argument, in this case it is “blkio:myapp” The rates in the top-terminal should look something similar to this.
The interesting part of this is that we can take any application which does not have rate-limiting built-in, we can throttle it as needed.

The above plot is plotted while reading 2 files, whose processes belong to the same cgroup, with a read throttle limit of 50 Mb/sec. As you can see initially, the read-rate jumps to maximum, but as soon as the 2nd read starts, it comes in equilibrium and a total of 50MB/s, as expected. Once the read for “file-abc” ends, the rate jumps to achieve the maxima again.
You can change the rate in real time by echoing new values in the blkio.throttle files. Kernel will update the configurations automatically.
Example 2: We follow similar steps to create a memory throttled application. I’ll skip the explanation since most of it is same, and directly jump to the commands.
Step 1 : I have created a simple c-program that allocates 1MB in each iteration and run for a total of 50 iterations, allocating a total of 50 MB.
// a simple c-program that allocates 1MB in each
// iteration and run for a total of 50 iterations,
// allocating a total of 50 MB
#include <stdio.h>
#include <stdlib.h>
#include <string.h>

int main(void)
{
    int i;
    char *p;
    for (i = 0; i < 50; ++i)
    {
        // Allocate 1 MB each time.
        if ((p = malloc(1<<20)) == NULL)
        {
            printf("Malloc failed at %d MB\n", i);
            return 0;
        }
        memset(p, 0, (1<<20));
        printf("Allocated %d to %d MB\n", i, i+1);
    }

    printf("Done!\n");
    return 0;
}
$ sudo su         # Switch to root for the rest of the commands
$ cgcreate -g memory:myapp_mem  OR  mkdir /sys/fs/cgroup/memory/myapp_mem
$ cd /sys/fs/cgroup/memory/myapp_mem
$ lscgroup        # To check if the group was created successfully.
Now, the format for throttling config for memory can be obtained from the kernel documentation.(Link in references)
$ echo "5242880" > memory.limit_in_bytes
Before running the code, we need to disable swap. If the program cannot obtain memory from RAM (since we have limited), it will try to allocate memory on swap, which is not desirable in our case.
$ sudo swapoff -a # Disable swap

Swap status must be similar to the one shown above.
$ gcc mem_limit.c -o mem_limit
First, run the code without any memory limits,
$ ./mem_limit
Now, compare its output when run from within the controlled cgroup,
$ cgexec -g memory:myapp_mem /root/mem_limit
You could check various resource accounting information like current memory usage, maximum memory used, limit of on memory etc from,
$ cat memory.usage_in_bytes
$ cat memory.max_usage_in_bytes
$ cat memory.limit_in_bytes
There are more parameters that you can explore such as, memory.failcnt, memory.kmem.* and memory.kmem.tcp.*
The more you read the documentation, the better will be your understanding.
We can extend this method and create throttled applications. This method was created a long time ago, but it is recently that it has been widely used in numerous applications. Virtual machines, containers etc use this to enforce resource limits.
The purpose of understand cgroups was to understand how actually resource throttling is done in containers. Next topic to explore is containers. We’ll talk about it in details in next article.
References:
About the Author:
Pinkesh Badjatiya hails from IIIT Hyderabad. He is a geek at heart with ample projects worth looking for. His project work can be seen here. If you also wish to showcase your blog here, please see GBlog for guest blog writing on GeeksforGeeks.
Like Article
Suggest improvement
Share your thoughts in the comments
Please Login to comment...