Laravel | View Basics
Last Updated :
30 Dec, 2019
Laravel is an MVC based PHP framework. In MVC architecture, V stands for View. The View is data that is going to be displayed to the user on their browser and the user can interact with it. It is simply an interface provided to the user for interaction.
Laravel used a powerful templating engine called Blade. The extension for this file used here is filename.blade.php. Even though there are some directives and layout format used with a blade for taking advantage of this templating engine, still it allows us to write plain PHP in the view file.
The main advantage of using Blade Templating Engine is that it provides template inheritance. With this, we can create a master layout page, which will become the base for other pages. So, the master page becomes the parent for all the child pages that we extend it to. IN this article we will cover the below topics:
- Check for View Existence
- Create the First Available View
- Create and Display Data in a View
- Share Data with all Views
- View Composer
- View Creator
1. Check for View Existence: To check if the view exists, there is a method called ‘exists()’.
2. Create the First Available View If there are many views in a Laravel application then using the ‘first()’ method, we can create the view that is available first.
- Syntax:
view()->first(['main', 'gfg', 'article']);
-
View::first(['main', 'gfg', 'article']);
Note: For this syntax, you will need to specify the View facade use Illuminate\Support\Facades\View; in the controller file.
- Example:
- Output:

3. Create and Display Data in a View: To display any kind of data stored in a variable then Blade provides a way to do that and that is by using ‘{{ }}’ i.e. double curly braces. The statements here are sent through PHP’s htmlspecialchars function which does the conversion of special characters to HTML entities. This is done to prevent XSS (Cross Site Scripting) attacks and this is done automatically by Blade.
- Syntax:
My name is {{ $name }} and my age is {{ $age }}
The variable $name and $age will be replaced by the values stored in those variables. If we don’t want the data to be escaped then we can use {!! !!}. This will prevent the data from being escaped but now it is not being protected by XSS attacks.
- Syntax:
My name is {!! $name !!} and my age is {!! $age !!}
- Example:
- Output:

4. Share Data with all Views: If you want to be shared between all the different views in a Laravel application then you can do that by using the share method. This is a View facade method so you will need to add use Illuminate\Support\Facades\View; this line.
- Syntax:
View::share(‘data’, ‘This is Shared Data’);
Here, the first argument in the function is the key and the second argument in the function is value.
- Example:
- Create three different view file in resources/views directory with the name gfg, main, and article and write the code below for the respective view file.
Note: The @include is a Laravel directive to include another view inside a view.
- gfg.blade.php
<!DOCTYPE html>
<html>
<head>
<title>GeeksforGeeks</title>
</head>
<body>
@include('shared')
<h3>This is GfG View</h3>
</body>
</html>
|
- main.blade.php
<!DOCTYPE html>
<html>
<head>
<title>Main | GeeksforGeeks</title>
</head>
<body>
@include('shared')
<h3>This is the Main View</h3>
</body>
</html>
|
- article.blade.php
<!DOCTYPE html>
<html>
<head>
<title>Article | GeeksforGeeks</title>
</head>
<body>
@include('shared')
<h3>This is the Article View</h3>
</body>
</html>
|
- Now, create another view with the name shared.blade.php and write the code below.
<h2>Welcome, {{ $data }}</h2>
|
- Now, open the file AppServiceProvider.php in the app/Providers directory. And in the boot function, write the below code.
<?php
namespace App\Providers;
use Illuminate\Support\ServiceProvider;
use Illuminate\Support\Facades\View;
class AppServiceProvider extends ServiceProvider
{
public function register()
{
}
public function boot()
{
View::share('data', 'This is Shared Data');
}
}
?>
|
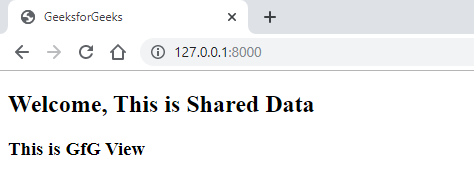
Here, we have passed the key as data with the value as This is Shared Data. This is done because we have specified the variable $data in shared.blade.php file. In the previous step. The $data variable is going to be replaced in the with the This is Shared Data.
- Now, specify routes for all the views created in previous steps in the web.php file which is in the routes directory.
Route::get('/', function () {
    return view('gfg');
});

Route::get('main', function () {
    return view('main');
});

Route::get('article', function () {
    return view('article');
});
-
Output:
- Same view not navigating to the other view.

- If we navigate to the other view, then the first line will be the same but the second line will change.

5. View Composer: The View Composer is used when we want to output a view with another view when the call is made. This can be used as another data sharing method in Laravel.
- Syntax:
View::composer('shared', function($view) {
  //
});
Here, in place of shared we can write any other view we want to share. We can specify multiple views in a composer by using an array. We can pass an array of views.
- Syntax:
View::composer(['shared', 'sharedNew'], function($view) {
$view->with('data', 'This is Shared Data');
});
We can also write a ‘*’ star symbol to have all the views passed in the composer.
- Syntax:
View::composer(*, function($view) {
  $view->with('data', 'This is Shared Data');
});
- Example:
- Create three different view file in ‘resources/views’ directory with the name gfg, main, and article and write the code below for the respective view file.
Note: The @include is a Laravel directive to include another view inside a view.
- gfg.blade.php
<!DOCTYPE html>
<html>
<head>
<title>GeeksforGeeks</title>
</head>
<body>
@include('shared')
<h3>This is GfG View</h3>
</body>
</html>
|
- main.blade.php
<!DOCTYPE html>
<html>
<head>
<title>Main | GeeksforGeeks</title>
</head>
<body>
@include('shared')
<h3>This is the Main View</h3>
</body>
</html>
|
- article.blade.php
<!DOCTYPE html>
<html>
<head>
<title>Article | GeeksforGeeks</title>
</head>
<body>
@include('shared')
<h3>This is the Article View</h3>
</body>
</html>
|
- Now, create another view with the name ‘shared.blade.php’ and write the code below.
<h2>Welcome, {{ $data }}</h2>
|
- Now, open the file ‘AppServiceProvider.php’ in the ‘app/Providers’ directory. And in the boot function, write the below code.
<?php
namespace App\Providers;
use Illuminate\Support\ServiceProvider;
use Illuminate\Support\Facades\View;
class AppServiceProvider extends ServiceProvider
{
public function register()
{
}
public function boot()
{
View::share('data', 'This is Shared Data');
}
}
|
Here, we have passed the key as ‘data’ with the value as ‘This is Shared Data’. This is done because we have specified the variable ‘$data’ in ‘shared.blade.php’ file. In the previous step. The ‘$data’ variable is going to be replaced in the with the ‘This is Shared Data’.
- Now, specify routes for all the views created in previous steps in the ‘web.php’ file which is in the ‘routes’ directory.
Route::get('/', function () {
    return view('gfg');
});

Route::get('main', function () {
    return view('main');
});

Route::get('article', function () {
    return view('article');
});
Output:
6. View Creator: The View Creator is the same as the View Composer that we previously saw and the syntax is also pretty the same. The only difference is that it does not wait for the view to render and gets executed immediately after the view is found.
Reference: https://laravel.com/docs/6.x/views
Like Article
Suggest improvement
Share your thoughts in the comments
Please Login to comment...