Laravel | Eloquent Model Basics
Last Updated :
30 Dec, 2019
Laravel is an MVC based PHP framework. In MVC architecture, ‘M’ stands for ‘Model’. A Model is basically a way for querying data to and from the table in the database. Laravel provides a simple way to do that using Eloquent ORM (Object-Relational Mapping). Every table has a Model to interact with the table.
Create a Model: To create an Eloquent Model, Laravel provides an Artisan Command as follows:
php artisan make:model Article
After running the command above, a file is created with the name Article.php in the app directory. The file content looks as follows:
<?php
namespace App;
use Illuminate\Database\Eloquent\Model;
class Article extends Model {
}
|
Retrieve Data: To retrieve data from the database, we can use two methods as described below:
- Here, the all() method will return all the data in the table in the form of an array and store it in the $articles variable.
public function index() {

        $articles = \App\Article::all();

        return view('gfg')->with('articles', $articles);

}
- We can also get a particular record by using ‘where()’ as shown below:
public function index() {

        $articles = \App\Article::all()->where('id', 1);

        return view('gfg')->with('articles', $articles);

}
Insert Data: To insert data in the database, we will use save() method as shown below:
- Here, we create a new Article and store it in the $article variable. The topic and content attribute are used to store the data specified in the respective columns in the table. And then ‘save()’ method is used to insert the data in the database. Then a successful message will be shown if the insert is successful.
public function insert() {

    $article = new Article;

    $article->topic = "View in Laravel";
    $article->content = "View is the data display at the user end.";

    $article->save();

    echo "Insert Successful!";

}
Note: The created_at and updated_at field in the table will be automatically be inserted with the time stamp.
Update Data: To update data in the database, we will again use save() method as shown below:
- Here, the find() method is used to specify the record that we want to update in the database. The number in the parenthesis is of id i.e. primary key. Now a new value is given to the topic field of the record which will change the old one. And then ‘save()’ method is used to insert the data in the database. Then a successful message will be shown if the update is successful.
public function update() {

        $article = \App\Article::find(1);

        $article->topic = "Laravel";

        $article->save();

        echo "Update Successful!";

}
Note: The updated_at field in the table will be automatically be inserted with the time stamp.
Delete Data: To delete data in the database, we will use delete() method as shown below:
Below example illustrates each of them:
Example:
- Create and Connect to a MySQL Database.
- Create a migration using the following Artisan command:
php artisan make:migration create_articles_table
And then write the below code in the up() function in the migration file created at database/migrations directory.
Schema::create('articles', function (Blueprint $table) {
$table->bigIncrements('id');
$table->string('topic');
$table->string('content');
$table->timestamps();
});
- Now run the migrate command to create migrations:
php artisan migrate
- Now create a model using the below Artisan command:
php artisan make:model Article
The Article.php file, which is created in the app directory, should look like as follows:
<?php
namespace App;
use Illuminate\Database\Eloquent\Model;
class Article extends Model {
}
|
- Now create a controller using the below Artisan command:
php artisan make:controller ArticleController
The ArticleController.php file, which is created in the app/Http/Controllers directory, should look like as follows:
<?php
namespace App\Http\Controllers;
use Illuminate\Http\Request;
class ArticleController extends Controller {
}
|
- Now, you will have to change the controller file as below code or copy the code below and paste it in that controller file which was created in the previous step.
<?php
namespace App\Http\Controllers;
use App\Article;
use Illuminate\Http\Request;
class ArticleController extends Controller {
public function index() {
$articles = \App\Article::all();
return view('gfg')->with('articles', $articles);
}
public function insert() {
$article = new Article;
$article->topic = "View in Laravel";
$article->content = "View is the data display at the user end.";
$article->save();
echo "Insert Successful!";
}
public function update() {
$article = \App\Article::find(1);
$article->topic = "Laravel";
$article->save();
echo "Update Successful!";
}
public function delete() {

        $article = \App\Article::find(1);

        $article->delete();

        echo "Delete Successful!";

}
}
|
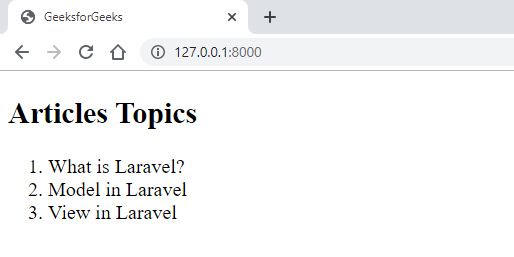
- Now, create a view with the name ‘gfg.blade.php’ in the ‘resources/views’ directory and the below code in that file.
<!DOCTYPE html>
<html>
<head>
<title>GeeksforGeeks</title>
<style>
body {
font-size: 20px;
}
</style>
</head>
<body>
<h2>Articles Topics</h2>
<ol>
@foreach($articles as $article)
<li>{{ $article->topic }}</li>
@endforeach
</ol>
</body>
</html>
|
- Now, create the routes by writing the following in the web.php file in the routes directory.
Note: Comment or remove any previous routes from the file.
Route::get('/', 'ArticleController@index');

Route::get('/insert', 'ArticleController@insert');

Route::get('/update', 'ArticleController@update');

Route::get('/delete', 'ArticleController@delete');
- Now run the Laravel app using the following Artisan command:
php artisan serve
Output:
- For Index Function:

- For Insert Function:

- For Update Function:


- For Delete Function:


Reference: https://laravel.com/docs/6.x/eloquent
Like Article
Suggest improvement
Share your thoughts in the comments
Please Login to comment...