Kubernetes is an open-source container orchestration tool developed by Google. It is primarily employed to automate the deployment, scaling, and management of software. In short, Kubernetes is termed as K8s. Kubernetes is currently maintained by the Cloud Native Computing Foundation. Although it now supports both containerd and CRI-O in addition to the Docker runtime Engine with which it was first intended to communicate. Automating the operations of container management is Kubernetes’ primary goal. It has built-in commands for application deployment and rolling out necessary modifications to the application. Companies like Google, Spotify, and Capital One are now using it.
What are known as Volumes?
On-disk files present in a container are ephemeral storages, they present some or other problems for non-trivial applications while running in containers. One of the major problems is the loss of files when the container crashes. The container is restarted by kubelet but it is restored in a clean state without any data. Another problem occurs when we are sharing files between containers that are running together in a Pod. All these problems are solved by Kubernetes volume abstraction.
Volumes in Kubernetes
Although Docker has the concept of Volumes it is loose and not well managed. Generally, a docker volume is a directory on a disk that is present inside another container. Though Volume drives are provided by docker functionality is very limited. Kubernetes supports multiple types of Volumes. Any number of volumes can be used by a Pod simultaneously. Persistent volumes are present beyond the lifetime of a pod even after they are destroyed but Ephemeral volume types have a lifetime of a pod which means they are destroyed once the lifetime of the Pod is finished. For any kind of Volume in a pod, data is preserved across container restarts.
At the lowest level, a volume is a directory mostly with some data, this data is accessible to containers that are in a pod. The content present in this is determined by the volume type used in it.
Types of Volumes
As discussed earlier there are multiple types of volume in Kubernetes:
1. AwsElasticBlockStore (deprecated)
- An Amazon Web Services (AWS) EBS volume is mounted in our pod if awsElasticBlockStore is used. This volume type is persisted which means unlike emptyDir the data present inside a pod is not erased and the volume is unmounted. This means that EBS volume can be pre populated with any data, this particular data can be shared amongst various Pods.
- There are some restrictions with using awsElasticBlockStore volume like the nodes on which the pods are running must also be AWS EC2 instances, these instances should be of the same region and availability zone as the EBS volume.
2. AWS EBS CSI migration
- When the CSI Migration feature for awsElasticBlockStore is enabled it redirects all plugin operations from the existing in-tree plugin to the ebs.csi.aws.com CSI)driver. If we want to use this feature then we must install the AWS EBS CSI driver on the cluster.
3. AWS EBS CSI migration complete
- If we want to disable awsElasticBlockStore storage plugin from being loaded by the controller manager or the kubelet we need to set the InTreePluginAWSUnregister flag value to true.
4. AzureDisk CSI migration
- When the CSIMigration feature for azureDisk is enabled it redirects all plugin operations from the existing in-tree plugin to the disk.csi.azure.com CSI. If we want to use this feature we need to install Azure Disk CSI Driver to our cluster.
5. AzureDisk CSI migration complete
- If we want to disable the azureDisk storage plugin from being loaded by the controller manager and the kubelet we need to set the InTreePluginAzureDiskUnregister flag to true.
6. AzureFile CSI migration
- When CSIMigration feature for azureFile is enabled then it redirects all plugin operations from the pre-existing in-tree plugin to file.csi.azure.com CSI. If we want to use this feature we need to install Azure File CSI Driver on a cluster and CSIMigrationAzureFile feature gates must be enabled. If we use the same volume with different fsgroups then it is not supported by Azure File CSI.
Kubernetes Storage Plugins
These Kubernetes Storage plugins lay the foundation for the easy management and internal operations of storage solutions in containers. It does the configurational settings on containers that are orchestrated by Kubernetes. These plugins increase the platform’s adaptability and guarantee a customized solution for a range of storage requirements. The following 2 popular kubernetes storage plugins
1. Network File System Plugin
2. Container Storage Interface ( CSI )
Network File System Plugin
- Effortless Data Sharing: NFS plugin servers a vital, in establishing the connection between Kubernetes volumes and network file systems without any difficulties for transmission of data.
- Cluster-wide Accessibility: The NFS plugin helps with enabling stable data transmission among the clusters improving the efficiency of resource usage.
- Scalable Solutions: NFS acts as a great option for customizing storage needs facilitating effective data exchange and offering scalable solutions.
Container Storage Interface, or CSI
- Standardized Integration: Container Storage Interface ( CSI ) comes with a standardized Interface with common language storage providers facilitating effortless integration with Kubernetes.
- Flexibility And choice: The CSI plugin provides a method for the users to select the storage options that exactly meet to the needs of their applications.
- Interoperability: CSI comes with adopting a standardized approach for enhancing the interoperability providing a smooth and efficient storage experience with containerized settings.
Creating a Pod Yaml File with PV and PVC
Whenever developer deploying an Application using Kubernetes to make the data in this application Persistant , he raise the request for the persistent Volume it known as PVC. IT Adminstrators looks over the specifications of the PVC requests and provides Persistant Volumes (PV) as per required needs.
Step 1: Creating a PVC (Persistant Volume Claim) with a Pod Yaml
Here we are creating PVC with name as mypvc using Yaml syntax file with specification of storage resource of 5Gib, having accessmodes Read and Write only Once. Save the file code with name such as my_pvc.yml
apiVersion: v1
kind: PersistentVolumeClaim
metadata:
  name: mypvc
spec:
  accessModes:
    - ReadWriteOnce
  resources:
    requests:
      storage: 2Gi
Run this yaml file with kubectl create command or kubectl apply command as follows
kubectl create -f my_pvc.yml
The following picture show the practical usage of the above commands

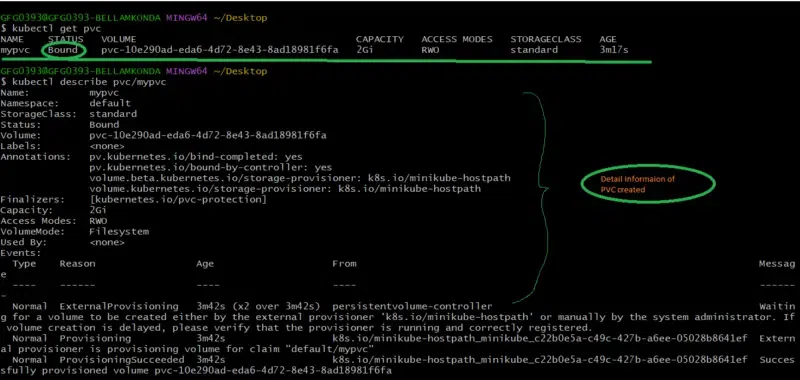
Step 2: Check the Status of the PVC
After executing the above step 1 to check the status of PVC creation try on running the following command:
kubectl get pvc
To know more about the PVC try on seeing the description on running the following command
kubectl describe pvc/mypvc
The following screenshots show the implementation of above step2 commands
Step 3: Creating a PV ( Persistant Volume ) with a Yaml file
Based on the PVC specification , the Persistant Volume is created and allocated to it , here we are going to the manual way instead of precreated storage classes for better understanding of workflow. Try on writing a yaml code for persistent volume as follow:
apiVersion: v1
kind: PersistentVolume
metadata:
  name: mypv
spec:
  capacity:
    storage: 2Gi
  accessModes:
    - ReadWriteOnce
  persistentVolumeReclaimPolicy: Retain
  hostPath:
    path: "/mnt/data"
In this file, we providing reclaim policy as Retain, to make the data permant even after the deletion of the pod application.
Save the above specified yaml file with “my_pv.yml” and then run it with the following command:
kubectl apply -f my_pv.yml
The following screenshots show the implementation of above step3 commands

Step 4: Checking the Status of PV
After once completing the step 3 to check the status of the PV try on running the following command:
kubectl get pv
To know more about the details of the PV that you created try on running the following command with its specific name of PV
kubectl describe pv mypv
The following screenshots show the implementation of above step4 commands

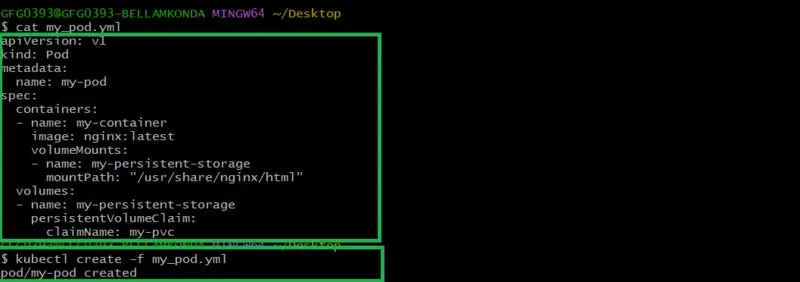
Step 5: Creating Pod Yaml File with PV and PVC
Now create a pod yaml file as referring the following yaml code for using the above created PV and PVC with Pod application with image nginx latest version.
apiVersion: v1
kind: Pod
metadata:
  name: my-pod
spec:
  containers:
  - name: my-container
    image: nginx:latest
    volumeMounts:
    - name: my-persistent-storage
      mountPath: "/usr/share/nginx/html"
  volumes:
  - name: my-persistent-storage
    persistentVolumeClaim:
      claimName: my-pvc
Save this pod yaml file with name my_pod.yml and then run it with the command kubectl create as follow:
kubectl create -f my_pod.yml
The following screenshots show the implementation of above step 5 commands
Step 6: To Check The Status Of Created Pod
to check the creation of the pod check with the following command:
kubectl get pods
To know more about the detailing of that pod, run with the following command
kubectl describe pods/mypod
The following screenshots show the implementation of above step6 commands


Conclusion
In this evolving era of Container Orchestration, Kubernetes plays an essential role in the management of data with persistence. It offers flexible management of data within pods ranging from permanence to short-term duration of storing data with volume types such as EmptyDir Volumes for temporary storage easy to use and Hostpath volumes making data permanent in the host filesystem. Kubernetes comes up with many features for orchestrating the containers effectively in an automated way with services such as “ConfigMap” resource for streamlining the configuration management, and hostPath Volumes for giving storage flexibility with the hostPath file system improving the overall efficiency of container applications.
The effective way of utilizing volumes in Kubernetes not only contributes to the management of data within a cluster but also inherits scalability and agility in Kubernetes Orchestration. Nowadays the need for Kubernetes volumes for data management is increasing because of its adoptness of microservices and distributed architectures.
Kubernetes Volumes – FAQs
How Do I Create a Persistent Volume (PV) In Kubernetes?
Create a persistent volume yaml file such as pv.yml including the storage type, capacity, and access modes. Then execute the file with the command `kubectl apply -f pv.yml`.
kubectl apply -f pv.yml
Can a Pod Use Multiple Persistent Volume Claims (PVCs) Simultaneously?
Yes. A pod can use multiple PVCs simultaneously with each managing its own storage needs inside the Pod.
What Happens To Data In An EmptyDir Volume When a Pod Restarts?
The data Stored in the EmptyDir volumes are temporary, they get erased upon the Pod whenever the pods are restarted or terminated.
How Can I Share a Volume Between Pods In Different Nodes?
You can share a Volume between Pods in different nodes by using a Network File System like NFS or distributed storage solutions like Ceph for cross-nodes.
Can I Dynamically Allocate Storage Using Persistent Volume Claims (PVCs)?
Yes, On using Dynamic providing of Storage such as predefined Storage classes and policies you can allocate storage dynamically to the PVCs
Like Article
Suggest improvement
Share your thoughts in the comments
Please Login to comment...