Apache Kafka is a publish-subscribe messaging queue used for real-time streams of data. Apache Kafka lets you send and receive messages between various Microservices. Developing a scalable and reliable Automation Framework for Kafka-based Microservices Projects can be challenging sometimes.
In this article, we will see how to design a Kafka Automation Framework with Python for Microservices Architecture.
Prerequisites:
- Basic knowledge of Microservices Architecture.
- Good knowledge of Kafka Basic Concepts (e.g. Kafka Topics, Brokers, Partitions, Offset, Producer, Consumer, etc).
- Good knowledge of Python Basics (pip install <package>, writing python methods).
Solution :
We will go through a Real World scenario for Kafka Automation to understand the technical challenges and try to design our Automation Solution. Let’s imagine we are working on a Data Pipeline Project like the below Diagram. And We want to develop an Automation Framework for the same.
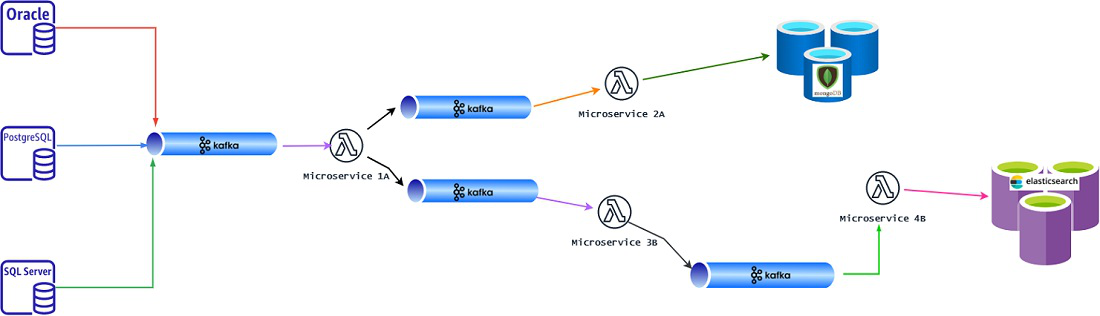
Various events (data) are coming from multiple Databases to our Kafka Topic. “Microservice 1A” consumes all such incoming messages and does some Processing and produces the Output in a different Kafka Topic.
The output of “Microservice 1A” is categorized into 2 different Kafka Topic, based on different requirements. Now, “Microservice 2A” consumes one of the Output Topic from “Microservice 1A”, then processes the data with some complex logic and Sends the final Data to the MongoDB cluster.
Alternatively, ” Microservice 3B” consumes from another Output Topic from Microservice 1A”, then, do some more processing and publish the output Data in the next Kafka Topic.
“Microservice 4B” consumes this data and after some more processing, it sends the final data to ElasticSearch Cluster.
We are trying to Design an Automation Framework that will validate all the Input and Output of these 4 Microservices. (These Microservices can be written in any Tech-Stacks like Java+SpringBoot Or C# DotNet Or Python+Django.)
We will design our Automation Framework using Python.
For now, let’s summarize a few major points based on our understanding of the above System Design.
- We need to choose a suitable Kafka Library for our Automation Framework.
- We need to develop the basic building block of Kafka automation i.e. Kafka Consumer with appropriate Kafka Configurations.
- We need to carefully use the appropriate Kafka Offset commit mechanism to properly Test the Data.
- We need to carefully handle Kafka Partition Rebalance if it happens during Automation execution.
- We need to design our Test Cases for future Scalability requirements. (i.e. 1 Kafka Topic may contain 6 partitions and they are parallelly sending different kinds of data in those 6 partitions. We can execute 6 parallel Automation TCs for each of these 6 partitions)
Popular Kafka Libraries for Python:
While working on Kafka Automation with Python we have 3 popular choices of Libraries on the Internet.
- PyKafka
- Kafka-python
- Confluent Kafka
Each of these Libraries has its own Pros and Cons So we will have chosen based on our Project Requirements.
Unlike most of the Kafka Python Tutorials available on the Internet, We will not work on localhost. Instead, We will try to connect to the Remote Kafka cluster with SSL Authentication.
For Internal Microservices (not exposed to Internet-facing End Users) We will see SSL as a popular Authentication mechanism with Kafka clusters. Most of the Companies use either Confluent Kafka clusters or Amazon MSK clusters (Managed Streaming Kafka is based on Apache Kafka).
In order to connect to Kafka clusters, We get 1 JKS File and one Password for this JKS file from the Infra Support Team. So our job is to convert this JKS file into the appropriate format (as expected by the Python Kafka Library).
Which Kafka Library to choose?
If we are using Amazon MSK clusters then We can build our Automation Framework using PyKafka or Kafka-python (both are Open Source and most popular for Apache Kafka Automation). If we are using Confluent Kafka clusters then We have to use Confluent Kafka Library as we will get Library support for Confluent specific features like ksqlDB, REST Proxy, and Schema Registry. We will use Confluent Kafka Library for Python Automation as we can serve automation of both Apache Kafka cluster and Confluent Kafka cluster with this Library. We need Python 3.x and Pip already installed. We can execute the below command to install the Library in our System.
pip install confluent-kafka
We need to convert the JKS file (JKS not compatible with Python) into PKCS12 format in order to use it with Confluent Kafka Library.
How to convert JKS to PKCS12?
JRE 8 or Above should be installed in the system.
We need to run “keytool” command Inside <JRE_install_path>/bin
So open CMD prompt, go to JRE_install_path>/bin
Step 1: Execute the below command to get the Alias name:
keytool -list -v -keystore <absolute_path_to_JKS_file>
(When asked we need to provide the password we received for the JKS file from our Infra Team)
Step 2: Execute the below command along with the Alias name we got from Step 1 output.
keytool -v -importkeystore -srckeystore <absolute_path_to_JKS_file> -srcalias <alias_name> -destkeystore certkey.p12 -deststoretype PKCS12
This will again ask for the source Keystore password and we must input the same password as Step 1.
After executing this command we will get the PKCS12 file (i.e. certkey.p12 ) in the current directory, we need to copy this file into our Automation Framework Directory. And we are good to start building our Automation Framework with Python.
Note: If we plan to use PyKafka or Kafka-python Library instead of Confluent Kafka then we need to generate PEM files from this PKCS12 file with some additional commands.
Writing Python Kafka Consumer with SSL Authentication:
We will use the same PKCS12 file that was generated during JKS to PKCS conversion step mentioned above.
from confluent_kafka import Consumer
import time

print("Starting Kafka Consumer")

mysecret = "yourjksPassword"
#you can call remote API to get JKS password instead of hardcoding like above

conf = {
        'bootstrap.servers' : 'm1.msk.us-east.aws.com:9094, m2.msk.us-east.aws.com:9094, m3.msk.us-east.aws.com:9094',
        'group.id' : 'KfConsumer1',
        'security.protocol' : 'SSL',
        'auto.offset.reset' : 'earliest',
        'enable.auto.commit' : True,
        'max.poll.records' : 5,
        'heartbeat.interval.ms' : 25000,
        'max.poll.interval.ms' : 90000,
        'session.timeout.ms' : 180000,
        'ssl.keystore.password' : mysecret,
        'ssl.keystore.location' : './certkey.p12'
        }

print("connecting to Kafka topic")

consumer = Consumer(conf)

consumer.subscribe(['kf.topic.name'])
while True:
    msg = consumer.poll(1.0)

    if msg is None:
        continue
    if msg.error():
        print("Consumer error happened: {}".format(msg.error()))
        continue
    print("Connected to Topic: {} and Partition : {}".format(msg.topic(), msg.partition() ))
    print("Received Message : {} with Offset : {}".format(msg.value().decode('utf-8'), msg.offset() ))
    time.sleep(2.5)
#consumer.close()
Sample Output of this Above Code :
Starting Kafka Consumer
connecting to Kafka topic
Connected to Topic:   kf.topic.name     and Partition :   kf.topic.name-0
Received Message : abc101     with Offset :  0
Connected to Topic:   kf.topic.name     and Partition :   kf.topic.name-1
Received Message : xyz201     with Offset :  0
Connected to Topic:   kf.topic.name     and Partition :   kf.topic.name-0
Received Message : abc102     with Offset :  1
Connected to Topic:   kf.topic.name     and Partition :   kf.topic.name-1
Received Message : xyz202     with Offset :  1
Further Steps :
We know how to consume messages from Kafka Topic with SSL authentication.
Going forward we can add our own logic to validate incoming messages in our Kafka Topic.
We can use other option of better offset management
Example: ‘enable.auto.commit’ : False
And Add custom code to Do Manual Commit of messages based on certain conditions.
We can simultaneously run this program in multiple Console Window to observe the Automatic Kafka Rebalance mechanism.
Example: If our Kafka Topic has total 3 partitions and We are executing this same Code in 3 Consoles (i.e. 3 instances)
Then, we might see each Instance is getting assigned 1 partition out of a total of 3 partitions.
This specific configuration ‘group.id’ : ‘KfConsumer1’ helps us to observe Kafka Partition rebalance in the above example (i.e. all 3 instances are having the same group.id mentioned)
Conclusion :
We have got the basic building block of Kafka automation i.e. Kafka Python Consumer with appropriate Kafka Configurations. So we can extend this Code as per our Project needs and continue modifying and developing our Kafka Automation Framework.
Like Article
Suggest improvement
Share your thoughts in the comments
Please Login to comment...