jQuery UI | Button
Last Updated :
14 Jul, 2021
Going through the jQuery UI framework, let us learn how to design themeable intuitive buttons using jQuery UI button() method along with managing options, actions, events and mouse movements related to it. These buttons are really useful in web designing projects where the user interface is expected to be highly interactive.
Syntax:
$(selector, context).button(options)
The options parameter takes care of the design or looks of buttons along with its behavior.
If there are more than one option to be provided then you may separate them using a comma as follows:
$(selector, context).button ({option1: value1,
       option2: value2, option3: value3...})
The button() method can also handle actions on buttons as follows:
$(selector, context).button ("action", [parameters]);
- Links for jQuery UI libraries:
<link rel=’stylesheet’
href=”http://ajax.googleapis.com/ajax/libs/jqueryui/1.8.16/themes/ui-lightness/jquery-ui.css”>
<script src=”https://ajax.googleapis.com/ajax/libs/jquery/1.7.1/jquery.js”>
</script>
<script src=”https://ajax.googleapis.com/ajax/libs/jqueryui/1.8.16/jquery-ui.js”> </script>
<link rel=’stylesheet’
href=”https://code.jquery.com/ui/1.10.4/themes/ui-lightness/jquery-ui.css”>
<script src=”https://code.jquery.com/jquery-1.10.2.js”> </script>
<script src=”https://code.jquery.com/ui/1.10.4/jquery-ui.js”> </script>
Example 1: The following example demonstrates creating the basic buttons.
html
<!DOCTYPE html>
<html>
<head>
<meta charset="utf-8">
<meta name="viewport" content=
"width=device-width, initial-scale=1">
<title>jQueryUI Button</title>
<script src=
</script>
<script src=
</script>
<link href=
rel="stylesheet" type="text/css" />
<style>
.height {
height: 10px;
}
</style>
<script>
$(function () {
$("#buttonId, #submitId, #anchorId").button();
});
</script>
</head>
<body>
<h1 style="color:green">GeeksforGeeks</h1>
<b>jQueryUI | Button </b>
<div class="height"> </div><br>
<div class="buttons-div">
<button id="buttonId">Button element</button>
<input id="submitId" type="submit" value="Submit button">
<a id="anchorId" href="">Anchor</a>
</div>
</body>
</html>
|
The script part of the above example program can also be written as follows
javascript
<script>
$(function () {
$("#buttonId, #submitId, #anchorId")
.button().click(function (event) {
event.preventDefault();
});
});
</script>
|
Output:

Example 2: The visual grouping of buttons are handled by using jQuery UI buttonset() method.
html
<!DOCTYPE html>
<html>
<head>
<meta charset="utf-8">
<meta name="viewport" content=
"width=device-width, initial-scale=1">
<title>jQueryUI | Checkboxradio buttons</title>
<script src=
</script>
<script src=
</script>
<link href=
rel="stylesheet type=" text/css" />
<script>
$(function () {
$("input").checkboxradio();
$("#buttonsetId").buttonset();
});
</script>
</head>
<body>
<h1 style="color:green">GeeksforGeeks</h1>
<b>jQueryUI | Checkboxradio buttons </b>
<h2>Radio buttons Group</h2>
<div id="buttonsetId">
<fieldset style="width:300px">
<legend>Select a Location: </legend>
<label for="radioId1">Delhi</label>
<input type="radio" name="radioId1" id="radioId1">
<label for="radioId2">Pune</label>
<input type="radio" name="radioId2" id="radioId2">
<label for="radioId3">Hyderabad</label>
<input type="radio" name="radioId3" id="radioId3">
</fieldset>
</div>
</body>
</html>
|
Output:

Example 3: The following example demonstrates the use of different types of jQuery UI buttons.
html
<!DOCTYPE html>
<html>
<head>
<title>jQueryUI Button types</title>
<script src=
</script>
<script src=
</script>
<link href=
rel="stylesheet" type="text/css" />
<style>
.height {
height: 10px;
}
</style>
<script>
$(function () {
$('.btnClass').click(function (event) {
event.preventDefault();
$(this).button();
});
});
</script>
</head>
<body>
<h1 style="color:green">GeeksforGeeks</h1>
<b>jQueryUI | Button types</b>
<div class="height"></div><br>
<input class="btnClass" type="submit" value="Submit button">
<input class="btnClass" type="reset" value="Reset button">
<div class="height"></div><br />
<input class="btnClass" type="button" value="Input button">
<button class="btnClass">Simple button </button>
<div class="height"></div><br />
<a class="btnClass" href="#">Anchor button</a>
<input class="btnClass" type="checkbox" id="checkboxID">
<label for="checkboxID">Toggle button</label><br>
</body>
</html>
|
Output:
- Before Clicking the Button:

- After Clicking the Button:

$(selector, context).button (options) method:
Example 4: The following example demonstrates the use of jQuery UI button() method with options text and icons. Other options are also handled, for example setting of icon position to “beginning” or “end” by iconPosition option. One or two icons are set on the button. The primary icons are set in the left and secondary icons are set on the right as shown below in the image. There are so many options available in the library of jQuery UI button(), the programmer can choose or customize other options as per the project requirement.
html
<!DOCTYPE html>
<html>
<head>
<title>jQueryUI | Setting icons, text options</title>
<meta charset="utf-8">
<meta name="viewport" content=
"width=device-width, initial-scale=1">
<script src=
</script>
<script src=
</script>
<link href=
rel="stylesheet" type="text/css" />
<script>
$(function () {
$("#iconBtnId").button({
iconPosition: "end",
// text shown on the button
label: "Label given by coder",
icons: {
primary: "ui-icon-locked"
},
text: true // text to be shown or not
});
$("#buttonId").button({
icons: {
primary: "ui-icon-gear",
secondary: "ui-icon-triangle-1-s"
}
});
});
</script>
</head>
<body>
<h1 style="color:green">GeeksforGeeks</h1>
<b>jQueryUI | Setting icons, text options </b>
<h2>Other functionalities of jQuery UI buttons</h2>
<button id="iconBtnId">
Button with icon
</button>
<button id="buttonId">
Button with two icons
</button>
</body>
</html>
|
Output:

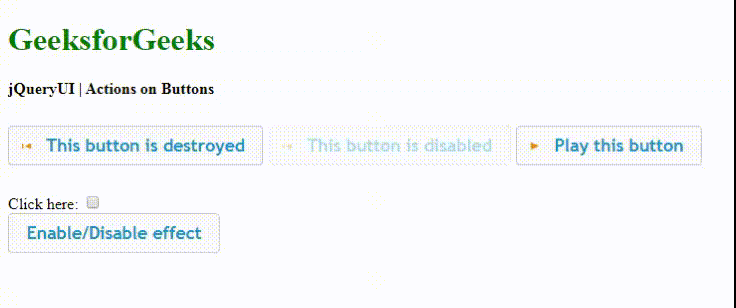
Example 5: jQuery UI button() provides many methods with options which can be used to control the themeable widget. The programmer can use any of them as per the requirement. The example only demonstrates some of them as a guide.
The following code demonstrates the click and change events triggered by the button along with use of options like icons, destroy and disable . jQuery UI button() method also supports event management as implemented. It also supports enable and disable status of the jQuery UI button.
html
<!DOCTYPE html>
<html>
<head>
<meta charset="utf-8">
<meta name="viewport" content=
"width=device-width, initial-scale=1">
<title>jQueryUI | Actions on Buttons </title>
<script src=
</script>
<script src=
</script>
<link href=
rel="stylesheet" type="text/css" />
<style>
.height {
height: 10px;
}
</style>
<script>
$(function () {
$('#destroyedBtnId').button().click(function (e) {
/* This option removes and returns
the element to its original state */
$('#destroyedBtnId').button("destroy");
e.preventDefault();
})
$("#destroyedBtnId").button({
// It is set to true, so that the
// text is visible
text: true,
icons: {
primary: "ui-icon-seek-start"
}
});
$("#disabledBtnId").button({
icons: {
primary: "ui-icon-seek-prev"
}
});
// It disables the themeable button
$("#disabledBtnId").button('disable');
$("#btnToPlay").button({
text: true,
icons: {
primary: "ui-icon-play"
}
});
// 'change' event management
$('#checkboxId').change(function (e) {
$('#btnToEnable').button(
// Handles status of the button
// through 'enable' or 'disable'
$(':checked').length == 1 ? "enable" : "disable"
)
});
$("#btnToEnable").button();
});
</script>
</head>
<body>
<h1 style="color:green">GeeksforGeeks</h1>
<b>jQueryUI | Actions on Buttons </b>
<div class="height"> </div><br>
<div class="buttons-div">
<button id="destroyedBtnId">This button is destroyed</button>
<button id="disabledBtnId">This button is disabled</button>
<button id="btnToPlay">Play this button </button>
<div class="height"> </div><br>
<div>Click here: <input type=checkbox id="checkboxId" /></div>
<button id="btnToEnable">Enable/Disable effect </button>
</div>
</body>
</html>
|
Output:
- Before Clicking the Button:

After Clicking the Button:
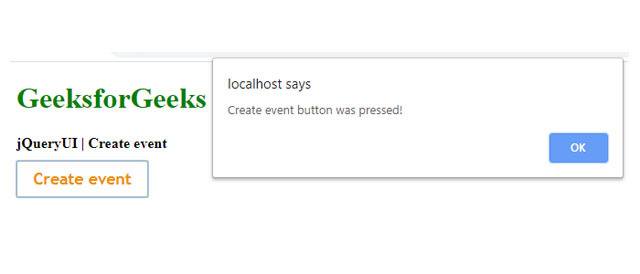
Example 6: When a button is created, the event is triggered as implemented in the following code.
html
<!DOCTYPE html>
<html>
<head>
<title>jQueryUI | Create event </title>
<script src=
</script>
<script src=
</script>
<link href=
rel="stylesheet" type="text/css" />
<style>
.height {
height: 10px;
}
</style>
<script>
// When the button is created, event is triggered
$(function () {
$("#btnCreateId").button({
create: function (event) {
$(event.target).click(function (event) {
event.preventDefault();
alert("Create event button was pressed!");
})
}
});
});
</script>
</head>
<body>
<h1 style="color:green">GeeksforGeeks</h1>
<b>jQueryUI | Create event </b><br />
<div class="height"></div>
<button id="btnCreateId">Create event</button>
</body>
</html>
|
Output:
- Before Clicking the Button:

After Clicking the Button:
Like Article
Suggest improvement
Share your thoughts in the comments
Please Login to comment...