JavaFX is a Java library and a GUI toolkit designed to develop and facilitate Rich Internet applications, web applications, and desktop applications. The most significant perk of using JavaFX is that the applications written using this library can run on multiple operating systems like Windows, Linux, iOS, Android, and several platforms like Desktops, Web, Mobile Phones, TVs, Tablets, etc. This characteristic of the JavaFX library makes it very versatile across operating systems and different platforms.
Sun Microsystems (now acquired by Oracle Corporation) released a toolkit known as JavaFX to promote desktop and rich internet applications (RIA) that can be accessed from the category of devices. After the arrival of JavaFX, Java developers and programmers were able to develop the GUI applications more effectively and more productively.
Note: Rich Internet Applications are those web applications that allow alike characteristics and expertise as that of desktop applications. These applications contribute more satisfying visual experience to the users when compared to the standard web applications.
JavaFX was introduced to supersede the Java Swing GUI framework. Nevertheless, the JavaFX provides more enhanced functionalities and features than the Java Swing. Similar to the Java Swing, the JavaFX also implements its own components. The components of the JavaFX are irrespective of the Operating system. JavaFX is considered to be lightweight and hardware stimulated. According to a report, after using the JavaFX for the development of Rich Internet applications (RIA), the browser penetration rate recorded for these applications was 76%.
Need of JavaFX
Before JavaFX, developing the client base applications was a very complicated and cumbersome task. Programmers and developers used to require several libraries for adding various functionalities like media, UI controls, animations and effects, 2D and 3D shapes, etc., in their applications. This issue was resolved when JavaFX came into the picture, which changed the whole scenario of the development of web applications by bringing in all the peculiarities into one single library. Apart from this, the programmers can also utilize all the existing perks of the older libraries like Java Swing and Advanced Windowing Tool Kit.
JavaFX also displays a valuable collection of graphics and various media APIs, which can further help in designing smooth applications. JavaFX also leverages the improved Graphical Processing Unit (GUI) with the help of hardware-accelerated graphics. If a developer wants to combine the graphics animations and UI control in their applications, then they can use the various interfaces provided by the JavaFX.
History of JavaFX
JavaFX was formerly developed by Chris Oliver. At that time, he was serving for a company named See Beyond Technology Corporation. Initially, the JavaFX project was recognized as Form Follows Functions (F3). This project was designed with the aim of providing richer interfaces for developing GUI applications. Later in June 2005, Sun Micro-systems took the F3 project and changed its name from F3 to JavaFX.
Timeline of JavaFX
- 2005 – Sun Microsystems took over the See Beyond company in June 2005 and acquired the F3 project as JavaFX.
- 2007 – JavaFX was officially declared at Java One, a worldwide web conference that is held yearly.
- 2008 – Net Beans integration with JavaFX was made open. The Java Standard Development Kit for JavaFX 1.0 was also released in the same year.
- 2009 – The next version of JavaFX was released, i.e., JavaFX 1.2, and the support for JavaFX Mobile was also introduced. In the same year only, Oracle Corporation also acquired Sun Microsystems.
- 2010 – JavaFX version 1.3 was released in 2010.
- 2011 – In 2011, JavaFX version 2.0 came out.
- 2012 – The support for JavaFX Mac OS for desktop was introduced.
- 2014 – The most advanced version of JavaFX, i.e., JavaFX 8, was released as an indispensable part of Java on the 18th of March 2014.
Features of JavaFX
JavaFX is an open-source framework based on Java, used for advancing rich client applications. JavaFX is recognized as the replacement or successor of the Java Swing in the field of graphical user interface (GUI) development technology in the platform of Java. The JavaFX library is available as a public Java application programming interface (API).
The JavaFX library comprises numerous peculiarities that make it a handpicked option for developers to develop rich client applications. These features are as follows:
- Java Library – JavaFX is a Java library, which allows the user to gain the support of all the Java characteristics such as multithreading, generics, lambda expressions, and many more. The user can also use any of the Java editors or IDE’s of their choice, such as Eclipse, NetBeans, to write, compile, run, debug, and package their JavaFX application.
- Platform Independent – The rich internet applications made using JavaFX are platform-independent. The JavaFX library is open for all the scripting languages that can be administered on a JVM, which comprise – Java, Groovy, Scala, and JRuby.
- FXML – JavaFX emphasizes an HTML-like declarative markup language known as FXML. FXML is based on extensible markup language (XML). The sole objective of this markup language is to specify a user interface (UI). In FXML, the programming can be done to accommodate the user with an improved GUI.
- Scene Builder – JavaFX also implements a tool named Scene Builder, which is a visual editor for FXML. Scene Builder generates FXML mark-ups that can be transmitted to the IDE’s like Eclipse and NetBeans, which further helps the user to combine the business logic to their applications. The users can also use the drag and drop design interface, which is used to design FXML applications (just like the Drag & Drop feature of the Java Swing and DreamWeaver Applications).
- Hardware-accelerated Graphics Pipeline – The graphics of the JavaFX applications are based on the hardware-accelerated graphics rendering pipeline, commonly known as Prism. The Prism engine offers smooth JavaFX graphics that can be rendered quickly when utilized with a supported graphics card or graphics processing unit (GPU). In the case where the system does not hold the graphic cards, then the prism engine defaults to the software rendering stack.
- WebView – JavaFX applications can also insert web pages. To embed web pages, Web View of JavaFX uses a new HTML rendering engine technology known as WebKitHTML. WebView is used to make it possible to insert web pages within a JavaFX application. JavaScript running in WebView can call Java APIs and vice-versa.
- Built-in UI controls – JavaFX comprises all the major built-in UI controls that help in developing well-featured applications. These built-in UI components are not operating system-dependent. In simple words, these controls do not depend on any of the Operating systems like Windows, iOS, Android, etc. These built-in controls are single-handedly ample to perform a whole implementation of the applications.
- CSS Styling – Just like websites use CSS for styling, JavaFX also provides the feature to integrate the application with CSS styling. The users can enhance the styling of their applications and can also improve the outlook of their implementation by having simple knowledge and understanding of CSS styling.
- Rich set of APIs – JavaFX library also presents a valuable collection of APIs that helps in developing GUI applications, 2D and 3D graphics, and many more. This collection of APIs also includes all the characteristics of the Java platform. Hence, working with this API, a user can access the specialties of Java languages such as Generics, Annotations, Multithreading, and Lambda Expressions, and many other features as well. In JavaFX, the popular Java Collections library was also improved, and notions like lists and maps were introduced. Using these APIs, the users can witness the variations in the data models.
- High-Performance media engine – Like the graphics pipeline, JavaFX also possesses a media pipeline that advances stable internet multimedia playback at low latency. This high-performance media engine or media pipeline is based on a multimedia framework known as Gstreamer.
Architecture of JavaFX
JavaFX has numerous built-in elements that are interconnected with each other. JavaFX library comprises a valuable collection of APIs, classes, and interfaces that are more than sufficient to produce rich internet applications and GUI applications with intense graphics that can run consistently over multiple platforms.
The subsequent figure displays the complete architecture of the JavaFX platform. Here you can examine the elements that support JavaFX API.
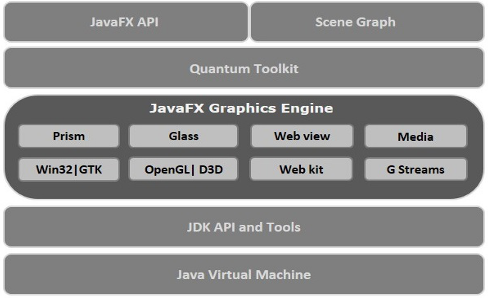
As we can see in the above figure that, JavaFX architecture comprises many different components. These components are briefly described as follows:
- JavaFX API – The topmost layer of JavaFX architecture holds a JavaFX public API that implements all the required classes that are capable of producing a full-featured JavaFX application with rich graphics. The list of all the important packages of this API is as follows.
- javafx.animation: It includes classes that are used to combine transition-based animations such as fill, fade, rotate, scale and translation, to the JavaFX nodes (collection of nodes makes a scene graph).
- javafx.css − It comprises classes that are used to append CSS–like styling to the JavaFX GUI applications.
- javafx.geometry − It contains classes that are used to represent 2D figures and execute methods on them.
- javafx.scene − This package of JavaFX API implements classes and interfaces to establish the scene graph. In extension, it also renders sub-packages such as canvas, chart, control, effect, image, input, layout, media, paint, shape, text, transform, web, etc. These are the diverse elements that sustain this precious API of JavaFX.
- javafx.application − This package includes a collection of classes that are responsible for the life cycle of the JavaFX application.
- javafx.event − It includes classes and interfaces that are used to perform and manage JavaFX events.
- javafx.stage − This package of JavaFX API accommodates the top-level container classes used for the JavaFX application.
- Scene Graph – A Scene Graph is the starting point of the development of any of the GUI Applications. In JavaFX, all the GUI Applications are made using a Scene Graph only. The Scene Graph includes the primitives of the rich internet applications that are known as nodes. In simple words, a single component in a scene graph is known as a node. In general, a scene graph is made up of a collection of nodes. All these nodes are organized in the form of a hierarchical tree that describes all of the visual components of the application’s user interface (UI). A node instance can be appended to a scene graph only once. The nodes of a scene graph can have numerous segments like Effects, Opacity, Transforms, Event Handlers, Application Specific States. The nodes are of three general types.
These are as follows:
- Root Node – A root node is a node that does not have any node as its parent.
- Leaf Node – A leaf node is a node that does not contain any node as its children.
- Branch Node – A branch node is a node that contains a node as its parent and also has a node as its children.

10. Quantum Toolkit – Quantum Toolkit is used to connect prism and glass windowing tool kits collectively and makes them prepared for the above layers in the stack. In simple words, it ties Prism and GWT together and makes them available to JavaFX.
11. Prism – The graphics of the JavaFX applications are based on the hardware-accelerated graphics rendering pipeline, commonly known as Prism. The Prism engine supports smooth JavaFX graphics that can be executed swiftly when utilized with a backed graphics card or graphics processing unit (GPU). In the situation where the system does not contain the graphic cards, then the prism engine defaults to the software rendering stack. To interpret graphics, a Prism practice −
- DirectX 9 on Windows XP and Vista.
- DirectX 11 on Windows 7.
- OpenGL on Mac and Linux, Embedded Systems.
12. Glass Windowing Toolkit – Glass Windowing Toolkit or simply Glass is a platform-dependent layer that assists in connecting the JavaFX platform to the primary operating system (OS). Glass Windowing Toolkit is very useful as it provides services such as controlling the windows, events, timers, and surfaces to the native operating system.
13. WebView – JavaFX applications can also insert web pages. To embed web pages, Web View of JavaFX uses a new HTML rendering engine technology known as WebKitHTML. WebView is used to make it possible to insert web pages within a JavaFX application. JavaScript appearing in WebView can call Java APIs and vice-versa. This element promotes different web technologies like HTML5, CSS, JavaScript, DOM, and SVG. Using web view, we can execute the HTML content from the JavaFX application and can also implement some CSS styles to the user interface (UI) part of the application.
14. Media Engine – Like the graphics pipeline, JavaFX also possesses a media pipeline that advances stable internet multimedia playback at low latency. This high-performance media engine or media pipeline is based on a multimedia framework known as Gstreamer. By applying the Media engine, the JavaFX application can support the playback of audio and video media files. The package javafx.scene.media covers all the classes and interfaces that can provide media functionalities to JavaFX applications.
The foregoing were the components that constitute the architecture of JavaFX.
LifeCycle of a JavaFX Application

There are in total three life cycle methods of a JavaFX Application class. These methods are –
- start() – The start() method is the entry point method of the JavaFX application where all the graphics code of JavaFX is to be written.
- init() – The init() method is an empty method that can be overridden. In this method, the user cannot create a stage or a scene.
- stop() – The stop() method is an empty method that can also be overridden, just like the init() method. In this method, the user can write the code to halt the application.
Other than these methods, the JavaFX application also implements a static method known as launch(). This launch() method is used to launch the JavaFX application. As stated earlier, the launch() method is static, the user should call it from a static method only. Generally, that static method, which calls the launch() method, is the main() method only.
Whenever a user launches a JavaFX application, there are few actions that are carried out in a particular manner only. The following is the order given in which a JavaFX application is launched.
- Firstly, an instance of the application class is created.
- After that, the init() method is called.
- After the init() method, the start() method is called.
- After calling the start() method, the launcher waits for the JavaFX application to end and then calls the stop() method.
Terminating the JavaFX application
As soon as the last window of the JavaFX application is closed, the JavaFX application is stopped implicitly. The user can turn off this function by passing the Boolean value “False” to the static method setImplicitExit(). This method should always be called from a static context only.
The user can also stop a JavaFX application explicitly by practicing any of the two methods, Platform.exit() or System.exit(int).
User Interface (UI) Components of JavaFX
JavaFX comprises all the major built-in UI components that help in developing well-featured applications. These built-in UI components are not operating system-dependent. In simple words, these controls do not depend on any of the Operating systems like Windows, iOS, Android, etc. These built-in controls are single-handedly ample to perform a whole implementation of the applications.
The users can add numerous components to their applications to make them look more advanced and rich in graphics. These segments are defined as follows:
JavaFX 2D Shapes
Any geometrical shape that can be represented on the coordinate system using two planes, which are X and Y planes, is known as a two-dimensional shape or a 2D shape. Examples of 2D shapes are line, square, rectangle, circle, eclipse, and many more.
JavaFX gives the flexibility to the user to add and create these 2D shapes in their JavaFX applications. There are several classes in JavaFX API that are used to execute 2D shapes in the JavaFX application. All these classes of 2D shapes are part of the javafx.scene.shape package. The class named Shape is the root class of all the 2-Dimensional shapes in JavaFX. There are many classes in this package that contains various sorts of 2D shapes.
Steps to create a 2D shape are as follows:
Step 1: The first step to add a 2D shape in a JavaFX application is to instantiate the corresponding class of the needed shape. For illustration purposes consider if a user wants to add a line to their JavaFX application, they should first instantiate the javafx.scene.shape.line class. They also need to instantiate an object of the same class like as defined below:
Line line = new Line();
Step 2: After the instantiation of the class and the object, the user should also set the properties of the required shape using the setter functions. For illustration purposes consider if a user wants to add a line to their JavaFX application, then after instantiation, they should set the X and Y coordinates of the starting and ending point of the line as defined below as follows:
line.setStartX(0);
line.setStartY(0);
line.setEndX(100);
line.setEndY(200);
Step 3: After doing the above two steps, the third step for the user is to add the object instantiated of the required shape to the group by declaring it as a parameter of the constructor. For illustration purposes consider if in order to get a line in the JavaFX application, the user should add the instantiated object of line shape to the group, then it is defined as follows:
Group root = new Group();
root.getChildren().add(line);
Types of 2D shapes
In the javafx.scene.shape package of JavaFX, there are numerous shapes available which the user can use in their application. The following is the list of various classes of the 2D shapes that are provided by JavaFX.
- Line – A geometrical structure that joins two coordinates (X and Y) on a 2D coordinate system is known as a Line. If a user wants to create a line in their JavaFX application, then they should instantiate the javafx.scene.shape.Line class.
- Rectangle – A Rectangle is a geometrical shape that has two sets of two identical sides and four right angles at their joint. If a user wants to create a rectangle in their JavaFX application, then they should instantiate the javafx.scene.shape.Rectangle class.
- Ellipse – In general, an ellipse can be defined as a curve with two focal points. In an ellipse, the sum of the distances to the focal points is constant from each point of the ellipse. If a user wants to create an ellipse in their JavaFX application, then they should instantiate the javafx.scene.shape.Ellipse class.
- Circle – In general, a specific sort of Ellipse that has both of its focal points at the same location is known as a circle. If a user wants to create a circle in their JavaFX application, then they should instantiate the javafx.scene.shape.Circle class.
- Arc – An arc can be defined as the portion of the circumference of the circle or an ellipse. If a user wants to create an arc in their JavaFX application, then they should instantiate the javafx.scene.shape.Arc class.
- Polygon – In general, a Polygon is a geometrical shape that can be formed by joining the various Co-planner line segments. If a user wants to create a polygon in their JavaFX application, then they should instantiate the javafx.scene.shape.Polygon class.
- Cubic Curve – A curve of degree 3 in the XY plane is known as a cubic curve. If a user wants to create a cubic curve in their JavaFX application, then they should instantiate the javafx.scene.shape.CubicCurve class.
- Quad Curve – A curve of degree 2 in the XY plane is known as a quad curve. If a user wants to create a quad curve in their JavaFX application, then they should instantiate the javafx.scene.shape.QuadCurve class.
JavaFX Effects
Any behavior or movement that improves the presentation of the graphics is known as an Effect. In JavaFX, we can say that any algorithm that is applied to nodes to enhance their appearance visually is an effect. In order to specify the effect, the effect property of the Node class is used.
JavaFX gives the flexibility to the user to add various effects such as bloom, blur, and glow in their JavaFX applications. There are several classes in JavaFX API that are used to execute these effects in the JavaFX application. All these classes of effects are part of the javafx.scene.effects package. The class named Effect is the root class of all the effects in JavaFX. There are many classes in this package that contains various sorts of effects.
In order to add an effect to a Node, the user needs to sequentially follow these steps as follows:
Step 1: The first step to applying an effect to a Node is to create all the nodes in a JavaFX application by instantiating their individual classes. For illustration purposes consider if a user wants to apply the glow effect to an image in their application, then they should create an image node first by instantiating the Image class. After that, they should set its view just as shown below as follows:
// Creating an image
Image img = new Image(“https://media.geeksforgeeks.org/wp-content/uploads/20210224040124/JSBinCollaborativeJavaScriptDebugging6.png”);
// Setting the image view
ImageView imgView = new ImageView(img);
// Setting the position of the image
imgView.setX(100);
imgView.setY(100);
// Setting the fit height and width of the image view
imgView.setFitHeight(200);
imgView.setFitWidth(400);
// Setting the preserve ratio of the image view
imgView.setPreserveRatio(true);
Step 2: After creating the image node and setting the image view, the user should instantiate the class representing the required effect that is needed to be applied to the node created. For illustration purposes of considering if the user wants to apply the glow effect in their application, then they need to instantiate the Glow class as shown below as follows:
Glow glow = new Glow();
Step 3: After instantiating the class of the required effect, the user needs to set the attributes for the instantiated effect using its setter methods. For illustration purposes consider as if the user can set the attributed of the Glow effect using the below-shown method as follows:
// Setting the level property
glow.setLevel(0.9);
Step 4: After the above three steps, the user can finally apply the required effect to the node using the setEffect() method.
For example – The user can set the glow effect to the image node by passing the object of the Glow class to this method as follows –
imgView.setEffect(glow);
Types of JavaFX Effects
In the javafx.scene.effect package of JavaFX, there are numerous effects available which the user can use in their application. The following is the list of various classes of these effects that are provided by JavaFX.
- Blend – A mixture of two or more different things or substances is known as a Blend. If the user applies the blend effect, then, this effect takes the pixels of the two distinct inputs, at the same location and creates a blended (combined) output based on the blend mode. The class javafx.scene.effect.Blend represents the blend effect.
- Glow – The Glow effect of JavaFX makes the provided input image glow. Using this effect, the bright pixels of the input can be made brighter. The class javafx.scene.effect.Glow represents the glow effect.
- Bloom – Just like the Glow effect, in the Bloom effect also the pixels in some parts of the node are produced to glow. The class javafx.scene.effect.Bloom represents the bloom effect.
- Shadow – The shadow effect is an effect that generates a duplicate of the given node with some blurry edges. The class javafx.scene.effect.Shadow represents the shadow effect.
- Reflection – In the reflection effect of JavaFX, whenever a user applies this effect to a specified node, then a reflection of the node is appended at the bottom of the node.The class javafx.scene.effect.Reflection represents the reflection effect.
- Color Adjust – In JavaFX, a user can also alter the color of an image by implementing the color adjust effect to it. This effect involves the adjustment of the hue, saturation, brightness, and contrast on every pixel. The class javafx.scene.effect.ColorAdjust represents the Color Adjust effect.
- SepiaTone – In JavaFX, when the Sepia tone effect is applied to a node of JavaFX (image in most cases), then that node is toned with a reddish-brown color. The class javafx.scene.effect.SepiaTone represents the Sepia Tone effect.
- Lighting – The effect which is used to resemble a light from a light source is known as the Lighting effect. In JavaFX, there can be various sorts of light sources specifically point, distant, and spot. The class javafx.scene.effect.Lighting represents the Lighting effect.
- InnerShadow – When a user applies this effect to a node, then a shadow of that node will be generated inside the edges of the node. The class javafx.scene.effect.InnerShadow represents the Inner shadow effect.
JavaFX Texts
Just like several shapes and effects, a user can also create a node for applying different texts in JavaFX. The text node is expressed by the class named Text, which belongs to the javafx.scene.text package. This Text class includes numerous characteristics to generate text in JavaFX and alter its appearance. Another feature of the text class is that this class also inherits the Shape class of JavaFX which belongs to the javafx.scene.shape package. Hence, in extension to the characteristics of the text like font, alignment, line spacing, text, etc., it also acquires the basic shape node properties such as strokeFill, stroke, strokeWidth, strokeType, etc.
To create a text node, the user needs to follow certain steps as follows:
Step 1: The first step to create a text node in a JavaFX application is to instantiate the corresponding class of the text node.
Illustration: The class Text of the package javafx.scene.text denotes the text node in JavaFX. A user can create a text by instantiating this class as given below as follows:
Text txt = new Text();
Step 2: After instantiating the corresponding class of the text node, the second step to create a text node in JavaFX is to set the properties of the required text using the setter functions.
Illustration: After instantiating the Text class, the user needs to set the value to this property using the setText() method as shown below as follows:
String text = "Hello how are you"
txt.setText(text);
txt.setX(50);
txt.setY(50);
Step 3: After doing the above two steps, the third step for the user is to add the object instantiated of the required text to the group by declaring it as a parameter of the constructor.
Illustration: In order to get a text in the JavaFX application, the user should add the instantiated object of the text node to the group.
Group root = new Group();
root.getChildren().add(txt);
Properties of JavaFX Texts
The attributes of the JavaFX Text are represented in the table below.
Attribute
|
Description
|
Setter Method
|
| Font |
It represents the font of the text. |
setFont(Font value) |
| Line spacing |
It represents the vertical space between the lines in pixels. The type of this property is double. |
setLineSpacing(double spacing) |
| Text |
It represents the text string that is to be presented. The type of this property is a string. |
setText(String value) |
| Underline |
Using this property, a user can underline the text by setting it to true. The type of this property is boolean. |
setUnderLine(boolean value) |
| X |
It represents the X coordinate of the text. |
setX(double value) |
| Y |
It represents the Y coordinate of the text. |
setY(double value) |
| Strike through |
With the help of this property, a user can put a line through the text by setting this property to true. The type of this property is boolean. |
setStrikeThrough(boolean value) |
| Wrapping width |
It represents the vertical space between the lines in pixels. The type of this property is double. |
setWrappingWidth(double value) |
| Text alignment |
It sets the text in Horizontal alignment |
setTextAlignment(TextAlignment value) |
JavaFX Animations
The transition which produces the myth of motion for an object is known as animation. Animations can also be defined as the set of transformations implemented on an object over the specified duration sequentially so that the object can be displayed as it is in action. This can be achieved by the rapid display of frames. In JavaFX, the package javafx.animation includes all the classes that assist in applying the animations onto the nodes. All the classes of this package extend the class javafx.animation.Animation. JavaFX provides the classes for the transitions like RotateTransition, ScaleTransition, TranslateTransition, FadeTransition, FillTransition, StrokeTransition, etc.
Steps to apply animations to the target node are as follows:
To apply a special animation to a target node, a user should follow the below-given steps as follows:
Step 1: The first step to applying an animation to a specific node is to create that node using the respective class of the node.
Square sqr = new Square(100,100,100,100);
sqr.setFill(Color.GREEN);
Step 2: After creating the node, the next step is to instantiate the respective animation class that is to be applied to the created node.
RotateTransition rotate = new RotateTransition();
Step 3: After instantiating the respective animation class, in the step, the user should set the properties of the animation.
rotate.setDuration(Duration.millis(2000));
rotate.setAxis(Rotate.Y_Axis);
rotate.setCycleCount(1000);
Step 4: In the next step, the user should set the target node on which the animation will be applied.
rotate.setNode(sqr);
Step 5: After following all the above steps, the last step to apply an animation to a target node is to play the applied animation using the play() method of the Animation class.
rotate.play();
Different classes of JavaFX animations/transitions
In the javafx.animation package of JavaFX, there are numerous transitions available which the user can use in their application. The following is the list of various animations that are provided by JavaFX.
- Scale Transition – The Scale transition is used to animate the scaling of the selective node over a specific duration of time. If a user wants to implement the scale transition to a node in their JavaFX application, then they should instantiate the javafx.animation.ScaleTransition class.
- Translate Transition – The Translate transition is used to translate the selective node from one location to another over a specific duration of time. If a user wants to implement the translate transition to a node in their JavaFX application, then they should instantiate the javafx.animation.TranslateTransition class.
- Rotate Transition – The Rotate transition is used to rotate the selective node by one of the axes over a specific duration of time. If a user wants to implement the rotate transition to a node in their JavaFX application, then they should instantiate the javafx.animation.RotateTransition class.
- Fade Transition – The Fade transition is used to animate the opacity of the node. In simple words, we can say that the fade transition keeps refreshing the opacity of the node over a specific duration of time in order to reach the final opacity value. If a user wants to implement the fade transition to a node in their JavaFX application, then they should instantiate the javafx.animation.FadeTransition class.
- Stroke Transition – The Stroke transition is used to animate the node’s stroke color so that the stroke color of the node varies between the two color values over a specific duration of time. If a user wants to implement the stroke transition to a node in their JavaFX application, then they should instantiate the javafx.animation.StrokeTransition class.
- Parallel Transition – The Parallel transition is used to perform a number of animations on a selective node in a parallel manner. If a user wants to implement the parallel transition to a node in their JavaFX application, then they should instantiate the javafx.animation.ParallelTransition class.
- Fill Transition – The Fill transition is used to animate the selective node’s fill color so that the fill color of the node varies between the two color values over a specific duration of time. If a user wants to implement the fill transition to a node in their JavaFX application, then they should instantiate the javafx.animation.FillTransition class.
- Path Transition – The Path transition is used to move the selective node along the specified path over a specific duration of time. If a user wants to implement the path transition to a node in their JavaFX application, then they should instantiate the javafx.animation.PathTransition class.
JavaFX 3D Shapes
Any solid geometrical figure that can be represented on the coordinate system using three planes, which are X, Y, and Z planes, is known as a three-dimensional shape or a 3D shape. The main difference between the 3D shapes and 2D shapes is that the 3D shapes always need to have an extra coordinate value Z as compared to 2D shapes, in order to be drawn on a coordinate system.
There are many basic 3D shapes which we see on a daily basis such as cylinders, spheres, boxes, cubes, pyramids, etc. Nevertheless, JavaFX implements only 3 classes to create 3D shapes. These classes include spheres, cylinders, and boxes. These classes are defined in the javafx.scene.shape package. This package provides all the methods to deal with the 3D shapes. The class Shape3D of the package javafx.scene.shape is the base class of all the 3D shape classes in javafx.
Types of 3D shapes in JavaFX
In JavaFX, 3D shapes are characterized in two separate types. These are:
1. Predefined 3D shapes: Predefined 3D shapes are the shapes whose classes are already present in the JavaFX API. These shapes are Cylinder, Sphere, and Box. In order to create these shapes in the JavaFX application, the user just needs to instantiate these classes. These classes include several properties and methods that are needed to be used in order to generate the proper shapes.
2. User Defined 3D shapes: JavaFX provides the class javafx.scene.shape.TriangleMesh which extends the abstract class javafx.scene.shape.Mesh. This class facilitates the user to define their own points, texture coordinates, and faces as the properties of the class.
Steps to create a 3D shape :
As mentioned above, there are different classes for the different 3D shapes in JavaFX. In order to create 3D shapes, the user just needs to instantiate those classes. The user can use the following steps to generate proper shapes in their JavaFX application.
1. The first step is to instantiate the class of the respective 3D shape which the user wants to build.
For Example – If a user wishes to create a Box, then he should instantiate the Box class of the JavaFX.
Box box = new Box();
2. After instantiating the class, the next step is to set of properties of the instantiated class.
For Example – If a user has instantiated the Box class of JavaFX, then he should set the properties such as Height, width, and depth of the Box class.
box.setHeight(100.0);
box.setDepth(80.0);
box.setWidth(60.0);
3. After the above two steps, the user should set the camera for the scene. In simple words, the user can set the camera to a particular position for the camera view. However, this step is optional. A user can set the camera view using the following code –
PerspectiveCamera cam = new PerspectiveCamera();
cam.setTranslateX(100.0);
cam.setTranslateY(80.0);
cam.setTranslateZ(-50.0);
scene.setCamera(cam)
4. The last step to creating a 3D shape for the JavaFX application is to attach the 3D shape to the Scene graph and set the relevant properties for the Scene and stage.
For example: If a user has instantiated the box class, then he should link that class with the Scene graph and the stage.
Group root = new Group();
root.getChildren().add(box);
Scene scene = new Scene(root,500,500);
primaryStage.setScene(scene);
primaryStage.setTitle("3D shape Example");
primaryStage.show();
Different classes of JavaFX 3D shapes
In JavaFX, there are basically 3 predefined 3D shapes classes that are available for the user to use in their application. The following is a brief introduction of various 3D shapes that are provided by JavaFX.
- Sphere – A sphere can be defined as a perfectly round solid 3D object. In JavaFX, the class javafx.scene.shape.Sphere represents Sphere.
- Box – In general, a box can be defined as a three-dimensional shape having all the faces in a rectangular shape. The three dimensions of Box are height, width, and depth. In JavaFX, the class javafx.scene.shape.Box represents Box.
- Cylinder – A Cylinder can be defined as a three-dimensional solid having two parallel circular bases connected by a curved surface. It has two main properties as radius and height. In JavaFX, the class javafx.scene.shape.Cylinder is used to denote cylinder.
JavaFX Transformations
Transformation implies modifying some graphics into something different by implementing various rules. In JavaFX there are different sorts of transformations such as Translation, Scaling Up or Down, Rotation, Shearing, etc.
Using JavaFX, a user can implement transformations on nodes such as rotation, scaling, and translation. All these transformations are expressed by several classes and these classes belong to the package javafx.scene.transform.
Different classes of JavaFX Transformations
In JavaFX, there are basically 4 predefined JavaFX transformations classes that are available for the user to use in their application. The following is a brief introduction of various transformations that are provided by JavaFX.
- Rotation – Rotation is used to rotate the object from its source by a certain angle. The class javafx.scene.transform.Rotate represents rotation.
- Translation – Translation is used to modify the location of the node. The class javafx.scene.transform.Translate represents the translation.
- Scaling – Scaling is used to modify the size of the node. The class javafx.scene.transform.Scale represents Scaling.
- Shearing – Shearing is used to altering the slope of the object in a particular direction. The class javafx.scene.transform.Shear represents Shearing.
Steps to apply transformations to the target node are as follows:
To apply a special transformation to a target node, a user should follow the below-given steps:
1. The first step is to instantiate the class of the respective transformation which the user wants to apply.
For example – If a user wants to apply a translate transformation on a specific node, then he should instantiate the translate class.
TranslateTransition translate = new TranslateTransition();
2. After instantiating the class, the next step is to set of properties of the instantiated class.
For example – If a user has instantiated the translate transformation class of JavaFX, then he should set the properties such as translate byX, translate byY, duration, and cycle count of the translated class.
translate.setByX(400);
translate.setDuration(Duration.millis(1000));
translate.setCycleCount(500);
3. Set the transformation to the respective node and play the transformation using the method play().
For Example: Let us assume that the user wants to translate a specific node then after instantiating a transformation class and setting its value, the user should set the node using the name of the node that should play the translation.
translate.setNode(name of the node);
translate.play();
JavaFX UI Controls
The UI controls are the elements that are truly exposed to the user for intercommunication or information exchange. A layout represents the structure of the UI elements on the screen. The response is the reaction of the UI component when some event has happened on it.
However, the package javafx.scene.control implements all the required classes for the UI elements like Button, Label, etc. Every class describes a particular UI control and explains few methods for their styling.
Different classes of JavaFX UI controls
In JavaFX, there are many UI controls that are used by the users in their applications. Below is the list of usually used UI controls while the GUI is designed using JavaFX.
- Button – The button is a component that controls the function of the application. The Button class is practiced to produce a specified button. It is represented by the javafx.scene.control.Button class.
- Label – Label is an element that is applied to describe plain text on the screen. Typically, a label is set with the node, it represents. It is represented by the javafx.scene.control.Label class.
- TextField – Text Field is usually used to take the input from the user in the form of text. It is represented by the javafx.scene.control.TextField class.
- ProgressBar – Progress Bar is used to display the output process to the user. It is represented by the javafx.scene.control.ProgressBar class.
- RadioButton – The Radio Button is used to provide various options to the user. The user can only choose one option among all. A radio button has two options, it can either be selective or deselective. It is represented by the javafx.scene.control.RadioButton class.
- CheckBox – Check Box is used to get the kind of information from the user which contains various choices. The user marked the checkbox either on (true) or off(false). The CheckBox in JavaFX is expressed by the javafx.scene.control.CheckBox class.
- Slider – Slider is used to provide a pane of options to the user in a graphical form where the user needs to move a slider over the range of values to select one of them. It is represented by the javafx.scene.control.Slider class.
- Menu – JavaFX provides a Menu class to implement menus. The menu is the main component of any application. It is represented by the javafx.scene.control.Menu class.
- PasswordField – PasswordField is practiced to take the user’s password. Whatever the user types in the password field, that is not displayed on the screen to anyone. It is expressed by the javafx.scene.control.PasswordField class.
- ScrollBar – JavaFX Scroll Bar is used to implement a scroll bar to the user so that the user can scroll down the application pages. It is represented by the javafx.scene.control.ScrollBar class.
JavaFX Charts
In general, the chart can be defined as the graph or diagram which represents the data in the form of symbols. Charts are mainly used to represent large quantities of data and the relationship between parts of the data. We can create different kinds of charts to represent different kinds of information. In JavaFX, we can create the charts by using the classes provided by the package javafx.scene.chart.
Types of charts
Charts in JavaFX can be classified into the subsequent types:

- Pie Chart – In Pie Chart, the areas of a circle are used to define several proportions of the complete information. In JavaFX, the class javafx.scene.chart.PieChart is used to deal with the pie chart.
- XYChart – In XYChart, the data is sketched on the XY (horizontal and vertical) axes. The X-axis depicts one type of value while the Y-axis depicts the other type of value. The mapping is done between the values plotted on X and Y charts to display the appropriate information. In JavaFX, the class javafx.scene.chart.XYChart is practiced to deal with the XYChart.
Types of Axis
In Charts, there can be different types of axis other than the X and Y-axis. These are –
- Category Axis – The category axis is used to describe the various sections of the information. This axis is distinct from the value axis in the sense that the specific values are not displayed on the category axis. In JavaFX, the class javafx.scene.chart.CategoryAxis depicts the category axis. A user just requires to instantiate this class in order to generate the category axis.
- Number Axis – The Number axis is used to express the specific range of values. In JavaFX, the class javafx.scene.chart.NumberAxis represents the value axis. A user just requires to instantiate this class in order to generate the Number axis.
Different classes of JavaFX Charts
In JavaFX, there are many charts that are used by the users in their applications. Below is the list of usually used charts while the GUI is designed using JavaFX.
- Pie Chart – In Pie Chart, the areas of a circle are used to define several proportions of the complete information. In JavaFX, the class javafx.scene.chart.PieChart is used to deal with the pie chart.
- Bar Chart – A bar chart is used to describe assorted data using rectangular bars. The length of these bars represents the values. The bars can be plotted both vertically and horizontally in the bar chart. In JavaFX, a Bar chart is represented by a class named javafx.scene.chart.BarChart.
- Line Chart – A line chart is applied to display the information as a list of data points (markers) connected by straight line segments. Line Chart explains how the data varies at regular time frequencies. In JavaFX, a line chart is represented by a class named javafx.scene.chart.LineChart.
- Area Chart – Area charts are applied to draw area-based charts. It plots the area between the given set of points and the axis. In general, this chart is used to differentiate two quantities. In JavaFX, an area chart is represented by a class named javafx.scene.chart.AreaChart.
JavaFX Layouts
Layouts are the top-level container classes that describe the UI styles for objects of the scene graph. The JavaFX layout can be seen as the father node to all the separate nodes. JavaFX presents several layout panes that promote various styles of layouts.
In JavaFX, Layout describes the process in which the elements are to be viewed on the screen. It primarily establishes the scene-graph nodes. There are various built-in layout panes in JavaFX that are HBox, VBox, StackPane, FlowBox, AnchorPane, etc. Each Built-in layout is represented by a separate class that requires to be instantiated in order to implement that specific layout pane.
All these classes belong to the javafx.scene.layout package. The javafx.scene.layout.Pane class is the root class for all the built-in classes of JavaFX layouts.
Steps to create a JavaFX layout
In order to create the layouts, we need to follow the following steps –
1. The first step to creating a layout in JavaFX application is that the user should instantiate the respective layout class,
For example – If a user wants to create an HBox layout, then he should instantiate the HBox Class of JavaFX layout.
HBox root = new HBox();
2. After instantiating the respective class, the next step is to set the properties for the layout.
root.setSpacing(20);
3. After the above two steps, the last step of creating a layout in the JavaFX application is to add nodes to the layout object.
root.getChildren().addAll(<NodeObjects>);
Different classes of JavaFX Layouts
In JavaFX, there are various JavaFX Layout classes that are available for the user to use in their application. The following is a brief introduction of various layouts that are provided by JavaFX.
- HBox – The HBox layout is used to arrange all the nodes in the JavaFX application in a particular horizontal row. In JavaFX, an HBox layout is represented by a class named javafx.scene.layout.HBox.
- BorderPane – The Border Pane layout is used to arrange the nodes in the JavaFX application in the top, left, right, bottom, and center positions. In JavaFX, a BorderPane layout is represented by a class named javafx.scene.layout.BorderPane.
- GridPane – The Grid Pane layout is used to arranges the nodes in the JavaFX application as a grid of rows and columns. This layout is very convenient in designing forms using JavaFX. In JavaFX, a GridPane layout is represented by a class named javafx.scene.layout.GridPane.
- FlowPane – The flow pane layout is used to wrap all the nodes in a flow. A horizontal flow pane wraps the components of the pane at its height, while a vertical flow pane wraps the components at its width. In JavaFX, a FlowPane layout is represented by a class named javafx.scene.layout.FlowPane.
- StackPane – The stack pane layout is used to arrange the nodes in the JavaFX application on top of another just like in a stack. The node appended first is ordered at the bottom of the stack and the next node is stored on top of it. In JavaFX, a StackPane layout is represented by a class named javafx.scene.layout.StackPane.
- VBox – The VBox layout is used to arrange all the nodes in the JavaFX application in a single vertical column. In JavaFX, a VBox layout is represented by a class named javafx.scene.layout.VBox.
JavaFX Event Handling
JavaFX grants users the adaptability to generate numerous types of applications such as Desktop Applications, Web applications, and graphical applications. In recent-day applications, the users perform an essential role in the precise execution of the application. The user needs to interact with the application in most cases.
In JavaFX, An event occurs whenever the user interacts with the application nodes. There are multiple references by using which, the user can create the event. For example, the user can make use of a mouse or it can press any button on the keyboard or it can scroll any page of the application in order to generate an event. Hence, we can say that the events are fundamentally the announcements that tell us that something has happened at the user’s end. A perfect Application is the one that takes the least amount of time in handling the events.
Processing Events in JavaFX
In JavaFX, events are primarily used to inform the application regarding the actions chosen by the user. JavaFX implements the tool to achieve the events, route the event to its target, and granting the application to handle the events.
JavaFX presents the class javafx.event.Event which includes all the subclasses describing the varieties of events that can be created in JavaFX. Any event is an instance of the class Event or any of its subclasses.
There are several events in JavaFX i.e. MouseEvent, KeyEvent, ScrollEvent, DragEvent, etc. A user can further specify their personal event by inheriting the class javafx.event.Event.
Types of Events
In general, the JavaFX events are principally grouped into the subsequent types –
- Foreground Events – Foreground events are essentially happened due to the straightforward communication of the user with the GUI of the application. For example, clicking the button, pressing a key, selecting an item from the list, scrolling the page, etc.
- Background Events – Background events don’t need the user’s interaction with the application. These events mainly occur due to the operating system interrupts failure, operation completion, etc.
Different classes of JavaFX Event Handling
JavaFX grants support to handle a wide variety of events. The class javafx.event.Event is the base class for every event. An instance of any of its subclass is an event. JavaFX provides a wide mixture of events. Some of them are placed below –
- KeyEvent – KeyEvent is an input event that symbolizes the keystroke that occurred on a node. This event includes actions like key pressed, key released and key typed. It is represented by the class named javafx.event.Event.KeyEvent.
- MouseEvent – MouseEvent is also an input event that happens when a mouse is clicked. It includes actions like mouse clicked, mouse pressed, mouse released, the mouse moved, mouse entered target, mouse exited target, etc. It is expressed by the class called javafx.event.Event.MouseEvent.
- WindowEvent – WindowEvent is an event associated with window showing and window hiding actions. It includes actions like window hiding, the window is shown, window hidden, window showing, etc. It is represented by the class named javafx.event.Event.WindowEvent.
- DragEvent – DragEventis an input event that occurs when the mouse is dragged. It involves activities like drag entered, drag dropped, drag entered target, drag exited target, drag over, etc. It is represented by the class named javafx.event.Event.DragEvent.
The above were the different UI components of the JavaFX API.
Setting up JavaFX in IDE
We need to configure JavaFX in our IDE in order to use it for which here we are illustrating with the help of Eclipse IDE as it is widely used by Java developers.
Step 1: Go to ‘Help’ section on by clicking the top right bar and further go into ‘Eclipse Marketplace’ as shown in below media.

Step 2: Now write initials ‘fx’ and press enter. Below window will pop-up then install the e(fx)clipse 3.6.0 as shown below which will appear in top search as later on continue installing by accepting terms and conditions and press ‘Next’. It will take a little bit of time.

Step 3: Restart the IDE and now open new ‘File’ new –> ‘Others’ and here you will find JavaFX plugin which earlier was not present here as depicted below as follows:

Step 4: Choose JavaFX project and choose ‘Next’

Just likely naming normal project so do create JavaFX project and choose settings as per requirements, further click on ‘Next‘ later on ‘Finish‘.

You will see this window where the keynote is that our IDE(eclipse) does not know where the JavaFX is as of now we only have set up JavaFX to work in eclipse only but have not been downloaded JavaFX.
Step5: Download JavaFX by extracting it to a location on the system and do remember the specified path where you have extracted it. While downloading one can pick a long-term support version or the latest release version but the long-term version is recommended if one is new to JavaFX as the latest release can throw some errors. as per your operating system.
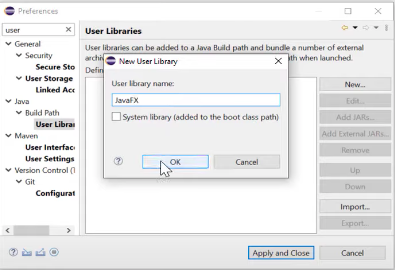
Step 6: Create a user library
Go to Windows –> Preferences and there type user and go to User Libraries. Here add a new user library and name t relevantly not necessarily to named JavaFX or retaining some previous counter names.
to
Step 7: Now go to ‘Add External JAR’ and do copy the path retained above where JavaFX is installed in the local directory and select all of them as shown below as follows:

Click on ‘Apply and Close’
Step 8: Resolve unwanted errors that pop up by right-clicking the project and go to Build path –> Configure Build Path. Now go to Library –> Classpath and Add library. here you will find all user library and the name will pop up which was given earlier to the library. Click on Finish –> Apply –> Apply and Close and you will see all the errors are gone by now.

Step 9: Now configure Run configurations.
Go to Run –> Java Application –> Main –> Arguments. keynote is here you need to pass the argument as shown in the image below but the path varies as per where you have installed JavaFX.
--module-path "YOUR\PATH\lib" --add-modules javafx.controls,javafx.fxml

After this one can start off with JavaFX operations as a window will be popped up by now. Cheers!
JavaFX v/s Java Swing
The performance of both Java Swing and Java FX is supported in the graphics business. However, both of them are very different from each other. Some of the key differences between Java Swing and Java FX are given below –
|
Java Swing
|
JavaFX
|
| Swing is the standard toolkit for Java developers in creating GUI |
JavaFX grants platform assistance for designing desktop applications. |
| Swing has a further refined collection of GUI components |
JavaFX has a fair amount of UI components available but is more inferior to what Swing provides. |
| Swing is a legacy library that fully features and provides pluggable UI components |
JavaFX has UI components that are still growing with a further advanced look and feel. |
| Swing can implement UI components with a conventional look and feel. |
JavaFX can provide rich internet applications having a modern UI. |
| Swing-related classes can be found in the Java API guide with complete documentation |
JavaFX doc is available in various formats with comprehensive detailing and file support. |
| Swing is an advent in nature. Hence, it can produce UI components using conventional Java component classes |
Java FX originally uses a declarative language called JavaFX Script. |
| Swing has a UI component library and acts as a legacy |
JavaFX has several components built over Swing. |
| Swing has assistance for MVC, but it is not uniform across a component. |
JavaFX support is really favorable with MVC. |
| Swing has various IDEs, which offer a tool for rapid development. |
JavaFX has also support from numerous IDEs as well, but it is not as experienced as Swing. |
| A swing was renamed from Java Foundation Classes, and sun microsystems announced it in the year 1997 |
JavaFX was initially released in December 2008 by Sun microsystem and is now acquired by Oracle. |
| Events in Swing aren’t that consistent |
Events in JavaFX are higher thought-out and additional consistent than their equivalents in Swing. |
| Swing lacks any support for modern touch devices. |
JavaFX has fundamental maintenance for signature gestures resembling scrolling, swiping, rotating, and zooming. |
| Swing has basic controls like buttons, checkboxes, and bandboxes. |
JavaFX has many eye-catching controls that Swing doesn’t have |
These are the main points of difference between JavaFX and Java Swing
Real-world Applications made using JavaFX
There are many real-world applications that were made using JavaFX. Some of the applications and their area of use are given below –
| S No. |
Application |
Area of Use |
Description |
| 1 |
CuratorOR Caliop |
Hospitals / Surgery |
It is an application that will be installed in the hospital’s operating rooms to look up patient data, to document the surgery, and store the produced documents in the central hospital database. |
| 2 |
Navigator Lynden |
Dispatching |
It is used to give managers at terminals the ability to see information regarding the flight that is scheduled to arrive at their facility, as well as the flight that is scheduled to depart from their facility. |
| 3 |
Atlas Trader |
Finance |
It allows the user to select which commodity (Gold, Oil, Wheat, etc.) they want to purchase or sell. |
| 4 |
Template Editor IAV |
Vehicle fleet data analysis |
It is a data analysis system for huge amounts of vehicle fleet data. It is used to configure analysis which gets performed on the platform. |
| 5 |
FORUM Carl Zeiss Meditec AG |
Medical |
It is an archive software for clinical patient data in ophthalmology. It’s a mixture of both Swing and JavaFX and it is still in emigration. |
| 6 |
AIDA German AIDS Foundation |
Office |
It is helping people that are affected by AIDS or HIV by providing financial support and supporting projects in this field among others. |
| 7 |
NEOS – New Eurovision Operations System EBU |
Television |
It is used to ensure TV and radio transmissions travel from one location to another. |
| 8 |
Network Capacity Optimization Emirates Airline |
Aviation |
It allows the Network Planning Department to integrate various requests into the existing flight schedule. Possible requests are new flight, canceled flight, modified flight, etc. |
| 9 |
Deep Space Trajectory Explorer Nasa |
Space |
It facilitates rapid trajectory design across a vast potential data space, supporting any Planetary and Moon-centered ballistic trajectory in the solar system. |
JavaFX is a Java library and a GUI toolkit designed to develop and facilitate Rich Internet applications, web applications, and desktop applications. The most significant perk of using JavaFX is that the applications written using this library can run on multiple operating systems like Windows, Linux, iOS, Android, and several platforms like Desktops, Web, Mobile Phones, TVs, Tablets, etc.
Like Article
Suggest improvement
Share your thoughts in the comments
Please Login to comment...