Introduction to Mocha
Last Updated :
30 Mar, 2023
Mocha is a testing framework for Javascript running on Node.js. The frameworks make it easier to test asynchronous Javascript concepts in the browser. Mocha is widely used for testing Javascript codes before deploying them onto the server.
Installation of the module:
- Install Nodejs onto your system as mocha makes use of it.
- Run the following command to install the module:
npm install mocha
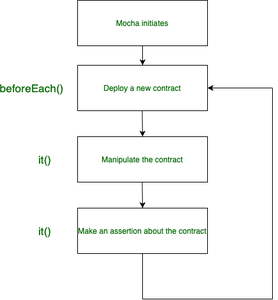
Hooks in Mocha: There are namely six hooks used in the testing by this framework to set up or load up preconditions used in the testing.
- it()
- describe()
- beforeEach()
- afterEach()
- before()
- after()
javascript
describe("hooks", function() {
before(function() {
});
after(function() {
});
beforeEach(function() {
});
afterEach(function() {
});
});
|
Mocha Structure:
Example: Create a test directory in your project. Inside the test directory create two files named helper.js and create_test.js respectively.
Project Directory: The project directory should look something like this:
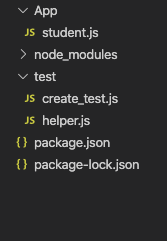
Project directory
Now inside the package.json file change the “test” field to “mocha” since the testing framework is mocha.
javascript
Javascript {
"name": "Introduction to Mocha",
"version": "1.0.0",
"description": "Learn to code",
"main": "index.js",
"scripts": {
"test": "mocha"
},
"author": "Yatharth Arora",
"license": "ISC",
"dependencies": {
"mocha": "^8.1.3",
}
}
|
The helper.js file contains the before() function which is to be executed before all the test cases.
Filename: helper.js
javascript
const mongoose = require('mongoose');
mongoose.Promise = global.Promise;
before( (done) => {
mongoose.connect("mongodb:
{ useUnifiedTopology: true, useNewUrlParser: true});
mongoose.connection
.once('open', () => {
done();
})
.on('error', (error) => {
console.log("Your error", error);
});
});
|
The create_test.js file contains all the test cases that we are going to check using the framework. It contains a describe() function which includes all the test cases defined by it() function.
Filename: create_test.js
javascript
const Student = require('../App/student');
const assert = require('assert');
describe("Create Records", () => {
it("create a user in db", () => {
const geek = new Student({name: "geek"});
geek.save()
.then( () => {
assert(!geek.isNew)
})
.catch( () => {
console.log("error");
})
});
});
|
Steps to run the code:
- Navigate into the directory where your test file is located and type the following command:
npm test
- The console will display the message that you passed as the first argument in each it() method. If the Test fails then the error will be reported.
Output:
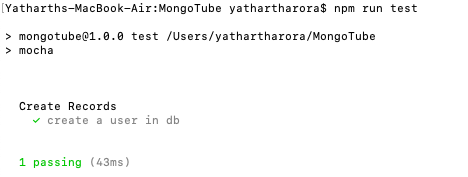
Output file
Need for Mocha Once the code is deployed on the server side, it is very difficult and costly to make any changes. User satisfaction is very important and therefore the code should go through vigorous testing before it is production-ready.
Like Article
Suggest improvement
Share your thoughts in the comments
Please Login to comment...