Installing MinGW Tools for C/C++ and Changing Environment Variable
Last Updated :
06 Feb, 2023
MinGW is a native C/C++ compiler(GCC) which have free distributable import libraries and header files for building native Windows applications. In this tutorial, we are going to install MinGW for C/C++. These are a few steps that we have to perform to successfully install MinGW on our device.
How to Install the MinGW Tools for C/C++?
Step 1: Go to the MinGW website and click on Download. It will start downloading in 5 seconds.

Step 2: Double click and open the exe MinGW file and click install. It will automatically start downloading all the setups for the MinGW.
Step 3: After all of the setup click Continue. Now the MinGW installation manager will pop up.
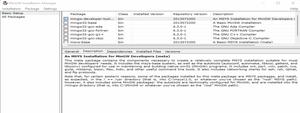
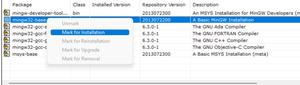
Step 4: In the installation manager right click on every option and then click Mark for Installation.
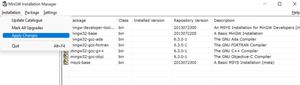
Step 5: In the Installation, option-click Apply changes. And then select Apply. It will start downloading all the files. It will take 5-6 minutes. After finishing click on Close.
How to Change Environment Variables for MinGW
After successful installation of MinGW, next step is to change the environment location for MinGW.
Step 1: Go to the C drive on your device and search for the MinGW folder. And in the MinGW folder go to the bin folder and copy its path.
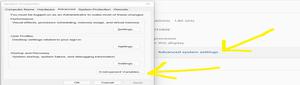
Step 2: Go to the control panel then go to System then Advanced system settings and then Environment variables.
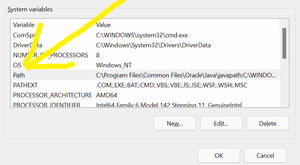
Step 3: In the system variables search for path and then select Edit. Now add a new path to it by clicking New. Now paste the path and click ok.
This marks the complete installation of MinGW in the system.
Another method to change Environment Variable for MinGw.
Step 1: Go to the C drive on your device and search for the MinGW folder. And in the MinGW folder go to the bin folder and copy its path.
Step 2: Now go to this pc and right click there and click on show more properties and click on properties pointed by the arrow.
Step 3: Now click on Advanced system setting.
Step 4: Now click on environmental variables.
Step 5: Now in system variables click on path and click on edit button.
Step 6: Now click on new button and paste the copied path there as shown in photo.
Now click on “ok” button of step 6, 5 and 4. and then close all the windows and restart your pc.
This marks the complete installation of MinGW in the system.
Like Article
Suggest improvement
Share your thoughts in the comments
Please Login to comment...