Implementation of Static Routing in Cisco – 2 Router Connections
Last Updated :
21 Nov, 2022
Pre-Requisite Types of Routing
Static routing is a routing protocol that helps to keep your network organized and to optimize routing performance. It enables the router to assign a specific path to each network segment and to keep track of network changes. This helps to improve network stability and continuity. This adds security because a single administrator can only authorize routing to particular networks.
Steps to Configure and Verify Two Router Connections in Cisco Packet Tracer :
Step 1: First, open the cisco packet tracer desktop and select the devices given below:
| S.NO |
Device |
Model Name |
Qty. |
| 1. |
PC |
PC |
4 |
| 2. |
Switch |
PT-Switch |
2 |
| 3. |
Router |
PT-Router |
2 |
IP Addressing Table For PCs:
| S.NO |
Device |
IPv4 Address |
Subnet Mask |
Default Gateway |
| 1. |
pc0 |
192.168.1.2 |
255.255.255.0 |
192.168.1.1 |
| 2. |
pc1 |
192.168.1.3 |
255.255.255.0 |
192.168.1.1 |
| 3. |
pc2 |
192.168.2.2 |
255.255.255.0 |
192.168.2.1 |
| 4. |
pc3 |
192.168.2.3 |
255.255.255.0 |
192.168.2.1 |
- Then, create a network topology as shown below the image.
- Use an Automatic connecting cable to connect the devices with others.
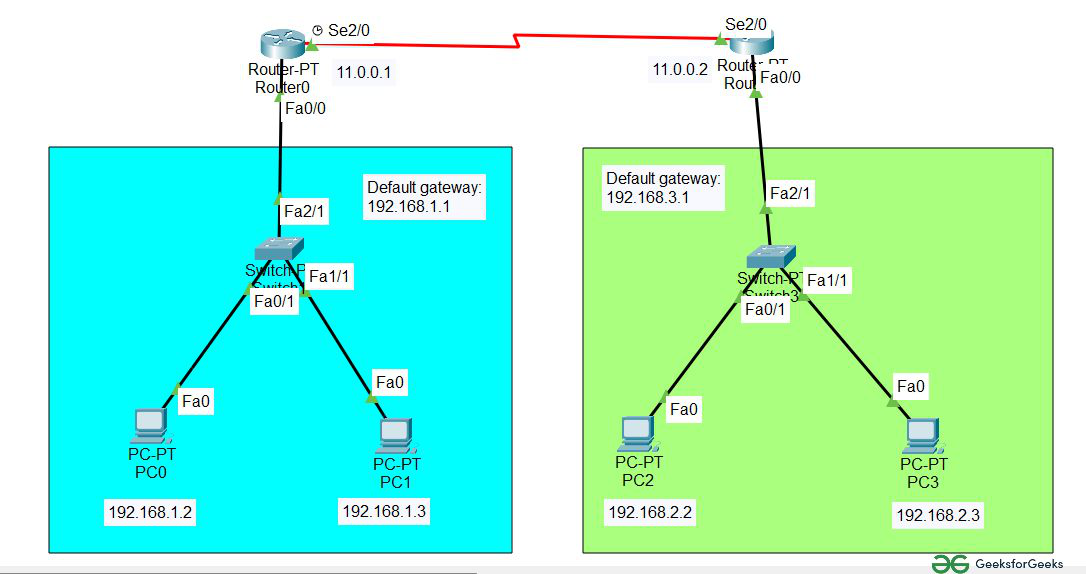
Correction: Default Gateway in 2nd network is 192.168.2.1
Step 2: Configure the PCs (hosts) with IPv4 address and Subnet Mask according to the IP addressing table given above.
- To assign an IP address in PC0, click on PC0.
- Then, go to desktop and then IP configuration and there you will IPv4 configuration.
- Fill IPv4 address and subnet mask.
Step 3: Assigning IP address using the ipconfig command.
- We can also assign an IP address with the help of a command.
- Go to the command terminal of the PC.
- Then, type ipconfig <IPv4 address><subnet mask><default gateway>(if needed)
Example: ipconfig 192.168.1.3 255.255.255.0 192.168.1.1
- Repeat the same procedure with other PCs to configure them thoroughly.
Step 4: Configure router with IP address and subnet mask.
| S.NO |
Device |
Interface |
IPv4 Addressing |
Subnet Mask |
| 1. |
router0 |
FastEthernet0/0 |
192.168.1.1 |
255.255.255.0 |
| Serial2/0 |
11.0.0.1 |
255.255.255.0 |
| 2. |
router1 |
FastEthernet0/0 |
192.168.2.1 |
255.255.255.0 |
| Serial2/0 |
11.0.0.2 |
255.255.255.0 |
- To assign an IP address in router0, click on router0.
- Then, go to config and then Interfaces.
- Then, configure the IP address in FastEthernet and serial ports according to IP addressing Table.
- Fill IPv4 address and subnet mask.
- Repeat the same procedure with other routers to configure them thoroughly.
Step 5: After configuring all of the devices we need to assign the routes to the routers.
To assign static routes to the particular router:
- First, click on router0 then Go to CLI.
- Then type the commands and IP information given below.
CLI command : ip route <network id> <subnet mask><next hop>
Static Routes for Router0 are given below:
Router(config)#ip route 192.168.2.0 255.255.255.0 11.0.0.2
Static Routes for Router1 are given below:
Router(config)#ip route 192.168.1.0 255.255.255.0 11.0.0.1
Step 6: Verifying the network by pinging the IP address of any PC. We will use the ping command to do so.
- First, click on PC1 then Go to the command prompt
- Then type ping <IP address of targeted node>
- As we can see in the below image we are getting replies which means the connection is working very fine
Example : ping 192.168.2.2
Simulation:
We are sending PDU from PC0 to PC2.
Like Article
Suggest improvement
Share your thoughts in the comments
Please Login to comment...