Image compression using K-means clustering
Last Updated :
29 May, 2023
Prerequisite: K-means clustering
The internet is filled with huge amounts of data in the form of images. People upload millions of pictures every day on social media sites such as Instagram, and Facebook and cloud storage platforms such as google drive, etc. With such large amounts of data, image compression techniques become important to compress the images and reduce storage space. In this article, we will look at image compression using the K-means clustering algorithm which is an unsupervised learning algorithm. An image is made up of several intensity values known as Pixels. In a colored image, each pixel is of 3 bytes containing RGB (Red-Blue-Green) values having Red intensity value, then Blue and then Green intensity value for each pixel.
Approach: K-means clustering will group similar colors together into ‘k’ clusters (say k=64) of different colors (RGB values). Therefore, each cluster centroid is representative of the color vector in the RGB color space of its respective cluster. Now, these ‘k’ cluster centroids will replace all the color vectors in their respective clusters. Thus, we need to only store the label for each pixel that tells the cluster to which this pixel belongs. Additionally, we keep a record of the color vectors of each cluster center.
Libraries needed For Image Compression
Image compression using K-means clustering is a technique that can be used to reduce the size of an image file while maintaining its visual quality. This technique involves clustering the pixels in an image into a smaller number of groups and then representing each group by its mean color. The resulting image will have fewer colors, which reduces the file size, but the overall appearance of the image is still preserved. We will use the OpenCV library for reading, writing, and saving the image, we will also use NumPy and Matplotlib library for creating and plotting the array.
Steps for compressing an image using K-means clustering:
- Convert the image from its original color space to the RGB color space, which represents colors using combinations of red, green, and blue values.
- Flatten the image into a 2D array, where each row represents a pixel and each column represents a color channel (red, green, or blue).
- Apply K-means clustering to the flattened image array, with K representing the desired number of colors in the compressed image. The algorithm will group similar pixels together based on their RGB values and assign each group a mean RGB value.
- Replace each pixel in the original image with the mean RGB value of its assigned cluster. This will result in an image with fewer colors, but a similar overall appearance to the original.
- Convert the compressed image back to its original color space, if necessary.
- Now by adjusting the value of K, the number of clusters used for the compression, the level of compression can be controlled. However, too much compression can result in loss of detail and reduced image quality. It’s important to strike a balance between compression and image quality when using this technique.
-> Numpy library: pip install numpy.
-> Matplotlib library: pip install matplotlib.
-> Opencv library: pip install opencv-python
Python Implementation for Image Compression
Input Image:
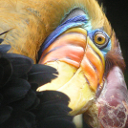
input image
Step1: Import libraries and Read the Image
First, we will import the libraries that are needed for this image, Then we will download the above image to our local system and upload it to the notebook and read it using OpenCV.
PYTHON
import numpy as np
import matplotlib.pyplot as plt
import cv2
def read_image():
img = cv2.imread('bird_small.png')
img = cv2.cvtColor(img, cv2.COLOR_BGR2RGB)
img = img / 255.0
return img
|
Step2: Initialize Random Centroid
Here, We will initialize random positions for the centroid. Also, the centroid will decide the total number of colors that we want in our compressed image.
Python3
def initialize_means(img, clusters):
points = img.reshape((-1, img.shape[2]))
m, n = points.shape
means = np.zeros((clusters, n))
for i in range(clusters):
rand_indices = np.random.choice(m, size=10, replace=False)
means[i] = np.mean(points[rand_indices], axis=0)
return points, means
|
Step3: Measure the Euclidean Distance Between Centroid
We will measure the Euclidean distance between the image array to adjust our image centroid
Python3
def distance(x1, y1, x2, y2):
dist = np.square(x1 - x2) + np.square(y1 - y2)
dist = np.sqrt(dist)
return dist
|
Step4: Applying the K-Means Clustering Algorithm
We will apply the k-means clustering algorithm, This algorithm works iteratively to find the data points which have similar colors and characteristics.
Python3
def k_means(points, means, clusters):
iterations = 10
m, n = points.shape
index = np.zeros(m)
while iterations > 0:
for j in range(m):
min_dist = float('inf')
temp = None
for k in range(clusters):
x1, y1 = points[j, 0], points[j, 1]
x2, y2 = means[k, 0], means[k, 1]
if distance(x1, y1, x2, y2) <= min_dist:
min_dist = distance(x1, y1, x2, y2)
temp = k
index[j] = k
for k in range(clusters):
cluster_points = points[index == k]
if len(cluster_points) > 0:
means[k] = np.mean(cluster_points, axis=0)
iterations -= 1
return means, index
|
Step4: Compress the image
We will create a function called Compres_image which will take a number of means as input where the position of the mean has been calculated by the k-means model and it will return a compressed image.
Python3
def compress_image(means, index, img):
centroid = np.array(means)
recovered = centroid[index.astype(int), :]
recovered = recovered.reshape(img.shape)
plt.imshow(recovered)
plt.show()
cv2.imwrite('compressed_' + str(clusters) + '_colors.png',recovered)
|
Step5: Drivers Code
We will call the function in a consecutive manner to compress the image.
Python3
if __name__ == '__main__':
img = read_image()
clusters = 16
clusters = int(input('Enter the number of colors in the compressed image (default = 16): '))
points, means = initialize_means(img,clusters)
means, index = k_means(points, means, clusters)
compress_image(means, index, img)
|
Output:

Compressed image for the Birds eye using python
Like Article
Suggest improvement
Share your thoughts in the comments
Please Login to comment...