Identify Members of BTS — An Image Classifier
Last Updated :
27 Sep, 2021
BTS is an eminent K-Pop band comprising of 7 members. This article looks at an image classifier that would recognize the name of the band member from a picture. The image classifier would be built using fastai. It is a deep learning library that aims to democratize deep learning. It is built on top of PyTorch, and has plethora of models with optimized weights that are ready-to-use. The application would be hosted on Binder, and the end product would look like this:
Preparing the Dataset
As is the case with any image classifier, the model needs to be trained on a dataset from which it can infer and extract the features corresponding to a particular category. The BTS Image Classifier would contain 7 categories (total number of members). The dataset can be prepared by manually collecting images of different members and then clubbing them in a folder of that category. In order to fasten this process, a Python script can be employed to create the dataset. The script would fetch images from Google Image Search. (Disclaimer: Using these images may lead to a copyright violation so proceed at your own risk).
A folder called simple_images would appear at the location where the script is present. Inside the simple_images folder, the folders corresponding to each of the seven members with 150 images would be present.
It is time to code the classifier. It is recommended to use Google Collab (the GPU would come in handy while training) and have the dataset uploaded to Google Drive.
Python3
from fastbook import *
from fastai.vision.widgets import *
from google.colab import drive
drive.mount('/content/drive')
import fastbook
fastbook.setup_book()
class DataLoaders(GetAttr):
def __init__(self, *loaders): self.loaders = loaders
def __getitem__(self, i): return self.loaders[i]
train, valid = add_props(lambda i, self: self[i])
|
DataLoaders is a class that is responsible for providing the valid and train dataset to the model.
Python3
from simple_image_download import simple_image_download as simp
response = simp.simple_image_download
response.download('BTS Jin', 150)
response.download('BTS Jimin', 150)
response.download('BTS RM', 150)
response.download('BTS J-Hope', 150)
response.download('BTS Suga', 150)
response.download('BTS Jungkook', 150)
|
Cleaning the Data
The images that have been downloaded may not be of the same dimensions. It is preferred to have all the images in the dataset of uniform dimensionality. The fastai library has a function for this:
Python3
bts = bts.new(
item_tfms=RandomResizedCrop(224, min_scale=0.5),
batch_tfms=aug_transforms())
dls = bts.dataloaders(path)
|
All the images are resized to 224 x 224 which is a standard size for images in the training dataset.
Creating the Model
It is time to create the Learner. The Learner is the model that is going to learn from the dataset that is provided. It will then be able to predict the output (independent variable) when supplied with an image that was not a part of the training set. The Learner that is used here is called ‘Resnet18’. It is already pretrained, meaning the weights are tweaked such that the model should be able to reasonable predictions without further tweaks. This idea is called transfer learning.
Python3
learn = cnn_learner(dls, resnet18, metrics=error_rate)
learn.fine_tune(8)
|
fine_tune(8) means the learning takes place for 8 epochs. This number can be played with. The tradeoff between accuracy and the computation power/time would be something to consider.
The model is now trained, and the result can be visualized by looking at the confusion matrix.
Python3
interp = ClassificationInterpretation.from_learner(learn)
interp.plot_confusion_matrix()
|
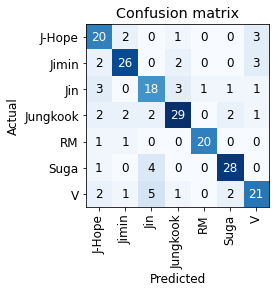
Ideally, only the diagonal elements of the confusion matrix should be non-zero. It can be seen that in the model’s predictions, there are some misclassifications present.
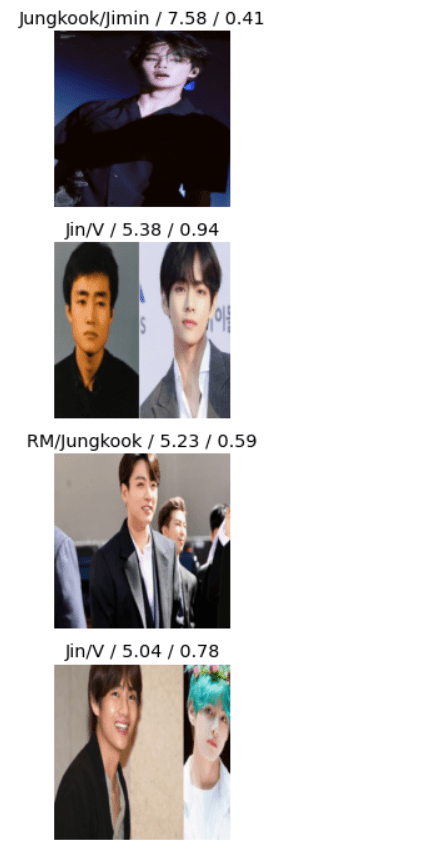
The images with the top losses can be seen. These are usually the images which the model predicts incorrectly with great certainty or correctly with less certainty.
Python3
interp.plot_top_losses(5, nrows=5)
|
Deploying the Model
The model would be deployed using Binder. The GitHub URL of the notebook needs to be pasted. Firstly, the model needs to be exported, and a file with the extension .pkl needs to be generated.
Python3
learn.export()
path = Path()
path.ls(file_exts='.pkl')
|
Visit the website for Binder. Paste the URL of the GitHub repository, containing the notebook and .pkl file. In the ‘URL to open’ blank, enter the (GitHub) URL of the notebook. Click on ‘launch’, and after a few minutes, the web-application would be ready to be used.
Note: This image classifier was first taught in the Fast.AI Deep Learning course, lecture 2.
Like Article
Suggest improvement
Share your thoughts in the comments
Please Login to comment...