Let us first understand the two types of app bars in an android app:
- The Regular AppBar
- The Contextual AppBar
The Regular AppBar is just a normalized app bar that appears on the top of a page and can be well customized according to the user’s requirements. It can be used to display page topics/company names/etc., clickable icons, navigation to other pages, drawers, text fields, and various other actions. Now here lies a catch…
The regular top AppBar can be transformed anytime into a contextual action bar, which remains active until the action has been removed/completed. This transformation results in a new customized app bar, overlapping the regular app bar, until the action has terminated. Now let us have a glimpse at these images, demonstrating the two types of app bars:
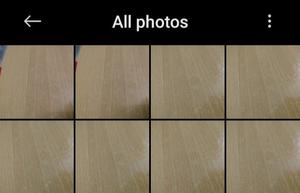
Regular App Bar (Customized)
Above is just a regular app bar that has its own decorations.
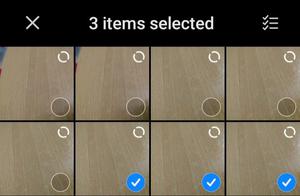
Contextual Action Bar
This is a Contextual Action Bar for the selected set of item(s), having its own set of animations/additions (which are also set by the user itself!). The action bar provides a visual consistency to a page of any application. It guides the users towards the specified destination in a persistent, user-friendly way. There are multiple ways of customizing an ActionBar. In this article, we are going to create a mini-project, which very well demonstrates the use of the Material Contextual Action Bar in an Android application.
Step by Step Implementation
Step 1: Create a New Project
To create a new project in Android Studio please refer to How to Create/Start a New Project in Android Studio. Note that select Java as the programming language.
Step 2: Working with the activity_main.xml file
Navigate to the app > res > layout > activity_main.xml and add the below code to that file. Below is the code for the activity_main.xml file.
XML
<?xml version="1.0" encoding="utf-8"?>
<androidx.constraintlayout.widget.ConstraintLayout
android:layout_width="match_parent"
android:layout_height="match_parent"
tools:context=".MainActivity">
<TextView
android:id="@+id/text_view"
android:layout_width="wrap_content"
android:layout_height="wrap_content"
android:text="Hello GFG!"
android:textSize="30sp"
app:layout_constraintBottom_toBottomOf="parent"
app:layout_constraintLeft_toLeftOf="parent"
app:layout_constraintRight_toRightOf="parent"
app:layout_constraintTop_toTopOf="parent" />
</androidx.constraintlayout.widget.ConstraintLayout>
|
We put an id to TextView widget, which we can refer to later with the id name “text_view“. The width and height of the app bar are adjusted to “wrap_content” and “match_parent” to provide a good visual appearance by resizing the widgets automatically according to their parent content(s). A random text “Hello GFG!”, sized at 30sp, is displayed at the center of the page, which will act as our action object, later.

Step 3: Create Vector Assets
Navigate to app > res > drawable. Right-click on “drawable” folder > New > Vector Asset. Choose any icon and customize according to liking, click on Next > Finish. Repeat this process one more time to create another icon of a different choice.

Step 4: Create a menu file and modify
Navigate to app > res. Right-click on res > New > Android Resource Directory.

Set Resource type to the menu. Click OK. This will create a new menu folder for you. Right-click on the menu folder > New > Menu Resource File.

Change the file name according to choice. Click OK. On the top right corner of the console, look for “Code | Split | Design“. Click on Code to modify the menu code.

Type in the following code:
XML
<?xml version="1.0" encoding="utf-8"?>
<item
android:id="@+id/option_1"
android:title="Option 1"
android:icon="@drawable/ic_delete" />
<item
android:id="@+id/option_2"
android:title="Option 2"
android:icon="@drawable/ic_baseline_share_24" />
</menu>
|
Note: “ic_delete” and “ic_baseline_share_24” are the vector assets created earlier (in step 3).
Step 5: Modify the MainActivity.java file, create Action Mode, generate the final output
Action Mode inside a Contextual Action Bar dedicates a specific action to be performed on a regular app bar, for example, which then transforms itself to a Contextual App Bar, as and when customized by the user itself. In other words, Action Mode temporarily changes the user interface for as long as the action is being executed. Take a look at what we are about to do now:

This here above, is the homepage of an application, with a regular app bar.

This now is a contextual app bar, transformed from the regular app bar on long-pressing the “Hello GFG!” text. Excited? Let us move on to the coding segment. Head to the already created MainActivity.java tab.

Go to the MainActivity.java file and refer to the following code. Below is the code for the MainActivity.java file. Comments are added inside the code to understand the code in more detail.
Java
import android.os.Bundle;
import android.view.Menu;
import android.view.MenuItem;
import android.view.View;
import android.widget.TextView;
import android.widget.Toast;
import androidx.appcompat.app.AppCompatActivity;
import androidx.appcompat.view.ActionMode;
public class MainActivity extends AppCompatActivity {
private ActionMode myActMode;
@Override
protected void onCreate(Bundle savedInstanceState) {
super.onCreate(savedInstanceState);
setContentView(R.layout.activity_main);
TextView textView = findViewById(R.id.text_view);
textView.setOnLongClickListener(new View.OnLongClickListener() {
@Override
public boolean onLongClick(View v) {
if (myActMode != null) {
return false;
}
myActMode = startSupportActionMode(myActModeCallback);
return true;
}
});
}
private ActionMode.Callback myActModeCallback = new ActionMode.Callback() {
@Override
public boolean onCreateActionMode(ActionMode mode, Menu menu) {
mode.getMenuInflater().inflate(R.menu.example_menu, menu);
mode.setTitle("Select option here");
return true;
}
@Override
public boolean onPrepareActionMode(ActionMode mode, Menu menu) {
return false;
}
@Override
public boolean onActionItemClicked(ActionMode mode, MenuItem item) {
switch (item.getItemId()) {
case R.id.option_1:
Toast.makeText(MainActivity.this, "Selected Option 1", Toast.LENGTH_SHORT).show();
mode.finish();
return true;
case R.id.option_2:
Toast.makeText(MainActivity.this, "Selected Option 2", Toast.LENGTH_SHORT).show();
mode.finish();
return true;
default:
return false;
}
}
@Override
public void onDestroyActionMode(ActionMode mode) {
myActMode = null;
}
};
}
|
Explanation:
Inside the onCreate() method, we first need a reference to our previously created text_view by accessing its id. To do this, we use:
TextView textView = findViewById(R.id.text_view);
Now we create a listener. I have created an onLongClick() listener here, which customizes the AppBar when the specified widget is long-pressed. For this, we type:
textView.setOnLongClickListener(new View.OnLongClickListener() {
            @Override
            public boolean onLongClick(View v) {
                if(myActMode!=null){
                    return false;
                }
                myActMode=startSupportActionMode(myActModeCallback);

                return true;
            }
return true; signifies that the user has consumed the click listener, and does not want to activate any other click listener(s). The null check is used to verify whether the Action Mode (to be created in the next step) has already been activated so that we do not have to activate it again. For now, myActModeCallback can be well ignored.
Now we come to the important part. Using Action Mode. To do this, we create a private Action Mode variable with a user-defined name. In my case, the name is myActMode.
private ActionMode myActMode;
Moving to the next part, we have to initiate the required callback interface. To do this, we have the following callback segment.
private ActionMode.Callback myActModeCallback = new ActionMode.Callback() {
        @Override
        public boolean onCreateActionMode(ActionMode mode, Menu menu) {
            mode.getMenuInflater().inflate(R.menu.example_menu, menu);
            mode.setTitle("Select option here");
            return true;
        }

        @Override
        public boolean onPrepareActionMode(ActionMode mode, Menu menu) {
            return false;
        }

        @Override
        public boolean onActionItemClicked(ActionMode mode, MenuItem item) {
            switch (item.getItemId()) {
                case R.id.option_1:
                    Toast.makeText(MainActivity.this, "Selected Option 1", Toast.LENGTH_SHORT).show();
                    mode.finish();
                    return true;
                case R.id.option_2:
                    Toast.makeText(MainActivity.this, "Selected Option 2", Toast.LENGTH_SHORT).show();
                    mode.finish();
                    return true;
                default:
                    return false;
            }

        }

        @Override
        public void onDestroyActionMode(ActionMode mode) {
            myActMode=null;
        }
    };
Since we have already created the callback functions (yet to be initialized and customized), we can pass myActModeCallback as an argument to startSupportActionMode() created in the previous step. The onCreateActionMode() is the method where we inflate our menu. To do this, we use:
mode.getMenuInflater().inflate(R.menu.example_menu, menu);
We do not need to code anything inside the onPrepareActionMode() method, since this method is called as and when the user wants to refresh the menu; certainly not the kind we want here! Coming to the next method, we of course need to tweak code into the onActionItemClicked() method, since this is the place that cares for our actions and dedicates it towards the Contextual Action Bar. Here we have:
switch (item.getItemId()) {
                case R.id.option_1:
                    Toast.makeText(MainActivity.this, "Selected Option 1", Toast.LENGTH_SHORT).show();
                    mode.finish();
                    return true;
                case R.id.option_2:
                    Toast.makeText(MainActivity.this, "Selected Option 2", Toast.LENGTH_SHORT).show();
                    mode.finish();
                    return true;
                default:
                    return false;
            }
I have decided to use a short Toast Message to be displayed at the bottom of the screen after an item (an icon, to be more specific) in the contextual action bar has been clicked. Of course, you can innovate new ideas too. Lastly, we arrive at the onDestroyActionMode() method, and set myActMode to null, so that the contextual app bar is closed after the action has terminated.
@Override
        public void onDestroyActionMode(ActionMode mode) {
            myActMode=null;
        }
That was it! Now Run the android application by clicking on the ▶ button, using an Android Emulator or an external android device.
Output:
Project Link: Click Here
Like Article
Suggest improvement
Share your thoughts in the comments
Please Login to comment...