How to Use Google Cloud Function with Python ?
Last Updated :
30 Mar, 2023
In this article, we will look into how to use the Google Cloud Function with python on any website.
To do so follow the below steps:
Step 1: Let’s first head to the functions manager site on Google Cloud Platform (GCP). It should look like below:

Function manager site
Step 2: Now let’s create our function. Click the “CREATE FUNCTION” on the top.
Create Function
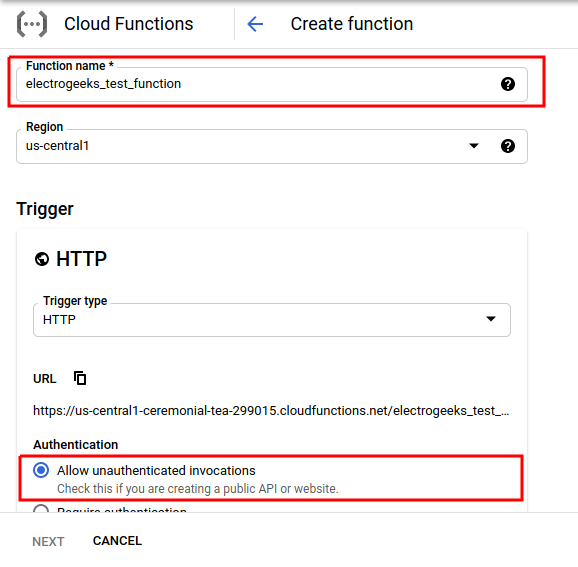
Step 3: A window like this one should appear next. Here in the function name, give any name. And if you are not going to use any authentication, choose “Allow unauthenticated invocations“. For this particular example at least, we will choose “Allow unauthenticated invocations“. Other options are not required to be changed. Now hit the “NEXT” button.

Allow unauthenticated invocations
Step 4: Now you will get a Trigger URL. Copy this URL somewhere as this is the URL we will use to invoke our function. Then hit “NEXT“.
Trigger URL
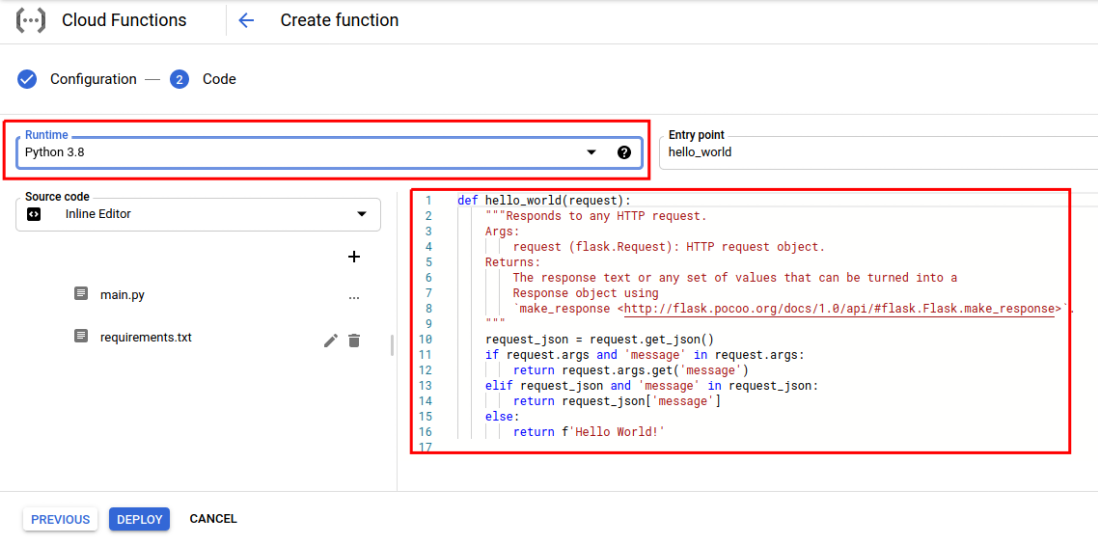
Step 5: Now under “Runtime“, select a Python version. We have selected “Python 3.8”. Now here comes the main part, the SOURCE CODE of the function. Right now if you deploy the function, it most probably won’t work because, in the source code, there is no “Access Control” header. This means when you will invoke this function from a browser like Firefox or Chrome, it won’t work. So let’s use our own source code.
Runtime
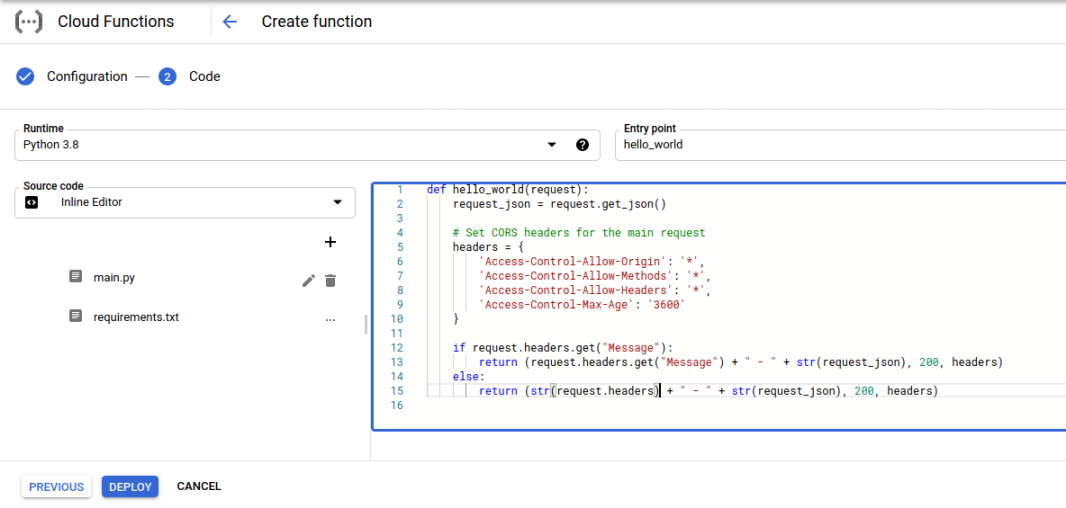
The request_json = request.get_json() extracts the JSON object sent by the client. The next code specifies the access scope of the user. The next code line checks whether there is a “Message” header in the headers. If yes, then send its value and the retrieved JSON, as a response to the client. If not, then send the entire header content along with any JSON retrieved back to the client. That’s it for the source code.
But before we test the function, here are a few things. The “Entry point” beside the “Runtime” shows the method which will be invoked when a request has been received. Under the source code section, you will also see the requirements.txt file. This file is used to specify additional dependencies for your function. For additional queries regarding requirements.txt, you may refer to this documentation.
Step 6: Now let’s hit “DEPLOY” to deploy the function. Now you will again be redirected to the functions manager site. It should take about 1-2 minutes for the function to be deployed.

Deploy
Now, let’s test our function.
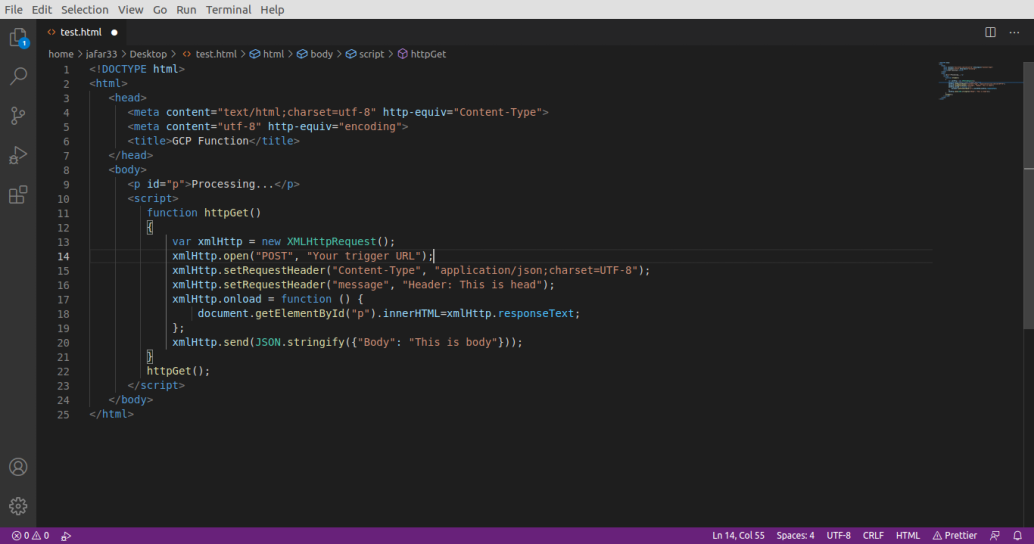
Step 7: Let’s create a test.html file from where we can call our function using JavaScript.
test.html
In the “Your trigger URL” on line 14, paste the trigger URL you copied before. We set a header “Content-Type” to tell our function, what kind of data we have sent. In our case, it is JSON. Next, we set a header named “Message” just for testing purposes. Then we specify what to do when the response has been received. And at last, send some dummy data as JSON. Now let’s run the below given HTML file in a browser.
HTML
<!DOCTYPE html>
<html>
<head>
<meta content="text/html;charset=utf-8" http-equiv="Content-Type">
<meta content="utf-8" http-equiv="encoding">
<title>GCP Function</title>
</head>
<body>
<p id="p">Processing...</p>
<script>
function httpGet()
{
var xmlHttp = new XMLHttpRequest();
xmlHttp.open("POST", "Your trigger URL");
xmlHttp.setRequestHeader("Content-Type", "application/json;charset=UTF-8");
xmlHttp.setRequestHeader("message", "Header: This is head");
xmlHttp.onload = function () {
document.getElementById("p").innerHTML=xmlHttp.responseText;
};
xmlHttp.send(JSON.stringify({"Body": "This is body"}));
}
httpGet();
</script>
</body>
</html>
|

Header
And bravo! Here is the response! Everything is up and running. But what will happen if you code wrong in the source code of the function? Google is there to the rescue.
Rescue to wrong code
Click the function you created. In the next window, select the “LOGS” tab to see the logs of your function.

Logs
Like Article
Suggest improvement
Share your thoughts in the comments
Please Login to comment...