How to Test React Components using Jest ?
Last Updated :
25 May, 2023
React is a frontend open-source JavaScript library, used to build interactive User Interfaces. React is focused on Single Page applications and is more popularly known as a SPA.
Testing is an important aspect of development. It examines whether the application is behaving as intended, and protects it when any unwanted changes are made to the application. There are various test libraries such as chai, mocha etc. In this tutorial, we’ll be using the jest library along with reacting testing library to test out the React Components.
Prerequisites:
Modules required:
Creating React App and Setting Up:
Step 1: You will start a new project using create-react-app so open your terminal and type.
npx create-react-app jest-testing
Step 2: Switch to the jest-testing folder using the following command.
cd tic-tac-toe-react
Step 3: Change to the src folder and remove the unnecessary stuff using the following command
cd src
rm*
Step 4: Create a components folder in the src folder
mkdir components
Step 5: Create a Button folder and a Text folder
mkdir Button,Text
Step 6: Create a Button.js file and Button.test.js file inside the Button folder.
touch Button.js Button.test.js
Note: The name of the test file should be the same as the component and should be followed with a .test.js extension as when the tests are run using the npm test command, React automatically checks for all the file names with a .test extension and runs the tests.
Step 7: Create a Text.js file and Text.test.js file inside the Text folder.
touch Text.js Text.test.js
Step 8: In the src folder, create App.js, index.js, and App.test.js files.
touch App.js index.js App.test.js
Project Structure: The file structure in the project will look like this.
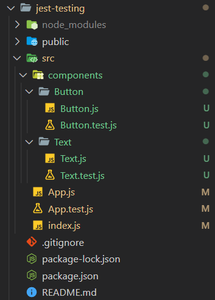
Project Structure
Example: Setup all the files with basic code to toggle the text GeeksForGeeks when a button is clicked.
index.js
Javascript
import React from 'react';
import ReactDOM from 'react-dom';
import App from './App';
ReactDOM.render(
<React.StrictMode>
<App />
</React.StrictMode>,
document.getElementById('root')
);
|
Button.js
Javascript
const Button = ({ setToggle, btnTxt }) => {
return <button data-testid="button"
onClick={() => setToggle((prev) => !prev)}>
{btnTxt}
</button>
}
export default Button;
|
Text.js
Javascript
const Text = ({ toggle, displayTxt }) => {
return <h1 data-testid="text">{toggle ? displayTxt : ""}</h1>
}
export default Text;
|
App.js
Javascript
import Button from "./components/Button/Button";
import Text from "./components/Text/Text";
import { useState } from "react";
const App = () => {
const [toggle, setToggle] = useState(true);
return (
<div className="App">
<Text toggle={toggle} displayTxt="GeeksForGeeks" />
<Button setToggle={setToggle} btnTxt="Toggle Text" />
</div>
);
}
export default App;
|
Output: Run the following command to start up the application:
npm start
A simple app is created which toggles the text GeeksForGeeks when the button is pressed.

Now that the basic application is set up, we can begin testing it. Before testing the application let’s learn about a few important testing methods.
- render(Component): Renders the given component on a mock screen.
- screen: A reference to the mock screen with various useful testing functions.
- cleanup(): Resets the DOM.
- afterEach(callback function): Runs the callback function given as a parameter after running each test suite.
- beforeEach(callback function): Runs the callback function given as a parameter before running each test suite.
- describe(nameOfTestSuite, callback function): Defines a test suite that contains many unit tests(Callback Function contains the unit tests).
- test(nameOfTest, callback function): Defines a test to be performed.
- fireEvent: Simulates a specified event.
Testing the Button Component: We are going to perform two tests on the Button Component.
- Test 1: Testing if the button is rendered correctly to the DOM.
- Test 2: Testing if the button displays the text passed as a prop.
Button.test.js
Javascript
import { render, screen, cleanup } from "@testing-library/react";
import '@testing-library/jest-dom'
import Button from "./Button";
afterEach(() => {
cleanup();
})
describe("Button Component", () => {
const setToggle = jest.fn();
render(<Button setToggle={setToggle} btnTxt="Click Me!" />);
const button = screen.getByTestId("button");
test("Button Rendering", () => {
expect(button).toBeInTheDocument();
})
test("Button Text", () => {
expect(button).toHaveTextContent("Click Me!");
})
})
|
Output:
Run the tests using the following command:
npm test
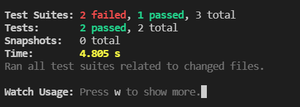
Test Result
We can see that two test suites have failed and one has passed. The reason for this is that no tests have been designed for the Text Component and the App Component. So the only test suite passing is the Button Component.
Testing the Text Component: We are going to perform three tests on the Text Component.
- Test 1: Testing if the text element is rendered correctly to the DOM.
- Test 2: Testing the content of the text element when the toggle is set to true.
- Test 3: Testing the content of the text element when the toggle is set to false.
Text.test.js
Javascript
import { render, screen, cleanup } from "@testing-library/react";
import '@testing-library/jest-dom'
import Text from "./Text";
afterEach(() => {
cleanup();
})
describe("Text Component", () => {
test("Text Rendering", () => {
render(<Text toggle={true} displayTxt={"GeeksForGeeks"} />);
const text = screen.getByTestId("text");
expect(text).toBeInTheDocument();
})
test("Displayed Text when toggle is set to true", () => {
render(<Text toggle={true} displayTxt={"GeeksForGeeks"} />)
const text = screen.getByTestId("text");
expect(text).toHaveTextContent("GeeksForGeeks");
})
test("Displayed Text when toggle is set to false", () => {
render(<Text toggle={false} displayTxt={"GeeksForGeeks"} />);
const text = screen.getByTestId("text");
expect(text).toBeEmptyDOMElement();
})
})
|
Output:
Run the tests using the following command:
npm test
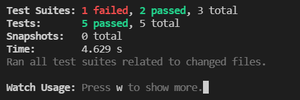
Test Result
Testing the App Component: Testing the App Component is also known as integration testing as we the testing the application when we have integrated our button and text components. We are going to perform three tests on the App Component.
- Test 1: Testing whether all the components have rendered
- Test 2: Testing the default value of the text element
- Test 3: Testing the toggle ability of the button
App.js
Javascript
import { render, screen, cleanup, fireEvent } from "@testing-library/react";
import '@testing-library/jest-dom'
import App from "./App";
afterEach(() => {
cleanup();
})
describe("App Component", () => {
test("App Rendering", () => {
render(<App />);
const text = screen.getByTestId("text");
const button = screen.getByTestId("button");
expect(button).toBeInTheDocument();
expect(text).toBeInTheDocument();
})
test("Default Text", () => {
render(<App />);
const text = screen.getByTestId("text");
expect(text).toHaveTextContent("GeeksForGeeks");
})
test("Toggling Text", () => {
render(<App />);
const text = screen.getByTestId("text");
const button = screen.getByTestId("button");
expect(text).toHaveTextContent("GeeksForGeeks");
fireEvent.click(button);
expect(text).toBeEmptyDOMElement();
fireEvent.click(button);
expect(text).toHaveTextContent("GeeksForGeeks");
})
})
|
Output: Run the tests using the following command:
npm test
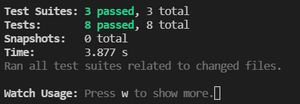
Test Result
Like Article
Suggest improvement
Share your thoughts in the comments
Please Login to comment...