How to Set Gradient and Image Backgrounds for ActionBar in Android?
Last Updated :
11 Jun, 2021
UI plays quite significantly to keep the user engaged within the application. The very basic starts with developing a theme for an application. Themes may apply to all the UI elements within the application, but, the first thing that the user may notice is the Action Bar. Action Bar has a theme by default. We can only change its colors from available assets. Through this article, we want to show you how you can change the background of the ActionBar and make it look more appealing. This article has been divided into two parts. First, we have demonstrated how you could create a gradient and apply it as a background to the Action Bar, and next, integrating similar ideas and methods to apply an image background to the Action Bar.
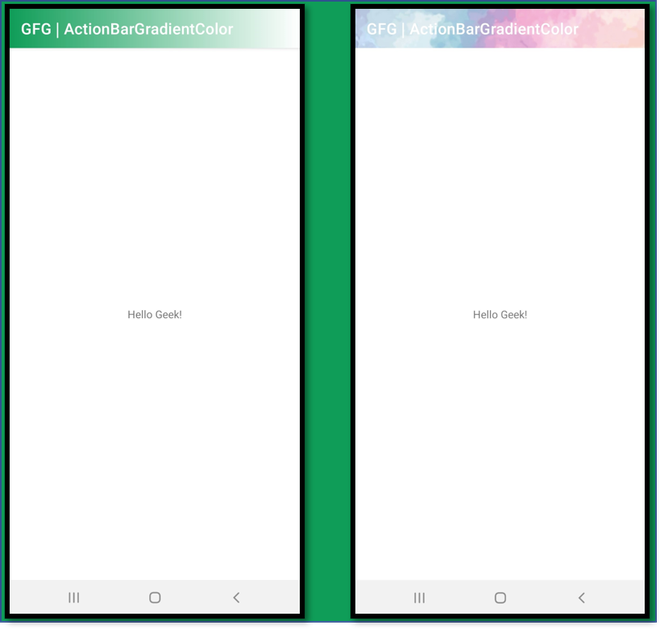
(Left) Gradient Background Action Bar, (Right) Image Background Action Bar
Steps for Setting Gradient Background for ActionBar
Step 1: Create a New Project
To create a new project in Android Studio please refer to How to Create/Start a New Project in Android Studio. Select Kotlin as the programming language.
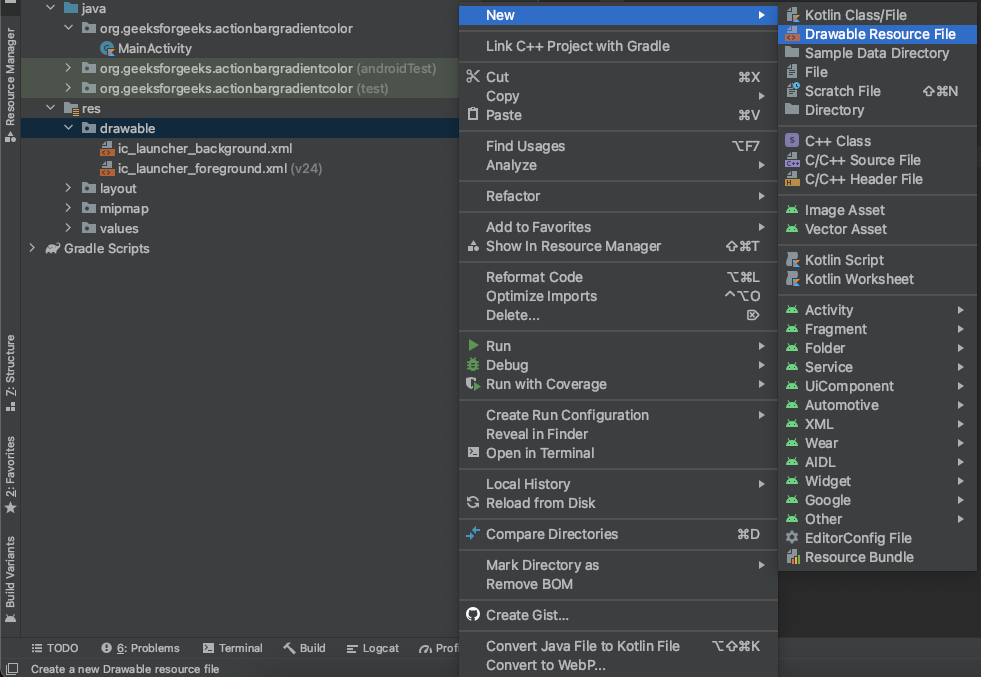
Step 2: Create a Drawable Resource File
Create a Drawable Resource File by right-clicking on the drawable folder in resources. Now move the cursor to New and select Drawable Resource File as shown below.
Once selected, a window pops up to fill the file name, root element, etc. We named our file “sample_gradient“. We will select the option of shape for the root element. Once done, click OK.

Step 3: Edit the Drawable Resource File
We need to write code for gradient fragments between the shape tags. This fragment will help us creating a gradient. Follow the below code for creating one. Drawable Resource Files are written in XML by default.
XML
<?xml version="1.0" encoding="utf-8"?>
<gradient
android:startColor="#0f9d58"
android:endColor="@color/white"/>
</shape>
|
Below is the preview of the gradient.

Step 4: Edit the MainActivity.kt
Kotlin
package org.geeksforgeeks.actionbargradientcolor
import androidx.appcompat.app.AppCompatActivity
import android.os.Bundle
class MainActivity : AppCompatActivity() {
override fun onCreate(savedInstanceState: Bundle?) {
super.onCreate(savedInstanceState)
supportActionBar?.setBackgroundDrawable(resources.getDrawable(R.drawable.sample_gradient))
setContentView(R.layout.activity_main)
}
}
|
Output:

Steps for Setting an Image Background for ActionBar
Step 1: Create a New Project
To create a new project in Android Studio please refer to How to Create/Start a New Project in Android Studio. Select Kotlin as the programming language.
Step 2: Add a Design Image in the drawable folder
Simply copy and paste a design image in the drawable folder.

design_image.png
Step 3: Edit the MainActivity.kt
Kotlin
package org.geeksforgeeks.actionbargradientcolor
import androidx.appcompat.app.AppCompatActivity
import android.os.Bundle
class MainActivity : AppCompatActivity() {
override fun onCreate(savedInstanceState: Bundle?) {
super.onCreate(savedInstanceState)
supportActionBar?.setBackgroundDrawable(resources.getDrawable(R.drawable.design_image))
setContentView(R.layout.activity_main)
}
}
|
Output:

Like Article
Suggest improvement
Share your thoughts in the comments
Please Login to comment...