How to read image from SQL using Python?
Last Updated :
28 Oct, 2021
In this article, we are going to discuss how to read an image or file from SQL using python. For doing the practical implementation, We will use MySQL database. First, We need to connect our Python Program with MySQL database. For doing this task, we need to follow these below steps:
Steps to Connect Our Python Program with MySQL:
- Install the MySQL Connector which Connects our program with MySQL database.
pip install mysql-connector-python
- Now, Let’s import the first module named mysql.connector.
import mysql.connector
- With the help of connect() method, We will create a connection between a Python Program and MySQL and Storing the connection in a connection object. We have to pass some arguments in this method such as host, database name, username, and password as in string format.
connection = mysql.connector.connect(host=’localhost’, database='<database_name>’, user='<User_name>’, password='<password>’)
- After creating the connection object, We need to create a cursor object with the use of cursor() method.
cursor = connection.cursor()
- Using cursor object for executing our SQL queries with execute() method.
cursor.execute("select * from table_name")
- Once all gets done, we need to close all connections or resources.
cursor.close()
con.close()
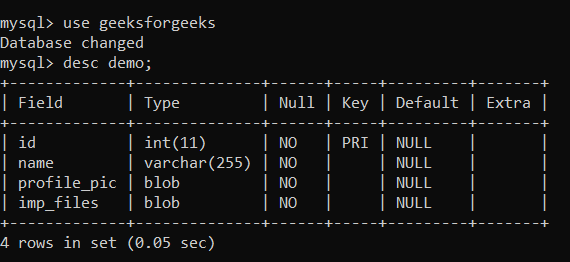
Table Structure:
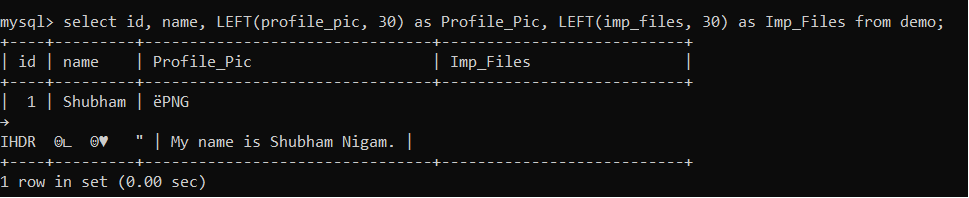
In this table, we have some data, let see how many already inserted. For checking, we need to run one command such as
select id, name, LEFT(profile_pic, 30) as Profile_Pic, LEFT(imp_files, 30) as Imp_Files from demo;
Implementation:
Here, In the above image, we can see that we have only one record in the table. Now, Let’s see its practical Implementation:
Click here to download Image File and Text File.
Python3
import mysql.connector
def convert_data(data, file_name):
with open(file_name, 'wb') as file:
file.write(data)
try:
connection = mysql.connector.connect(host='localhost',
database='geeksforgeeks',
user='root',
password='shubhanshu')
cursor = connection.cursor()
query =
id = 1
cursor.execute(query, (id,))
records = cursor.fetchall()
for row in records:
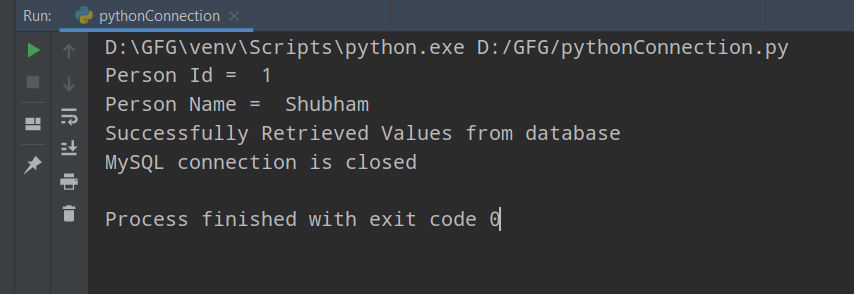
print("Person Id = ", row[0])
print("Person Name = ", row[1])
image = row[2]
file = row[3]
convert_data(image, "D:\GFG\images\One.png")
convert_data(file, "D:\GFG\content.txt")
print("Successfully Retrieved Values from database")
except mysql.connector.Error as error:
print(format(error))
finally:
if connection.is_connected():
cursor.close()
connection.close()
print("MySQL connection is closed")
|
Output:
Explanation:
Now, Let’s understand the above code,
- First, We are creating one function named convert_data and takes two arguments as data and filename. In this function, we are converting our binary data into human-readable or understandable form with the given file name. In the first argument, data stores binary data and in the second argument, filename holds the name for file which are retrieving from the database.
- Now, Creating a connection with MySQL database using the above python program.
- Creating one select SQL query, which retrieves data where id will be equal to given id(User will give this value).
- With the help of fetchall() method, we are retrieving all records which are having given id values and creating a list of those values.
- Using for loop, for retrieving the records one by one. For accessing each and every column, we are using indexing values such as 0 for Column 1, 1 for Column 2, and so on.
- Printing Data and Saving the retrieved files with the given file name.
Video Demonstration:
Like Article
Suggest improvement
Share your thoughts in the comments
Please Login to comment...