How to pass value between Screens in React Native ?
Last Updated :
09 Mar, 2022
React Native is use to create cross-platform applications. One of the biggest drawbacks of React Native is that it doesn’t come with any built-in navigation system. We have to use other libraries to implement navigation in React Native. React Navigation library is widely used with React Native to implement various types of navigation systems.
With the React Navigation, we can also pass values or parameters between screens in React Native. We will create a simple stack navigator with 2 screens and will pass values from one screen to another screen.
Creating Application:
Step 1: Open your Terminal and run below command. It will install Expo CLI globally in your system.
npm install -g expo-cli
Step 2: Now, create a new React Native Project by running below command.
expo init "Your_Project_Name"
Step 3: You’ll be asked to choose a template. Select blank template.
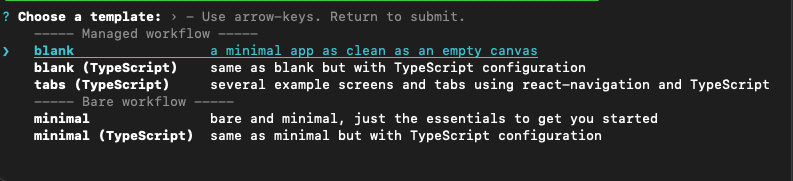
blank template
Step 4: Now go to the project folder
cd "Your_Project_Name"
Step 5: Now, to implement any type of navigation, we first need to install React Navigation package in our React Native Project. Run below command.
npm install @react-navigation/native // OR
yarn add @react-navigation/native
Step 6: Install required dependencies into an Expo managed project.
expo install react-native-screens react-native-safe-area-context
Step 7: The libraries we’ve installed so far are the required packages for navigators. But each navigator in React Navigation has its own library that we need to add.
npm install @react-navigation/native-stack // OR
yarn add @react-navigation/native-stack
Step 8: Now run below command to start the server.
npm start
Project Structure: It will look like the following.
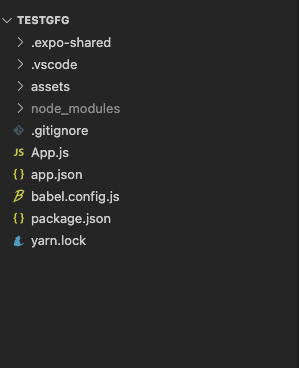
Project Structure
In the following example, we will create 2 screens called HomeScreen and MessageScreen. We will also create a stack navigator and pass values from HomeScreen to MessageScreen. So create 2 files called HomeScreen.js and MessageScreen.js.
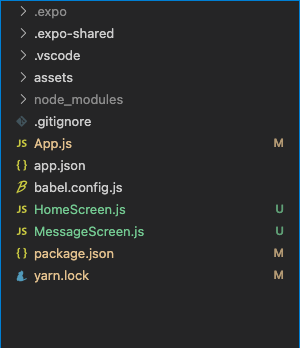
HomeScreen and MessageScreen
Example: Follow these steps in order to pass value between screens in React Native.
Step 1: Open the HomeScreen.js file and write below code in that file.
In this file, we will create a TextInput and a Button component. Users can add messages in this TextInput and press the button. The user will be redirected to MessageScreen. We will pass whatever value the user has entered from HomeScreen to MessageScreen and that message will be displayed on the MessageScreen.
HomeScreen.js
import { Button, StyleSheet, Text, TextInput,
View } from 'react-native';
import React, { useState } from 'react';
import { useNavigation } from '@react-navigation/native';
const HomeScreen = () => {
const [message, setMessage] = useState('');
const navigation = useNavigation();
const goToMessageScreen = () => {
navigation.navigate('Message', {
message,
});
};
return (
<View style={styles.container}>
<Text style={styles.title}>GeeksforGeeks</Text>
<TextInput
placeholder="Enter your message here"
value={message}
onChangeText={(text) => setMessage(text)}
style={styles.input}
/>
<Button title="Submit"
onPress={goToMessageScreen} color="green" />
</View>
);
};
export default HomeScreen;
const styles = StyleSheet.create({
container: {
flex: 1,
backgroundColor: '#fff',
alignItems: 'center',
},
title: {
fontSize: 40,
fontWeight: 'bold',
color: 'green',
marginTop: 50,
},
input: {
width: '75%',
padding: 10,
marginTop: 20,
color: '#000',
},
});
|
Step 2: Open the MessageScreen.js file and write below code in that file.
In this file, we will receive value from HomeScreen through route. Later on, we will display that value in a Text component on the screen.
MessageScreen.js
import { StyleSheet, Text, View } from 'react-native';
import React from 'react';
import { useRoute } from '@react-navigation/native';
const MessageScreen = () => {
const route = useRoute();
return (
<View style={styles.container}>
<Text style={styles.title}>{route.params.message}</Text>
</View>
);
};
export default MessageScreen;
const styles = StyleSheet.create({
container: {
flex: 1,
backgroundColor: '#fff',
alignItems: 'center',
justifyContent: 'center',
},
title: {
fontSize: 25,
fontWeight: 'bold',
color: 'green',
marginTop: 50,
},
});
|
Step 3: Open the App.js file and write below code in that file.
App.js is the main file that renders first when you run your app. In this file, we will create a stack navigator. NavigationContainer will contain HomeScreen and MessageScreen so that we can navigate between them.
App.js
import { useState } from 'react';
import { NavigationContainer } from '@react-navigation/native';
import { createNativeStackNavigator } from '@react-navigation/native-stack';
import HomeScreen from './HomeScreen';
import MessageScreen from './MessageScreen';
const Stack = createNativeStackNavigator();
export default function App() {
return (
<NavigationContainer>
<Stack.Navigator
screenOptions={{
headerStyle: {
backgroundColor: 'green',
},
headerTintColor: '#fff',
}}>
<Stack.Screen name="Home" component={HomeScreen} />
<Stack.Screen name="Message" component={MessageScreen} />
</Stack.Navigator>
</NavigationContainer>
);
}
|
Output:

Passing values between screens
Like Article
Suggest improvement
Share your thoughts in the comments
Please Login to comment...