How to move an image with the mouse in PyGame?
Last Updated :
26 Nov, 2021
Pygame is a Python library that is used to create cross-platform video games. The games created by Pygame can be easily run through any of the input devices such as a mouse, keyboard, and joystick. Do you want to make a game that runs through mouse controls? Don’t you know how to move the image with the mouse in it? Don’t worry, what you need to do is to declare the two values, i.e., running and moving. Once declared values, set what your app should do when it is in running state. Read the article given below to know more in detail.
Approach:
Step 1: First, import the library pygame.
import pygame
from pygame.locals import *
Step 2: Now, take the colors as input that we want to use in the game.
color_1 = #RGB value of color 1
color_2 = #RGB value of color 2
color_n = #RGB value of color n
Step 3: Then, construct a GUI game.
pygame.init()
Step 4: Further, set the dimensions of your GUI game.
w, h = #Width dimension, #Height dimension
screen = pygame.display.set_mode((w, h))
Step 5: Next, take the image as input which you want to move with the mouse
img = pygame.image.load('#Enter the image')
img.convert()
Step 6: Moreover, you can make your image look attractive by adding rectangle borders around it.
rect = img.get_rect()
rect.center = w//2, h//2
Step 7: Later on, set the running value for running the game and moving value for moving the image.
running = True
moving = False
Step 8: Set the things which you want your app to do when in running state.
while running:
   for event in pygame.event.get():
- Step 8.1: Once the app is in a running state, make it quit if the user wants to quit.
       if event.type == QUIT:
           running = False
- Step 8.2: In case, the user doesn’t want to quit, move your image around the dimensions of the GUI app.
       elif event.type == MOUSEBUTTONDOWN:
          if rect.collidepoint(event.pos):
              moving = True
- Step 8.3: Next, set the moving value as False if you want to move the image only with the mouse click else set moving as True if you want to move the image without the mouse click.
       elif event.type == MOUSEBUTTONUP:
           moving = False
- Step 8.4: Further, set your image in a moving state if it has been once moved.
       elif event.type == MOUSEMOTION and moving:
           rect.move_ip(event.rel)
Step 9: Next, you need to set the screen color and image on the screen.
   screen.fill(YELLOW)
   screen.blit(img, rect)
Step 10: Further, make your image look attractive by constructing the border to the image.
pygame.draw.rect(screen, BLUE, rect, 2)
Step 11: Furthermore, update the changes done in the GUI game.
pygame.display.update()
Step 12: Finally, quit the GUI game.
pygame.quit()
Below is the implementation.
Python
import pygame
from pygame.locals import *
YELLOW = (255, 255, 0)
BLUE = (0, 0, 255)
pygame.init()
w, h = 640, 350
screen = pygame.display.set_mode((w, h))
img = pygame.image.load('geek.jpg')
img.convert()
rect = img.get_rect()
rect.center = w//2, h//2
running = True
moving = False
while running:
for event in pygame.event.get():
if event.type == QUIT:
running = False
elif event.type == MOUSEBUTTONDOWN:
if rect.collidepoint(event.pos):
moving = True
elif event.type == MOUSEBUTTONUP:
moving = False
elif event.type == MOUSEMOTION and moving:
rect.move_ip(event.rel)
screen.fill(YELLOW)
screen.blit(img, rect)
pygame.draw.rect(screen, BLUE, rect, 2)
pygame.display.update()
pygame.quit()
|
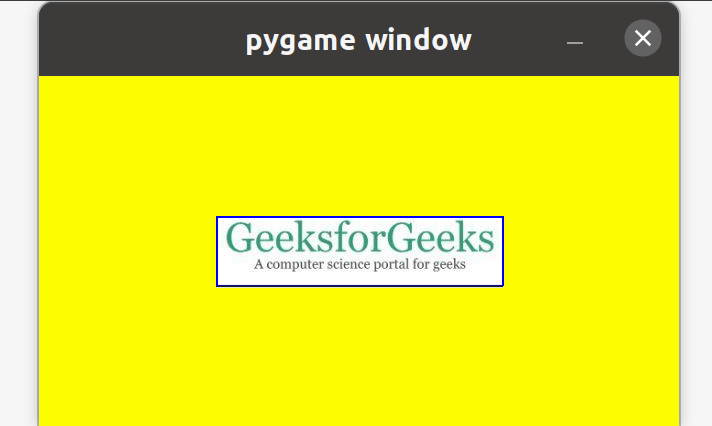
Output:
Like Article
Suggest improvement
Share your thoughts in the comments
Please Login to comment...