How to Install Verilog HDL on Linux?
Last Updated :
04 Apr, 2022
Verilog which stands for Verify Logic. It is widely used in programming Hardware Devices, with the increase in demands of System Of Chips and hardware devices Verilog HDL has grown in larger popularity. In Verilog, the designing and verifying of the Digital Devices at the RTL level abstraction has become less complex. Understanding Verilog is as same as C programming as it has most of the syntax similar to it.
With the increase in demand for VLSI, the designs of chips have grown in numbers. In the initial days, it was difficult to synthesize the logic and debug the code. Thus Hardware Description Language came into existence. The latest Verilog HDL standard has made a significant to HDL programming by making the design logically synthesizable and easy to debug. Now we shall write our first Verilog program and install Verilog in Linux Kernel.
Installation Verilog HDL On Linux
Icarus Verilog is a Verilog simulation and synthesis tool. Using this tool it operates as the Verilog compiler in a specific target format. This compiler can generate an intermediate form called vvp assembly for batch simulation and this intermediate form is executed with the help of “vvp” command. For synthesis, the compiler generates netlists in the desired format.
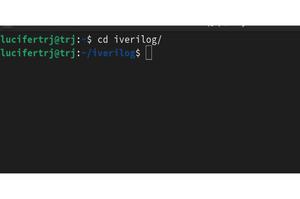
Step 1: Clone Icarus Verilog Repository Locally. Clone Icarus Verilog Repository: git clone https://github.com/steveicarus/iverilog.git. Once you clone the repository a directory is created with the name iverilog now use the cd command to change the present working directory.
git clone https://github.com/steveicarus/iverilog.git
cd iverilog
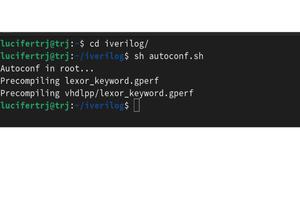
Step 2: Configure Files. Once you are inside the iverilog directory, there are very few steps to configure. To configure the iverilog in your local repository run the following command.
sh autoconf.sh
If you run into an error then it means autoconf is not been installed in your system. Install autoconf by entering the following command.
Fedora: sudo dnf install autoconf
Ubuntu: sudo apt-get install autoconf
The successful configure message looks like this:
Autoconf in root…
Precompiling lexor_keyword.gperf
Precompiling vhdlpp/lexor_keyword.gperf
And then configure the files to update the default settings.
./configure
Now you are ready to work.
Step 3: Install iverilog and GTKWave. Once you configure the default setting, get into the root directory and run the make install command. But before that make sure you have GCC, g++, bison, and flex installed. Since Verilog is been created using C programming: g++, gcc, flex and bison should be installed in order to compile and run the iverilog code. If you don’t have gcc, g++, bison, and flex run these commands.
//sudo apt-get install package_name in ubuntu
sudo dnf install flex
sudo dnf install gcc
sudo dnf install bison
sudo dnf install g++
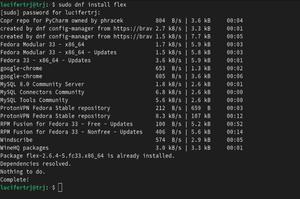
Once you have these essentials installed proceed to make the installation.
sudo su
make install
sudo dnf install iverilog
sudo dnf install gtkwave
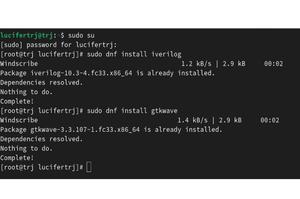
The iverilog is installed successfully, now let’s write Verilog code and run it.
Compile And Run Verilog Code
We will be writing a simple And Gate Code of both design and simulation. Make sure you save Verilog with the .v extension. The truth table is:
| a |
b |
out |
| 0 |
0 |
0 |
| 0 |
1 |
0 |
| 1 |
0 |
0 |
| 1 |
1 |
1 |
First, create a file name as dut.v which is our design under the test code block. We start with defining a module name starting with a module keyword module. We pass a port list as the argument for the module name. Using data flow abstraction modeling.
//dut= save in dut.v
module and_gate(out,a,b);
input a,b;
output out;
assign out = a & b;
//and a1(out,a,b); for gate level abstraction
endmodule
Next, write the testbench or Simulation code. Simulation is to verify the design block by providing input to it.
//testbench for and gate
module tb;
reg A, B; //input assigned to register
wire out; //output assigned to net
//instantiate dut
and_gate dut(out,A,B);
initial
begin
A = 0; B = 0;#10
$display(“A=%b B=%b Output=%b”,A,B,out);
A = 0; B = 1;#10
$display(“A=%b B=%d Output=%b”,A,B,out);
A = 1; B = 0;#10
$display(“A=%b B=%b Output=%b”,A,B,out);
A = 1; B = 1;#10
$display(“A=%b B=%b Output=%b”,A,B,out);
$finish;
end
endmodule
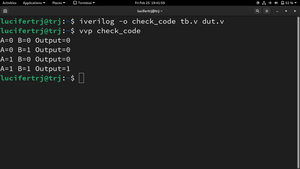
The following syntax is used to compile and run the Verilog code:
//to compile:
iverilog -o check_code tb.v dut.v
//to run:
vvp check_code
Output:
You can verify output by referring to the truth table
Like Article
Suggest improvement
Share your thoughts in the comments
Please Login to comment...