How to Install Pillow on MacOS?
Last Updated :
22 Sep, 2021
In this article, we will learn how to install Pillow in Python on MacOS. Python Imaging Library (expansion of PIL) is the de facto image processing package for Python language.
Installation:
Method 1: Using pip to install Pillow
Follow the below steps to install the Pillow package on macOS using pip:
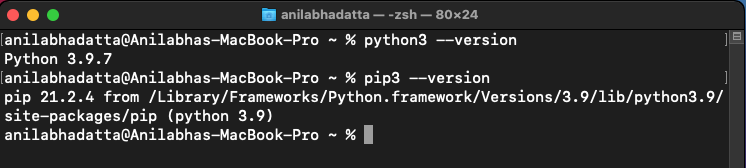
Step 1: Install the latest Python3 in MacOS
Step 2: Check if pip3 and python3 are correctly installed.
python3 --version
pip3 --version
Step 3: Upgrade your pip to avoid errors during installation.
pip3 install --upgrade pip

Step 4: Enter the following command to install Pillow using pip3.
pip3 install Pillow

Method 2: Using setup.py to install Pillow
Follow the below steps to install Pillow package on macOS using the setup.py file:
Step 1: Download the latest source package of Pillow for python3 from here.
curl https://files.pythonhosted.org/packages/90/d4/a7c9b6c5d176654aa3dbccbfd0be4fd3a263355dc24122a5f1937bdc2689/Pillow-8.3.2.tar.gz > pillow.tar.gz

Step 2: Extract the downloaded package using the following command.
tar -xzvf pillow.tar.gz

Step 3: Install homebrew and run the following commands to install the dependencies.
brew install libtiff libjpeg webp little-cms2
brew install freetype harfbuzz fribidi


Step 4: Go inside the folder and Enter the following command to install the package.
Note: You must have developer tools for XCode MacOS installed in your system
cd Pillow-8.3.2
python3 setup.py install

Verifying Pillow installation on macOS:
Make the following import in your python terminal to verify if the installation has been done properly:
import PIL

If there is any error while importing the module then is not installed properly.
Like Article
Suggest improvement
Share your thoughts in the comments
Please Login to comment...