How to Install MySQL on Linux?
Last Updated :
18 Mar, 2024
MySQL is an open-source relational database management system that is based on SQL queries. Here, “My” represents the name of the co-founder Michael Widenius’s daughter and “SQL” represents the Structured Query Language. MySQL is used for data operations like querying, filtering, sorting, grouping, modifying, and joining the tables present in the database.
In this article, we will are going to download and install MySQL on Linux and will verify MySQL installation by creating a database. But Before that Let’s see some features of MySQL.
Feature of MySQL
MySQL is the most popular RDBMS, It offers various features like:
- It is easy to use and free of cost to download.
- It contains a solid data security layer to protect important data.
- It is based on client and server architecture.
- It supports multithreading which makes it more scalable.
- It is highly flexible and supported by multiple applications.
- MySQL is fast, efficient, and reliable.
- It is compatible with many operating systems like Windows, MacOS, Linux, etc.
Read more: MySQL and its working
Steps to Install MySQL on Linux
For almost every Linux system, the following commands are used to install MySQL:
Installing MySQL on Linux using Terminal
Step 1: Open terminal using Ctrl+Alt+T. Now copy and paste the following command in the terminal to install MySQL in Linux.
sudo apt install mysql-server

Then give your password and hit ENTER.
Step 2: Press “y” to continue.
.jpg)
It will take some time to download and install MySQL in Linux.
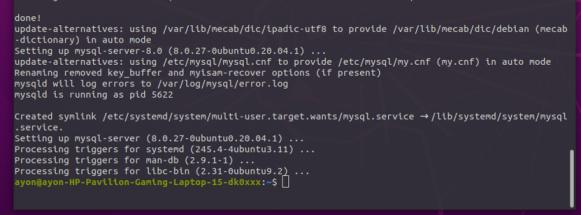
Verify MySQL Installation
Step 3: To verify the MySQL installation or to know the version enter the following commands in your Terminal.
mysql --version
.jpg)
Protecting and Securing MySQL
Step 4: Now we will set the VALIDATE PASSWORD component.
sudo mysql_secure_installation
.jpg)
Step 5: Then press “y” to set the password. Next press “0” for the low-level password or choose as you want to set the password.
.jpg)
Step 6: Create a password. Then Re-enter the password, then to continue press “y”.
.jpg)
Now the whole setup is done. Hence, MySQL installaion is successfully done!
.jpg)
Start Using MySQL
To get started with MySQL, type the following command to go to the root directory.
sudo mysql -u root
Let’s create a database using the following two commands:
Command 1: create database database_name;
.jpg)
Command 2: show databases;
.jpg)
Hence, we have successfully created a database using create database command. You are now ready to start using MySQL. MySQL is the best relational database that will keep all your data secure. Many Companies use MySQL because of its solid data security and is supported by multiple applications. So Install MySQL in Linux now and learn SQL in 30 Days – From Basic to Advanced Level!
Also Read
Like Article
Suggest improvement
Share your thoughts in the comments
Please Login to comment...