How to install MongoDB on MacOS
Last Updated :
17 Apr, 2024
MongoDB is an open-source document-oriented database. It is categorized under the NoSQL(Not only SQL) database because the storage and retrieval of data in the MongoDB are not in the form of tables. This is the general introduction to MongoDB and now we learn how to install MongoDB on MacOS.
You can install MongoDB using two different methods:
- Using .tgz tarball
- Using Homebrew.
Here, we will learn how to install MongoDB using .tgz tarball. Before learning the installation process, please verify the system requirements mentioned below.
Requirements to Install MongoDB on MacOS
- macOS 11 (Big Sur) or later is recommended.
- A 64-bit processor (x86_64 architecture) is required.
- The account running Mongod has read and write permissions for data and log directories.
Steps to Install MongoDB on MacOS Using .tgz tarball
To install MongoDB on MacOS, first download the MongoDB, and then setup the command line. Check the steps below, that explain the strep-by-step installation process for MongoDB.
Download MongoDB
Step 1: Go to MongoDB Download Center to download MongoDB Community Server.
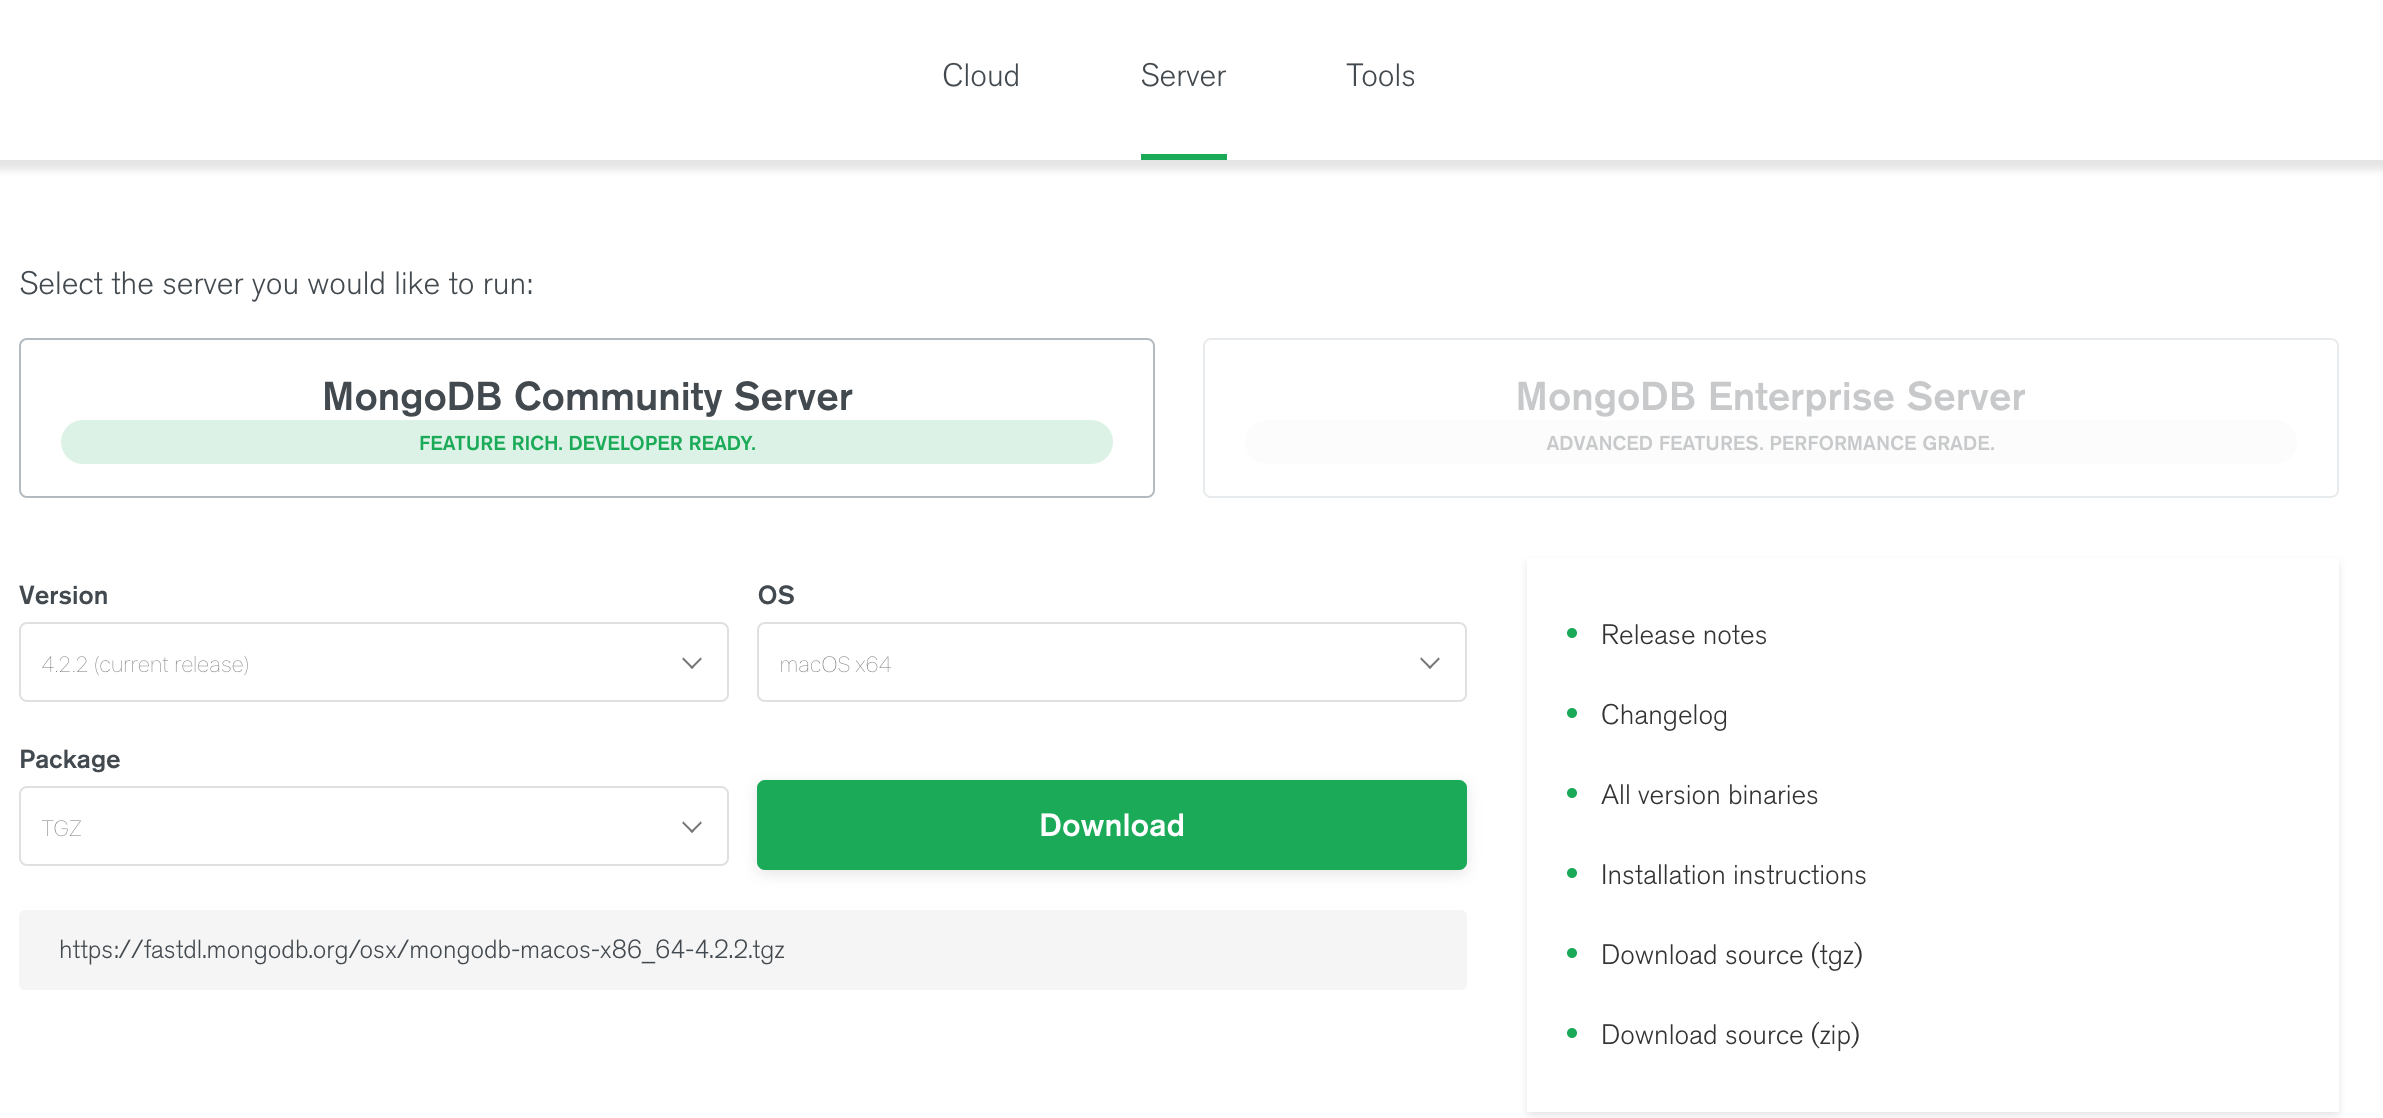
Here, You can select any version, OS, and package according to your requirement. For macOS we need to choose:
- Version: 4.2.2
- OS: macOS x64
- Package: TGZ
Step 2: When the download completes, you will get a TGZ file( with extension .tgz). Now, extract this file to wherever the location you want in your system. Like, as shown in the below image.:

Here, the bin folder is the most important folder which contains all the MongoDB related executables like mongo for command-line interface to interact with the database, mongod is a database, mongodumps is used for creating a binary export of the contents of a database, etc.
Setting Command Line Interface (mongo Shell)
Step 3: Now to run mongo shell we need to set an environment variable or path. You can set your path in .bash_profile file If you are using Mojave OS or below, or you can set your path in .zprofile file if you are using Catalina or above. If you do not have .bash_profile or .zprofile, then you can create them using the following two ways:
- Simply open Text Editor and save a file with a name .bash_profile or .zprofile in your home directory. This file is hidden in your home directory if you wish to see them then press command + shift + . in finder(in the Home).
- You can also create them in the terminal by using the following commands:
- Go to home directory: cd ~/
- Create a new file: touch .bash_profile or touch .zprofile
- Opening these files for editing in TextEdit: open -e .bash_profile or open -e .zprofile
- Read updated file: source ~/.bash_profile or source ~/.zprofile
After creating or getting .bash_profile or .zprofile set your path. Like, as shown in the below image:

Here, “/Users/anki/mongodb-macos-x86_64-4.2.2/bin” is the path where the .tgz file is extracted and “:$PATH” allows to run the paths(other than MongoDB) presents in the .bash_profile or .zprofile. After entering the path in the .bash_profile or .zprofile save that file and then the terminal read the updated path using the source command.
Important Point: For Catalina users when you run mongo or mongo –nodb command in your terminal, your macOS would not allow to run mongo. So, to run mongo you need to give them permission manually i.e,
System Preferences > Security & Privacy > Allow Anyway
Same procedure to run mongod.
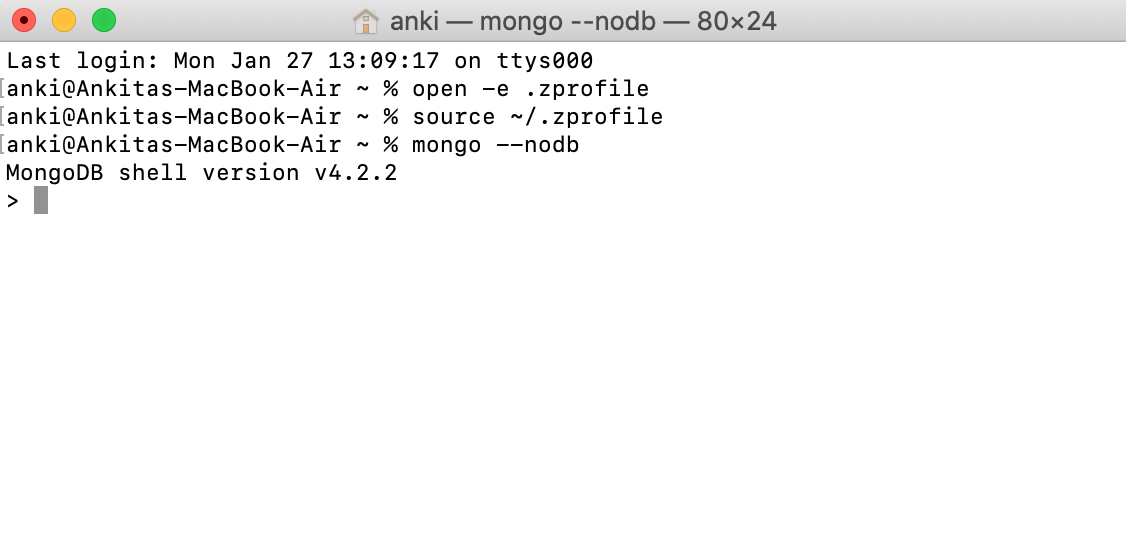
After setting up the command-line interface (mongo Shell) of MongoDB when you try to start mongo Shell, it will look like as shown in the below image, here the connections are failing because we do not have a database server(i.e, mongod). To run mongo Shell you need a MongoDB server, i.e, mongod which will run locally on our system.

Setting Database Server (mongod)
Step 4: Before running mongod first we will create a folder or directory which will store all the data processed by the mongod. Or in other words, we will create a data directory in which mongod process will write data.
Important Point: For those who are using macOS Mojave or below they are allowed to use MongoDB default data directory of /data/db. But those who are using macOS Catalina or above are not allowed to use MongoDB default data directory of /data/db because Apple restricted access so, you need to create a different data directory and you are allowed to keep that directory wherever you want in your system. Or in other words, Catalina users are not able to use /data/db as a database folder instead of this you can use a non-root path like ~/data/db. Like, as shown in the below image.
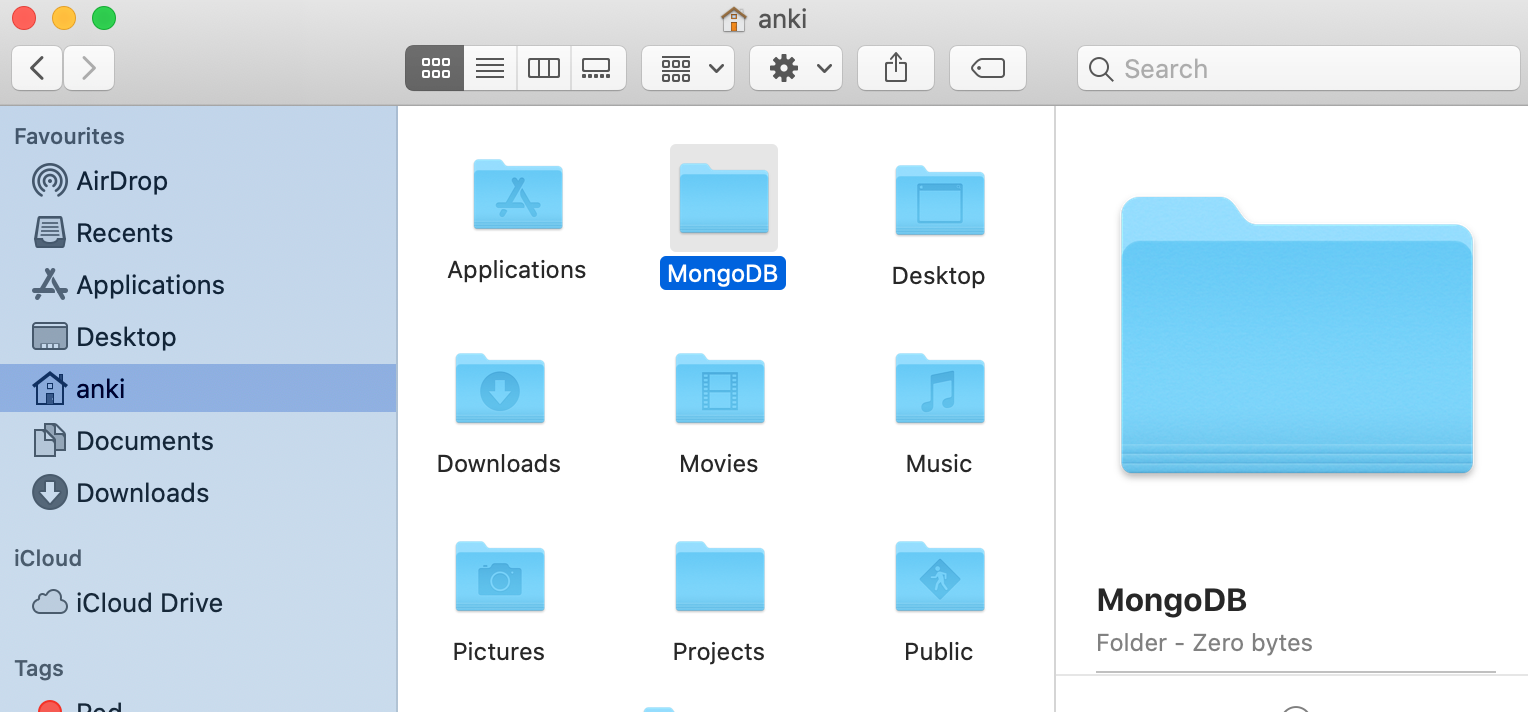
Here, MongoDB is the data directory where the mongod writes the data.
Step 5: Now we are going to run mongod with its data directory path. Here, mongod is the database server provided by the MongoDB. To start mongod you can use one of the following commands:
 mongod --dbpath /data/db
Or
sudo mongod --dbpath /data/db
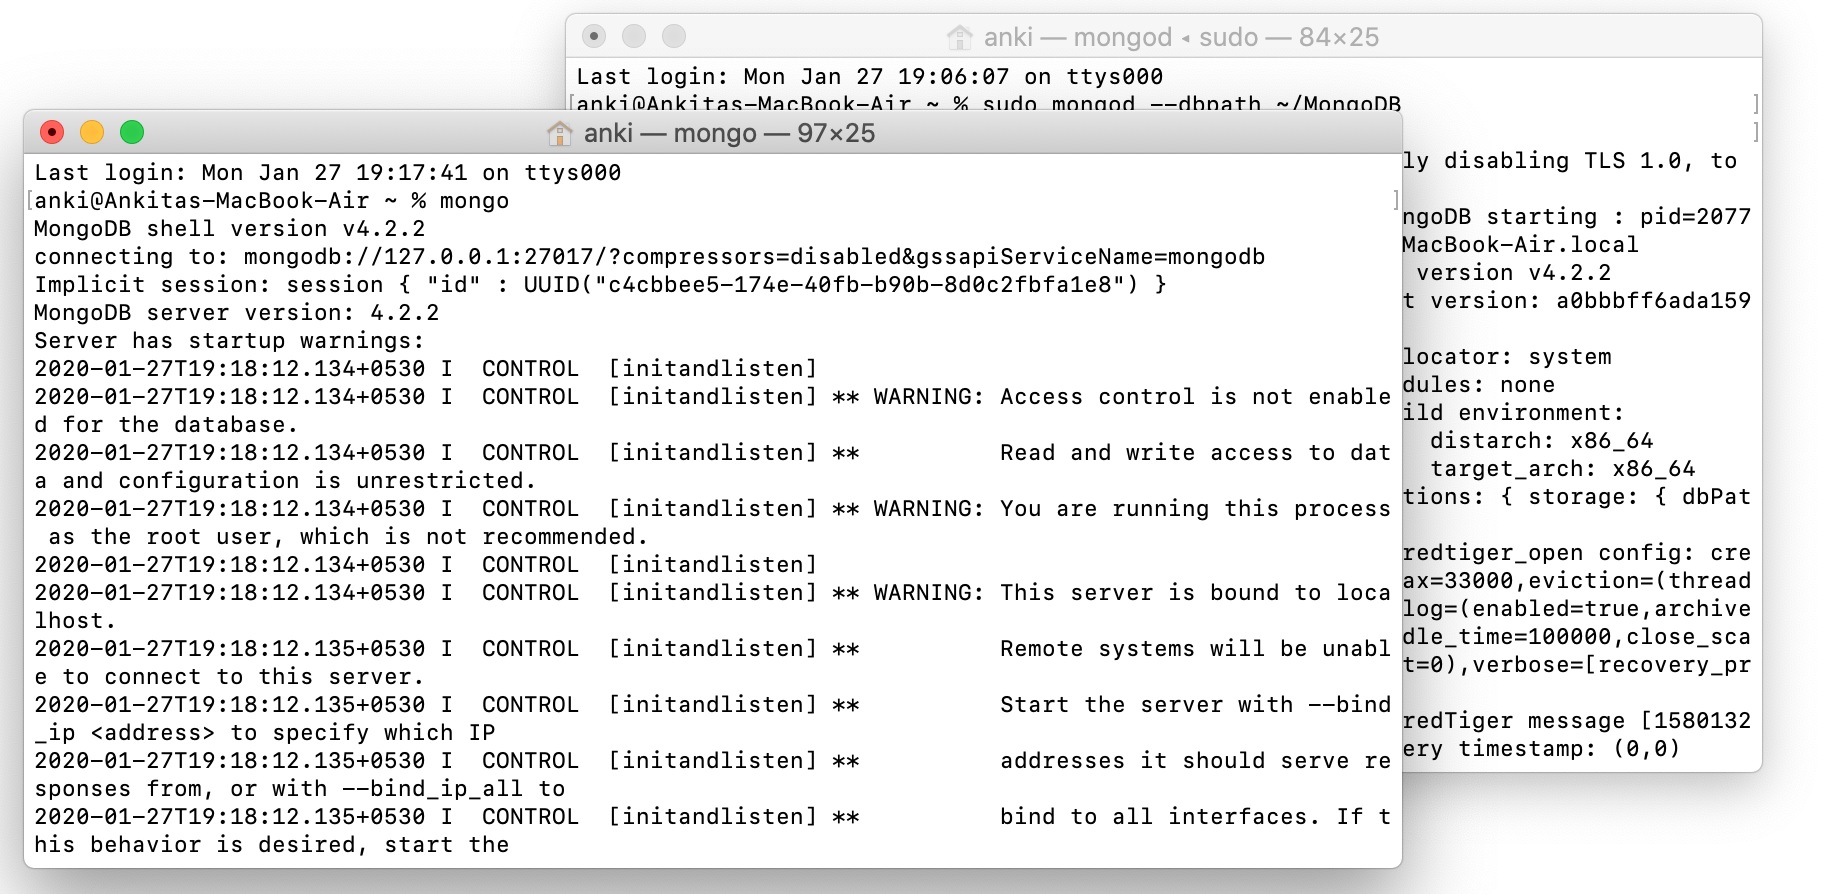
Here, sudo command means allow to give all the permissions to start the database. Like, as shown in the below image:

Here, sudo mongod –dbpath ~/MongoDB command to start mongod server and ~/MongoDB is data directory.
Run mongo Shell
Step 6: Now we are going to connect our server (mongod) with mongo shell. So, keep that mongod terminal window and open a new terminal window and write mongo and now our mongo shell will successfully connect to the mongod.
Important Point: Please do not close the mongod terminal window if you close this terminal window your server will stop working and you will not connect to the mongo shell.
Now, you are ready to write queries in the mongo Shell.
Also Read
Like Article
Suggest improvement
Share your thoughts in the comments
Please Login to comment...