How to Install Magento2 on Windows?
Last Updated :
01 Nov, 2022
Magento is a powerful open-source e-commerce web application written in PHP. It was developed by Magento, inc 31 march 2008. Magento was built using the Zend framework, it uses entity attribute value(EAV) database model to store value and there is an only free version available by the Magento community edition. Magento provides the power to manage e-commerce stores by providing incorporate working with resources like categories, products, and sales orders. Magento is a highly flexible and customizable framework.
Installation of Magento2
There are two ways we can install magento2:
- Using Wamp Server: WampServer refers to a software stack for the Microsoft Windows operating system, created by Romain Bourdon and consisting of the Apache web server, OpenSSL for SSL support, MySQL database and PHP programming language.
- Using Xampp Server: XAMPP is an abbreviation for cross-platform, Apache, MySQL, PHP, and Perl, and it allows you to build Magento site offline, on a local web server on your computer. This simple and lightweight solution works on Windows, Linux, and Mac – hence the “cross-platform” part.
So, to install Magento2 on our machine, we need to first install Xampp or Wamp Server. Following are the steps for the installation process:
Step 1: Magento can be downloaded from its official site magento.com
Note: Download the latest version, here we have used Magento-CE-2.3.4-2020-01-16-11-19-26.zip
Step 2: After the download is over, Go to the C:\xampp\htdocs and past CE-2.3.4-2020-01-16-11-19-26.zip file.
Note: If you are using Wamp Server then go to the C:\Wamp\www and past and CE-2.3.4-2020-01-16-11-19-26.zip file.
Step 3: Then right click on CE-2.3.4-2020-01-16-11-19-26.zip file. And select the extract to CE-2.3.4-2020-01-16-11-19-26.zip file.
Step 4: Then wait for the extraction of file.
Step 5: After file Full(100%) extraction rename the file. Rename your File name Magento.
Step 6: Go to the C:\xampp\htdocs\Magento\vendor\magento\framework\View\Element\Template\File and then open the Validator.php
Note: If you are using Wamp Server then go to the C:\Wamp\www\Magento\vendor\magento \framework\View\Element\Template\File and then open the Validator.php
Step 7: Then find the protected function isPathInDirectories($path, $directories) {……..}
And replace with below code.
protected function isPathInDirectories($path, $directories)
{
    if (!is_array($directories))
    {
        $directories = (array)$directories;
    }

    $realPath = $this->fileDriver->getRealPath($path);
    foreach ($directories as $directory)
    {
        $directory=$this->fileDriver->getRealPath($directory);
        if (0 === strpos($realPath, $directory))
        {
            return true;
        }
    }
    return false;
}
Note: After installation your admin panel is displayed properly. That’s why we can add this code.
Step 8: Now, go to the C:\xampp and open Xampp-control and then 1st start the Apache and after start Apache and then start the MySQL.
Step 9: now, open the Google chrome and write a path localhost: 80/phpmyadmin /
Step 10: After then, create a blank database and give the name is magento (here magento is your database name)
Step 11: now open Google chrome and write localhost: 80/Magento/ (Open for client side).
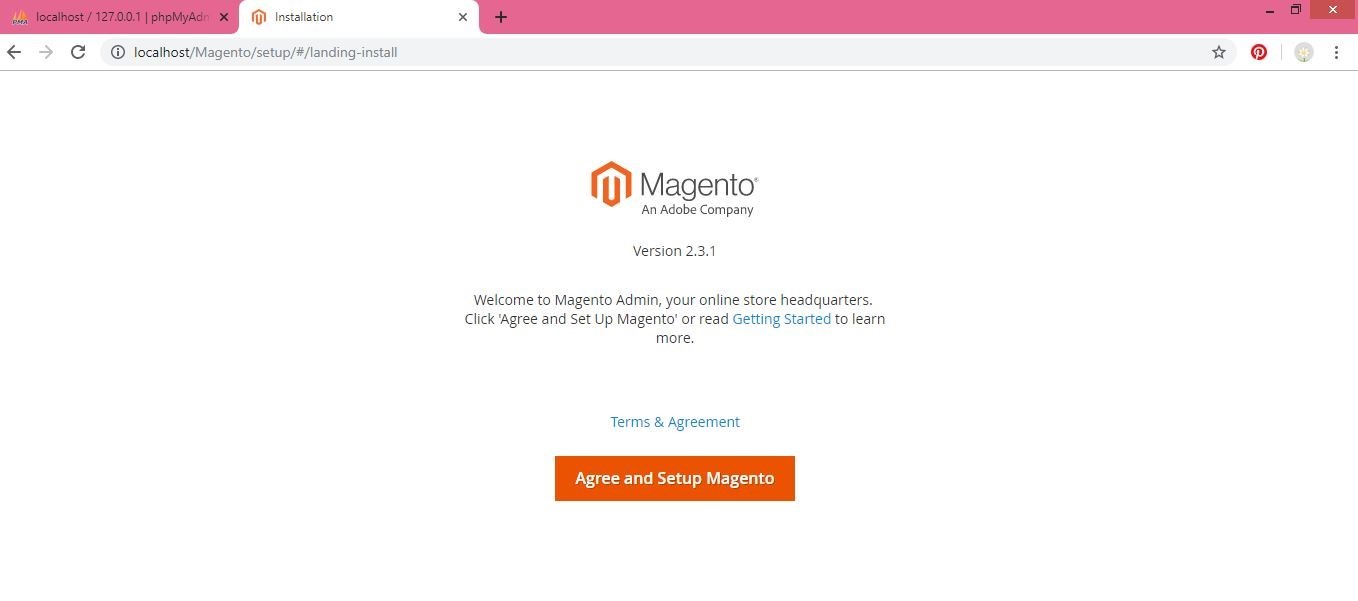
Step 12: After Click on Agree and Setup Magento button. Then you can see below screen Click on Readiness Check

Note: If Some kinds of error display then go to the C:\xampp\php\php.ini Then after remove the comment on ;entension=soap ;entension=xsl ;entension=intl ;entension=socket Here comment is (; semicolon) so, just remove the semicolon and then after save and close file. Then after refresh your url link.
Step 13: Then click on Next button
Step 14: Fill your database information.

Step 15: Check your store address properly.

Step 16: Just Click on Next

Step 17: Here you can give the Email, Username and Strong Password. For Example: Username: admin and Password: Magento2@
Note: Password must be One Latter Uppercase, lowercase and numeric and at least add one Symbol.
Step 18: Then click on Install Now Button.

Step 19: After installation successfully, you can see the Store Address and Magento Admin Address
Note:
- Store Address (which means client side) Google chrome and write a path localhost: 80/ Magento
- Magento Admin Address (which means admin side) Google chrome and write path localhost: 80/ Magento/admin
Step 20: Now, open the Google chrome and write a path localhost:80/phpmyadmin/ [And see your magento database is full of tables.]
Like Article
Suggest improvement
Share your thoughts in the comments
Please Login to comment...