Pre-requisites: Windows OS, Docker
Before understanding the concept of Docker, let’s first discuss the concept of Hypervisors. So in an IT Company, or any cooperate, there is a development team, a testing team, and an operation team for developing the application, testing it, and deploying it. Now suppose the developers are working on a different OS, for example, let’s say macOS, and they used some dependencies or libraries as per the language they are using, so they just won’t hand the software to the testing team, but also the libraries, but now, the application didn’t run o the tester’s machine, but it worked on the developer’s machine, maybe because the tester’s machine has different OS features than the developer’s one, so now, devs have to send the OS, but that is not practically possible, as one can’t just copy the C drive and hand it over, that’s where the concept of Hypervisors comes into the picture, think of this as a virtual machine or Wim-ware, so you have the physical hardware, you host an OS on it, and the OS can now host another OS also called Guest OS, and this guest OS can be packed and send to the testing team.
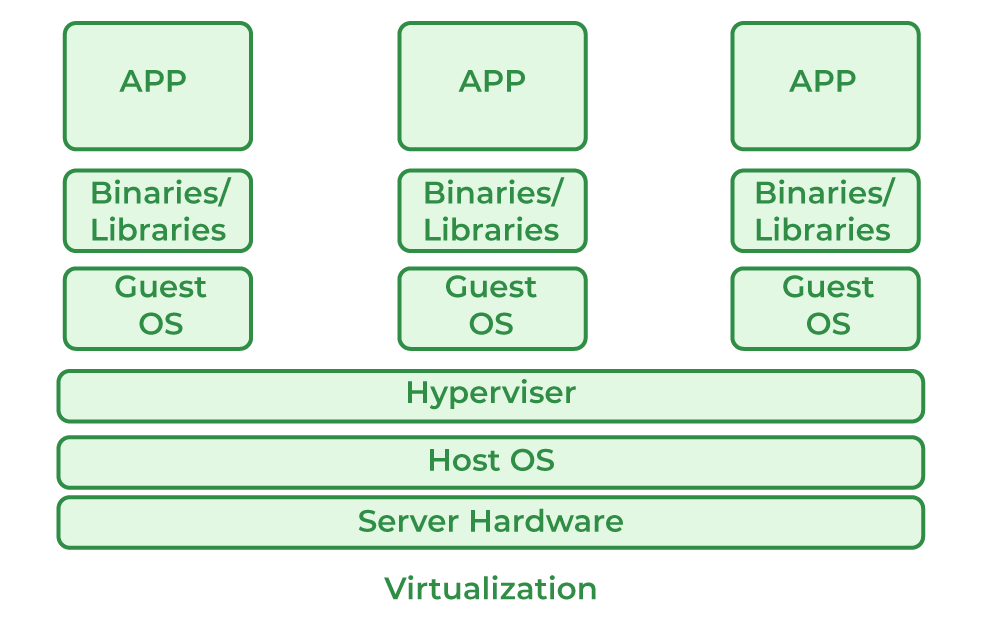
But the problem here is, for every application, one needs a different OS, this will result in a waste of resources as multiple OSs will be running. So for this problem, we have the concept of Containers, the difference between Hypervisors and containers is that we don’t need multiple OS for every application, multiple applications can share the same OS kernel, great isn’t it? So instead of installing HYPERVISOR, we will be installing Docker.
What is Docker?
Docker is an open-source platform where we run our applications in the form of containers. Docker containers are very light in weight and contain all the dependencies and configurations so we can run them across different computing environments. Developers can package all the dependencies of the application in the form of images it can be portable easily or shared easily with other developers without worrying about the underlying OS.
Requirements
- Windows 11 64-bit: Home or Pro version 21H2 or higher, or Enterprise or Education version 21H2.
- Windows 10 64-bit: Home or Pro version 21H2 or higher, or Enterprise or Education version 21H2.
- 4GB RAM or Higher.
- Hyper V feature must be enabled in Windows.
Specifications
- RAM: The minimal amount of Memory needed to run containers smoothly is 4GB, however, if a program has more complicated functions, it will need more than 6 GB RAM.
- Storage: For running the containers and installation of docker the minimum space required is 25GB. If you want to store the container images and data then we need at least more than 35 GB to 40 GB.
- Network: To download, push and pull the images we need active internet then only we can maintain the container images with the help of docker.
- CPU: At least a 64-bit processor is required for docker.
Docker can be run on a laptop with 4 GB of Memory, a 64-bit processor, and 25 GB of storage. It might change based on our use cases.
Step-By-Step Docker Installation On Windows
Follow the below steps to install and configure Docker on Windows:
Step 1: For installation of Docker, go to your favorite browser(chrome will be used here, but it can be done by using any browser). In the search bar, type Docker download. And click on the first link that appears.
Step 2: After clicking the link, choose your OS, be it Windows, MAC, or Linux for installation.
Step 3: The download will start, and based on your internet speed, it will take some time to do so. To know more about docker desktop installation visit Docker Desktop.
Start Docker Desktop Tool
Step 1: After installation, it will look something like this in Windows:
- Open the Docker Desktop.
- Accept the Docker Subscription Service Agreement window. and click On continue. Docker Desktop will start after we accept the terms and conditions.
Step 2: After clicking Ok the installation will start.
Step 3: After installation, it will show something like the below:
Step 3: After installation, we need to restart our PC and install WSL 2, which stands for Windows Setup for LINUX. It is a compatibility layer for running Linux binary executables natively on Windows 10. Please follow the next few instructions carefully. After restarting, the following dialog box will appear, then click on the Stop Docker button there.
Step 4: After clicking, we need to enable the Hyper-V, for that we will restart the PC and go to BIOS setup, Settings>Update and Security>Recovery>Advanced Setup>Device Configuration. After that, if the option Enable Turbo Boost on DC. is unmarked, mark it, after it, save, and exit.
Step 5: Afterward, in the last step, go to Control Panel> Turn Windows Features on and off. Then for activating Hyper-V, mark the Hyper-V and Windows Hypervisor Platform.
At this point, you have successfully installed and configured Docker on your Windows machine.
How To Install From The Command Line?
To install the Docker desktop, follow the procedures listed below.
Step 1: Run the following command in the Command prompt.
start /w "" "Docker Desktop Installer.exe" install
Step 2: Add user account into docker user groups.
net localgroup docker-users <users>/add
Verification
Verify the docker installation and versions,
1. Run the following command in the command prompt to check the docker version.
docker --version
2. After that we will receive a Beta invitation email When you start docker for the first time.
How To Install Docker On Windows 10?
You must perform the following steps in order to install Docker on Windows 10:
Step 1: In this step, we must assure that our Windows can support Docker the minimum requirement is Docker requires 64-bit Windows 10 Pro.
Step 2: You can download the docker by using this link “https://www.docker.com/products/docker-desktop”.
Step 3: Once the installation is finished go to the start menu and open Docker Desktop. Enable Hyper-V and Windows Subsystem for Linux features after enabling Docker Desktop will automatically restart. After restarting you can open the Docker Desktop and start using it.
Step 4: To test whether the Docker Desktop is installed or not open the command prompt or PowerShell window and run try to pull the sample image for example Nginx if the image is pulled then the Docker installation in Windows was completed successfully completed.
How To Install Docker On Windows 11?
First, make sure that your Windows matches Docker’s requirement Docker requires 64-bit Windows 11 Pro, and the rest all the steps are the same as Windows 10.
How To Update The Docker In Windows?
By following the steps mentioned below we can update our Docker:
Step 1: Open the Docker Desktop from the start menu.
Step 2: Click on the settings and click on the “resource” tab there we can find an option called “Check for Updates.”Docker Desktop will check for any available updates.
Step 3: If any update is available Docker will show us like “Download and Install” Directly click on it Docker Desktop will automatically download it after completion of installation you can the Docker version by using the following command in the command prompt or PowerShell window.
docker version
Advantages of Docker In Windows
- Docker for Windows allows developers to their applications easily on any Windows.
- Docker can be installed very easily on Windows.
- Docker containers can be moved in between Windows and Linux without changing the Source code.
- The application is isolated from the underlying OS which makes it more secure.
Uninstall Docker Desktop Tool
To uninstall the Docker Desktop follow the steps mentioned below.
- Find “Add or Remove Programs” in the start menu and choose it.
- Click Docker Desktop when you see Docker in the list of installed programs.
- When you click on uninstall in Docker Desktop, be sure to follow the steps that appear.
- After the uninstallation is complete, restart the computer.
How To Install And Enable WSL 2 On Windows
Before installing docker by using WSL 2 make sure your Windows is supported for that and then install and enable WSL2 on your laptop.
Step 1:Enter the following command as an administrator to enable the Windows Subsystem for Linux feature.
dism.exe /online /enable-feature /featurename
:Microsoft-Windows-Subsystem-Linux /all /norestart
Step 2: In this step, you need to enable the virtual machine platform feature to enable it to run the following command in Powershell as an administrator
dism.exe /online /enable-feature /featurename
:VirtualMachinePlatform /all /norestart
Step 3: After running the above command you need to restart your computer by this the virtual machine platform feature will be enabled.
Step 4: Know download and install WSL 2 Linux kernel updated package from the official website of Microsoft
Step 5: Make WSL 2 the standard version. Run the following command when logged in as an administrator in Windows PowerShell.Install a Linux distribution by using the Microsoft Store. You can pick from a variety of Linux distributions, including Kali Linux, Debian, and Ubuntu.
wsl --set-default-version 2
After completing the above steps we can use execute Linux commands on your windows using WSL 2.
How To Install Docker With WSL 2 Backend On Windows?
Utilizing dynamic memory allocation will help the WSL 2 backend consume resources more efficiently. which enables us to launch Docker very quickly and improve Docker’s speed. To make this happen please follow the steps mentioned below.
Step 1: Install and enable WSL 2 on Windows by following the steps outlined in the previous answers. And install Docker Desktop as mentioned above for Windows.
Step 2: Once the Docker Desktop installation is completed open the setting in Docker Desktop click on the resources tab and click on WSL 2 integration. Click “Apply & Restart” to apply the changes.
Step 3: Open a terminal in your WSL 2 distribution and use the following command to confirm that Docker is operational after Docker Desktop has restarted.
docker pull ubuntu
If the image is successfully retrieved, WSL 2 has likely been deployed as a backend for Docker. The WSL 2 backend now allows you to use Docker to construct and manage containers on your Windows computer.
Note: The Docker CLI interacts with the Docker daemon running in the Windows Docker Desktop application when you issue Docker commands in your WSL 2 terminal.
Conclusion
In this article, we covered a step-by-step procedure to install docker in Windows 11 and Windows 10. We also covered how to install docker in Windows 10 and 11 with the help of the Command line. Refer to Install in Mac and Ubuntu to know more about installation in different OSs.
Like Article
Suggest improvement
Share your thoughts in the comments
Please Login to comment...