How to Install Android Studio on Ubuntu?
Last Updated :
04 Apr, 2024
Android Studio is a full-featured cross-platform IDE that helps us to build applications for Android devices. Android Studio is based on JetBrains’ IntelliJ IDEA. This IDE includes everything we need for Android development. Android Studio build system is powered by Gradle allowing you to make multiple build variants for various devices from one project. This article will explain the way to install Android Studio on Ubuntu 20.04. We can use the same instructions for older Ubuntu versions and any Ubuntu-based distribution, including Ubuntu, Linux Mint, and Elementary OS.
Prerequisites: We need to be logged in as a user with sudo access. It will make our system able to install packages on our Ubuntu system.
System Requirements for Installing Android Studio in Ubuntu
These are some important specifications our machine needs to meet:
- 64-bit distribution capable of running 32-bit applications.
- GNU C Library (glibc) 2.19 or later
- A minimum of 3 GB RAM, 8 GB RAM is recommended; plus 1 GB for the Android Emulator.
- The minimum disk space should be 2 GB,
- 4 GB Recommended (1.5 GB for Android SDK and emulator system image + 500 MB for IDE)
- The minimum screen resolution should be 1280×800.
Methods to Install Android Studio on Ubuntu
There are multiple methods to Install Android Studio on Ubuntu as mentioned below:
- From the Ubuntu Software Centre
- Using Snap Tool
- Using Repository
- Using Zip File
Explanation of the Methods and Steps are mentioned below:
1. From The Ubuntu Software Centre
We can easily install Ubuntu software from Ubuntu Software Centre but desired software must exist in the software store. To install Android Studio we can visit the Ubuntu Software Centre and search for Android Studio. Once we found the software easily clicked on the install button. We will get a password prompt to confirm the installation process. Once the installation is completed we will have the Android Studio icon in our application tray. Once it is installed successfully, we can check the final setup section.
When the snap tool is available it becomes too easy to install software packages. We do not have to modify any files or type in any scary commands. But we need to have Snap installed on our machine in the first place.
i). We can install Snap, using the below command:
$ sudo apt-get install snapd
ii). Once the installation of Snap gets successful, we can proceed to install Android Studio with the below command:
$ sudo snap install android-studio
It may take some time, hence we have to wait for some minutes. It should be installed successfully, but for some reason, if it throws an error like this:
error: This revision of snap “android-studio” was published using classic confinement and thus may perform arbitrary system changes outside of the security sandbox that snaps are usually confined to, which may put your system at risk.
iii). Then we have to add the –classic parameter to the command as shown below:
$ sudo snap install android-studio --classic
Once it installed successfully, we can check the final setup section.
3. Install Android Studio Using Repository
There are Steps to Install Android Studio using Repository.
i). Add the PPA(Personal Package Archive)
The first command adds the PPA to system software sources.
sudo add-apt-repository ppa:maarten-fonville/android-studio
ii). Update the package list
Update the package manager list to include the added repository.
sudo apt update
iii). Install Android Studio
Installing Android Studio using the command line in terminal.
sudo apt install android-studio
4. Using the Zip File
Installing Java OpenJDK
To install Android Studio we require OpenJDK version 8 or above to be installed in our system. First, we will install OpenJDK 8. The installation is very simple, steps are mentioned below:
i). We can start by updating the package index:
$ sudo apt update
ii). Now install the OpenJDK 8 package using the below command
$ sudo apt install openjdk-8-jdk
iii). To verify the installation we can use the below command to check the version:
$ java -version
The output will be something like this:
openjdk version "1.8.0_191"
OpenJDK Runtime Environment (build 1.8.0_191-8u191-b12-2ubuntu0.18.04.1-b12)
OpenJDK 64-Bit Server VM (build 25.191-b12, mixed mode)
Downloading Android Studio
To download and install the Android Studio, visit https://developer.android.com/studio. Click on the “Download Android Studio Giraffe” button.
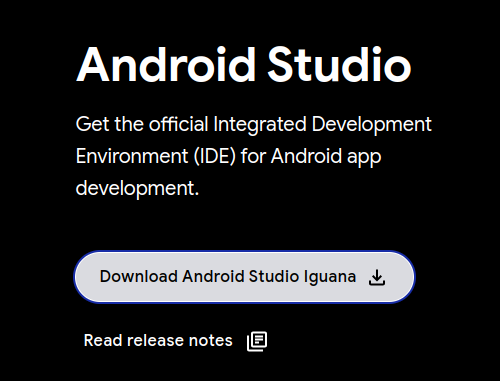
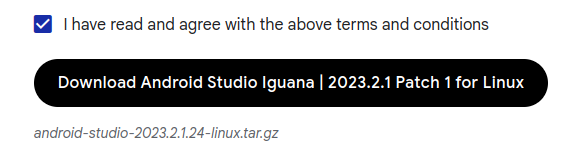
A prompt asking us to accept all the licenses will appear. Scroll to the bottom and accept the license and click on “Download Android Studio Iguana | 2023.2.1 Patch 1 for Linux”.
Note: The version number may vary based on the time of installation
After downloading the zip file, locate it in your file explorer and extract it.
Copy over the extracted folder to /opt/local.
cd /path/to/extracted/folder
sudo cp android-studio/ /opt/local/ -v
Now Android Studio has been installed on our Ubuntu desktop.
Starting Android Studio
Once the Android Studio is installed in the system using snap, we can start Android Studio through our terminal by typing android-studio in our terminal or by clicking on the Android Studio icon.
To start Android Studio when installed using the zip file, run the following command:
/usr/local/android-studio/bin/studio.sh
Tip: To make Android Studio available in your list of applications, select Tools > Create Desktop Entry from the Android Studio menu bar.
When we start Android Studio for the first time, the below window will appear asking us to import Android Studio settings from a previous installation:
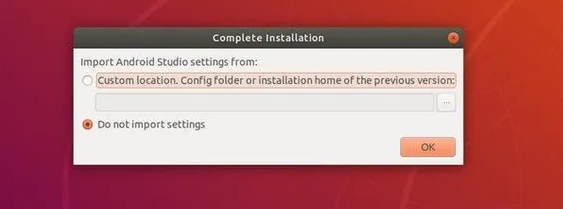
When we click on the OK button, the Setup Wizard window will appear. We have to click on the Next button to start the initial configuration and post-installation steps. Now option to choose the type of setup we want for Android studio will appear. We can select the “Standard” option or “Custom” option if we want to customize our Android Studio.
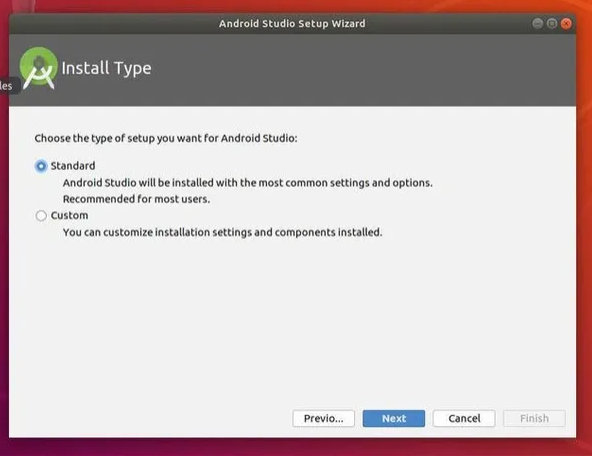
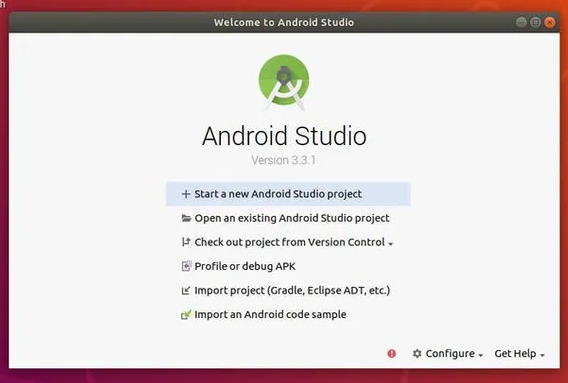
We can select the UI theme and the Setup Wizard on the next step. It will download and install the required SDK components. The process may take some time depending on our system and connection speed. Once the Android Studio IDE is loaded, the Welcome page will be presented:
Like Article
Suggest improvement
Share your thoughts in the comments
Please Login to comment...