How to Insert 3D Models in MS PowerPoint?
Last Updated :
05 Aug, 2021
Microsoft PowerPoint is a presentation of topics that allows us to create “presentation slides” that can be displayed on the computer screen or on a widescreen. A PowerPoint presentation is a good way to convey information to a large audience. It helps in creating a topic in a proper manner by providing various features like editing, graphical animations, and many more. A user does not have to carry around any slides or slide projector, and, if necessary, can make any last-minute changes to the presentation.

Features of MS PowerPoint are:
- Slide Design
- Animations
- Insert Icons, and 3D models
- Video Recording
- Slide Layout
- Slide Transitions
- Visual effects etc.
What are 3D Models in MS Powerpoint?
Microsoft PowerPoint has a special feature to insert 3D models directly into your documents or presentations. A 3D model is a three-dimensional view of an object or picture. You can rotate the models in 360 degrees or tilt up and down to show a specific view of an object. The 3D model helps to create a real-world and conceptual visuals in our mind. It is mostly used in many different industries such as virtual reality, video games, 3D printing, pictures, medicals, and many more.
Microsoft PowerPoint has a unique feature that it allows us to insert clips, and rotate the 3D model in 360 degrees. So you should use a 3D model in your presentation for a better understanding of the concept.
Some images of 3D model are:


Steps to Add a 3D Model
Step 1: On the navigation menu bar click on the insert option.

Step 2: Under the illustration section, click on the drop-down arrow button of the 3D Models as shown:

Step 3: A Insert 3D Model From dialog box will be open.

Step 4: Next click on the This Device option.

Step 5: A insert 3D model window will pop up on the screen as shown:

Step 6: Now select the drive or folder from the left panel of the window where you have saved the 3D Model file.

Step 7: Now select the 3D Model file.

Step 8: Next click on the insert option.

Finally, 3D Model is inserted in the document as shown in the figure:

Step 9: To resize the 3D Model, drag the button as shown in the figure:

Step 10: Double click on highlighted part of the model and rotate it according to your need as shown in the figure:

Step 11: Set the final position of the 3D model.

Step 12: Then click on the 3D model and select the Format option from the navigation menu bar as shown in figure 17.

Step 13: Click on the drop-down arrow button of 3D Model views.
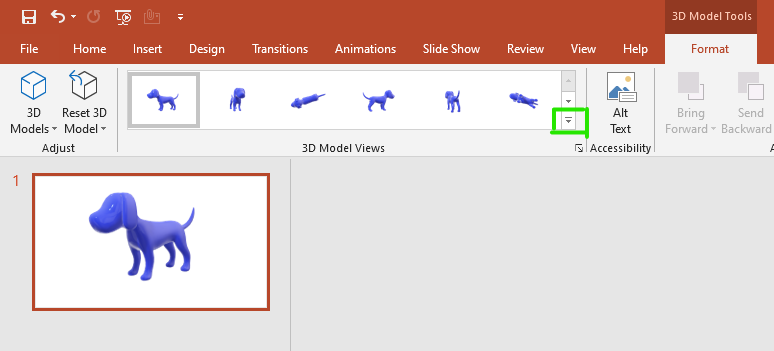
Step 14: Now select the different views of the 3D model as shown in the figure:

Animations in 3D Model
Step 1: On the navigation menu bar click on the Animations option.

Step 2: Select the Animations of your choice.

Step 3: Click on the drop-down arrow button of the effect option as shown in the figure:

Step 4: Select the effect of your choice.

Animation is added.
Finally, your 3D Model is inserted into the document.

These are some of the steps to insert 3D models in MS PowerPoint.
Like Article
Suggest improvement
Share your thoughts in the comments
Please Login to comment...