A CSV (comma-separated values) file is a text file with commas separating information. They are most commonly found in spreadsheets and databases and are now primarily used for datasets in data science and machine learning. They assist businesses in exporting large amounts of data. However, we cannot run SQL queries on such CSV data, so we must convert it to structured tables.
There are many methods of converting CSV data into a structured table. We will go over three of the most popular methods for converting.csv files to SQL format. This task becomes more complex when the comma-separated data that we use for this contains a timestamp.
In this article, we will see at three different methods for importing .csv files into MySQL tables along with the timestamp attribute.
Import .CSV Files Into MYSQL Tables:
This can be accomplished in a variety of ways. The three methods that we will discuss use different methods to import.csv files into MySQL tables. We will look at the following methods:
- Using Command Line
- Using PhpMyAdmin
- Using MySQL Workbench
Using Command Line:
Step 1: Open the terminal window and log in to the MySQL Client using the password. Refer to the following command:
mysql -u root -p
Step 2: Create a database and then create a table inside that database. The .CSV file data will be the input data for this table:
#To create a database
CREATE DATABASE database_name;

#To use that database
use database_name;

#To create a table
CREATE TABLE table_name(
id INTEGER,
col_1 VARCHAR(100),
col_2 INTEGER,
col_3 DATETIME DEFAULT CURRENT_TIMESTAMP,
PRIMARY KEY (id)
);
We create a database and a table called table_name inside it. The table contains various attributes such as id, col_1, col_2, and col_3. The col_3 attribute is of the DATETIME type, and it contains both data and time in the format YYYY-MM-DD hh:mm:ss. In addition to the integer and varchar attributes, we’ll look at how to import a DateTime type attribute from a CSV file into a MySQL table.
Step 3: Now we must examine the MySQL variable “secure_file_priv”. By default, the MySQL server starts with the -secure-file-priv option. When using LOAD DATA INFILE, it specifies the directory from which data files can be loaded into a given database instance. To view the configured directory, use the following command:
SHOW VARIABLES LIKE 'secure_file_priv';
Output:

Output For Steps 1, 2 and 3
The variable “secure_file_priv” will be set to a file directory configured by the MySQL server. We now have two options for making the LOAD DATA INFILE command work properly:
- Move the input .csv file into the specified folder structure.
- To change the configured folder structure to our needs.
We’ll go over both of these approaches.
Approach 1:
In this approach, we will need to put the input CSV file into the specified folder structure, and then only we will be able to access the file to be loaded into the database. Once we do this, now we are ready to run the command to import the CSV files to the database. Refer to the following command:
LOAD DATA INFILE '{folder_structure}/{csv_file_name}'
INTO TABLE table_name
FIELDS TERMINATED BY ','
ENCLOSED BY '"'
LINES TERMINATED BY '\n'
IGNORE 1 ROWS;
- LOAD DATA INFILE – It specifies the location of the input CSV file.
- INTO TABLE – It specifies the table into which data is to be populated.
- FIELDS TERMINATED BY – It specifies the delimiter through which the individual values in the file are separated.
- ENCLOSED BY – It specifies the symbol which specifies the values in the CSV file.
- LINES TERMINATED BY – It specifies the code for a line break.
- IGNORE 1 ROWS – It specifies the number of lines to be ignored from an input CSV file which might contain column labels, etc.
Output:

Output For LOAD DATA INFILE Command
Approach 2:
For Windows:
Step 1: The existing folder structure in my.ini must be changed. Go to This PC -> C Drive -> ProgramData -> MySQL -> MySQL Server * -> my.ini [The ProgramData folder is hidden. To see the folder, go to View in the top menubar and enable Hidden items.]
Step 2: Open the file and search for “secure-file-priv”. It will look something like this.
# Secure File  Priv.
secure-file-priv=”C:/ProgramData/MySQL
/MySQL Server 5.7/Uploads”
Step 3: Change the folder structure as per your choice and save the file in a different location, as the file cannot be saved at the same location. Now, copy and paste the file into its actual location. To do so, we need administrator access.
Step 4: Now, press “Ctrl + R” -> Type “services.msc” -> Press “Enter”. This will open the Services tab.
Step 5: Search for MySQL57 [The number 57 may vary on your PC]. Right-click on it and then click on the restart button.
Step 6: Log in to the MySQL Command Line client and run the following command:
LOAD DATA LOCAL INFILE '{file_location}'
INTO TABLE table_name
FIELDS TERMINATED BY ','
ENCLOSED BY '"'
LINES TERMINATED BY '\n'
IGNORE 1 ROWS;
Following the steps outlined above, we can import a CSV file to a MySQL table in Windows OS without encountering any errors.
For Linux:
Step 1: We need to add the new folder structure of our choice in my.cnf file. The file is located in /etc/mysql/ folder. Open my.cnf file using the editor of your choice and add the following lines to the file:
[mysqld]
secure-file-priv={new_folder_structure}
Step 2: Save the file after making the changes and restart the MySQL service. Refer to the following command for that:
sudo systemctl restart mysql
Step 3: Log in to the MySQL client again using the following command:
mysql -u root -p --local-infile
Step 4: Once you log in, run the following command:
set global local_infile = 1;
SHOW VARIABLES LIKE 'local_infile';
Output:
Step 5: Now, we are set to import the CSV file data to the MySQL table. Refer to the following command:
LOAD DATA LOCAL INFILE '{file_location}'
INTO TABLE table_name
FIELDS TERMINATED BY ','
ENCLOSED BY '"'
LINES TERMINATED BY '\n'
IGNORE 1 ROWS;
Output:
Following the steps outlined above, we can import a CSV file to a MySQL table in Linux OS without encountering any errors.
The following command can be used to determine whether or not the dob attribute with timestamp type has been properly imported. In this way, we can ensure that the attribute in the table corresponds to the actual DateTime datatype of MySQL:
SELECT * FROM table_name WHERE col_3
= TIMESTAMP('{YYYY-MM-DD HH:MM:SS}');

Validation Of DATETIME Attribute
Optional Step: Transforming Data while Importing
When you want to load data from a file into a MySQL table, you might notice that the incoming datatime format does not exactly match the target table. As an example, consider the col_3 timestamp format in the items. If the target table format is “yyyy/mm/dd %H:%i:%s.%f” and the csv file format is “dd/mm/yyyy %H:%i:%s.%f”. The SET clause in the LOAD DATA INFILE statement can be used to convert the CSV file datetime format to the one used by the destination table in MySQL. While performing the operation to load data from file to table in MySQL, you can use the SET clause in the end along with the str to date() function. Refer to the following command:
LOAD DATA INFILE '{file_location}'
INTO TABLE table_name
FIELDS TERMINATED BY ','
ENCLOSED BY '"'
LINES TERMINATED BY '\n'
IGNORE 1 ROWS
(id, col_1, col_2, @col_3)
SET col_3 = timestamp(str_to_date(@col_3,'%d-%m-%Y %H:%i:%s.%f'));

Transforming Data while Importing
Using PhpMyAdmin:
phpMyAdmin is a free PHP-based software tool designed to handle MySQL administration over the Internet. phpMyAdmin can perform a wide variety of MySQL operations. The user interface can be used to perform frequently used operations (such as managing databases, tables, columns, relations, indexes, users, and permissions), while you can still execute any SQL statement directly.
Let’s look at how we can use PhpMyAdmin to import a CSV file into a MySQL database.
Step 1: When you launch PhpMyAdmin, you will see various databases and tables on the left side of the interface. Create a table into which you want to import the CSV file data. The columns and datatypes must match the corresponding data in the CSV file.
Step 2: Select the table and then click on the import button from the top side menu bar.
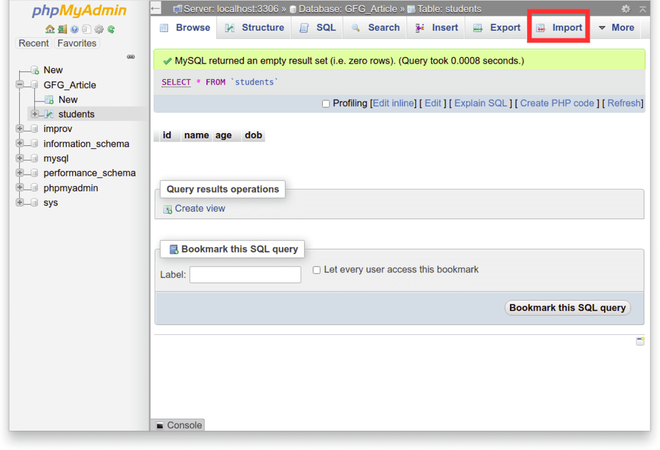
Import Button To Input CSV File
Step 3: Click the “choose file” button and navigate to your local storage to find the input CSV file. On the same page, you can also specify the number of lines to skip in the file.

Select Input CSV File
Step 4: Scroll down the page to choose the file format, which is csv in our case. Similarly to the command line approach, we have several Format-specific options here. When we’re finished, click the “Go” button.

Format And Format-specific Options For Input CSV File
Step 5:The CSV file gets imported into the MySQL table. When the import is successful, we see the following messages.
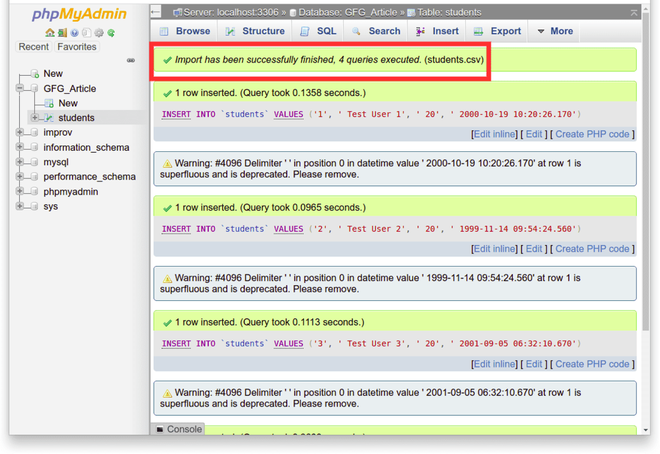
Successful Import of CSV File Into MySQL Table
Step 6: We can now return to the table and examine the data imported from the CSV file.

MySQL Table Imported With Input CSV Data
Using MySQL Workbench:
MySQL Workbench is a visual database design tool that combines SQL development, administration, database design, creation, and maintenance for the MySQL database system into a single integrated development environment.
Let’s look at how we can use MySQL Workbench to import a CSV file into a MySQL database.
Step 1: When you launch MySQL Workbench, you will see various databases and tables on the left side of the interface. Create a table into which you want to import the CSV file data. The columns and datatypes must match the corresponding data in the CSV file.
Step 2: Right-click on the table and select the option of “Table Data Import Wizard”. Browse your local storage to select the input CSV file.
Step 3: Select the file encoding and match the source and destination columns to configure the import settings. When you’re finished, click the next button.
Step 4: The input CSV file data will then be imported into the MySQL table. We can then check the imported data on the MySQL workbench interface.
Conclusion:
This article demonstrated three methods for importing a CSV file into MySQL. You now know how to Import CSV files into MySQL using the command line, phpMyAdmin, and MySQL Workbench. Please feel free to add any additional tools that can aid in the import of CSV files into MySQL.
Like Article
Suggest improvement
Share your thoughts in the comments
Please Login to comment...