This article focuses on discussing how to implement JSON-RPC API [eth_sendTransaction] in web3 projects. The approach will be to create a dummy example project file that will contain two buttons i.e. Connect to MetaMask and second the send eth button through which transactions are going to happen.
Prerequisites: Basic Understanding of Ethereum, JSON-RPC, and API.
Approach:
Step 1: Install Ganache and Metamask.
Visit here to know how to install Ganache and Metamask. Make sure you have also added the ganache local chain to your MetaMask as shown in the fig (Ganache local chain) below. The further process will be clear ahead as you move down with this article.
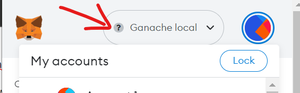
Ganache local chain
Step 2: Setting Ganache with Metamask
A. Open Ganache, and you will be redirected to an interface as shown in the figure below.
.jpg)
Ganache Interface
B. Next, open your MetaMask and now we will see how to import accounts from Ganache to Metamask, and then we will see how to link them via API.
C. Click on the first account key as shown in the figure below.

Click on the key icon
D. You will see your private key along with your account address. Copy that private key and go to your MetaMask extension.

private key
E. After opening Metamask click on the import account tab and you will be redirected to where you will be asked to input your private key for that particular account that you want to import.
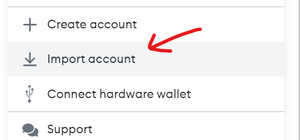
import account

Paste private key
F. Paste your copied private key in the [Enter your private key string here] section and click on import, hence your account will be imported as shown in fig. (Account 1 Imported)

Account 1 Imported
G. In a similar way try importing another account.
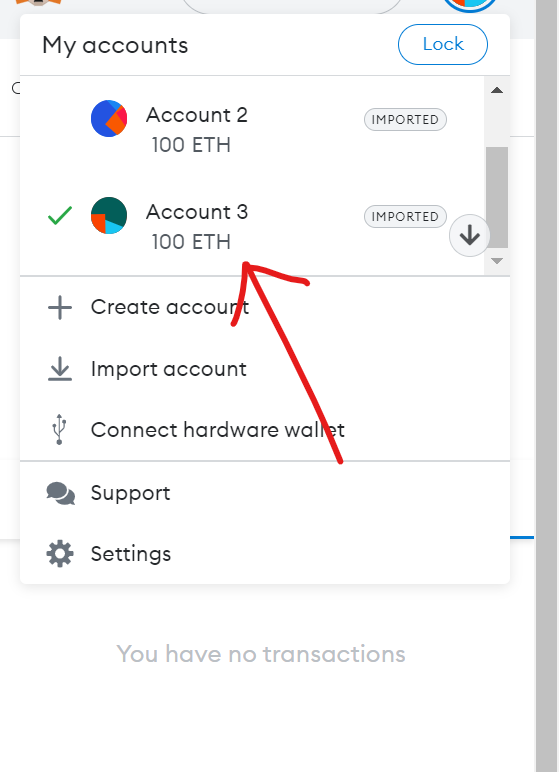
Two accounts imported
H. In this way, we have imported two accounts in our MetaMask from the Ganache, and we are going to use these two accounts in our task.
I. Further, let us now move on to the coding part where the actual working of all these functions will be done. In short, we can say this is the part that you are going to use in your web3 projects.
Step 3: Coding / Implementation part.
Here I have implemented a simple code for demonstration purposes. I have implemented this code in HTML format.
HTML
<!DOCTYPE html>
<html lang="en">
<head>
<meta charset="UTF-8">
<meta http-equiv="X-UA-Compatible" content="IE=edge">
<meta name="viewport" content="widtd=device-widtd, initial-scale=1.0">
<title>JSON-RPC-API-TUTORIAL</title>
</head>
<body style="background:white">
<div class="donatebtn" style="margin-left:14cm;margin-top:5cm">
<button class="button-27" onclick="connectMetamask()" role="button">CONNECT TO METAMASK</button>
<p id="accountArea"></p>
</div>
<div class="transact" style="margin-left:15cm;margin-top:1cm">
<button onclick="sendTransaction()" style="margin-top:1cm" id="eth" class="button-86" role="button">SEND ETH</button>
</div>
<script>
//connect metamask
let account;
const connectMetamask = async () => {
if(window.ethereum !== "undefined") {
const accounts = await ethereum.request({method: "eth_requestAccounts"});
account = accounts[0];
document.getElementById("accountArea").innerHTML = account;
}
}
</script>
<script>
async function sendTransaction(){
let params = [
{
"from": "0x5ac5b8D9Efb99b49176eBfcB1A78f8F85FcB0967",
"to": "0xFb30D953a3fE1298df870C390Cf75A506091C607",
"gas": Number(21000).toString(16),
"gasPrice": Number(2500000).toString(16),
"value": Number(1000000000000000000).toString(16),
}
]
let result = await window.ethereum.request({method: "eth_sendTransaction", params}).catch((err)=>{
console.log(err)
})
}
</script>
</body>
</html>
|
Here are some of the important parameters from the dummy example project code:
Connecting Web3: Make sure you have entered this script between the head tags
<!–WEB3-CONNECT–>
<script type=”text/javascript” src=”https://cdnjs.cloudflare.com/ajax/libs/web3/1.2.7-rc.0/web3.min.js”></script>
MetaMask Connection: Use this script to connect your MetaMask account to the particular web page account.
<!–METAMASK CONNECTION–>
<script>
//connect metamask
let account;
const connectMetamask = async () => {
if(window.ethereum !== “undefined”) {
const accounts = await ethereum.request({method: “eth_requestAccounts”});
account = accounts[0];
document.getElementById(“accountArea”).innerHTML = account;
}
}
</script>
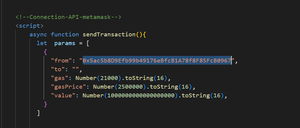
JSON-RPC API [eth_sendTransaction] connection: The API part where we are going to implement JSON-RPC API [eth_sendTransaction] in our web3 projects. This is the most important part. Simply paste the script given below.
In the below code, there are two functions “from” and “to”. Input the address of those two accounts which we have imported in our MetaMask form ganache. Let’s see how it can be done.
- Copy the address as shown below in the figure. (Copy address) and paste it into your code as shown in the figure. (Paste address).
- In a similar way, another account is shown in the figure (Paste code for account 2).
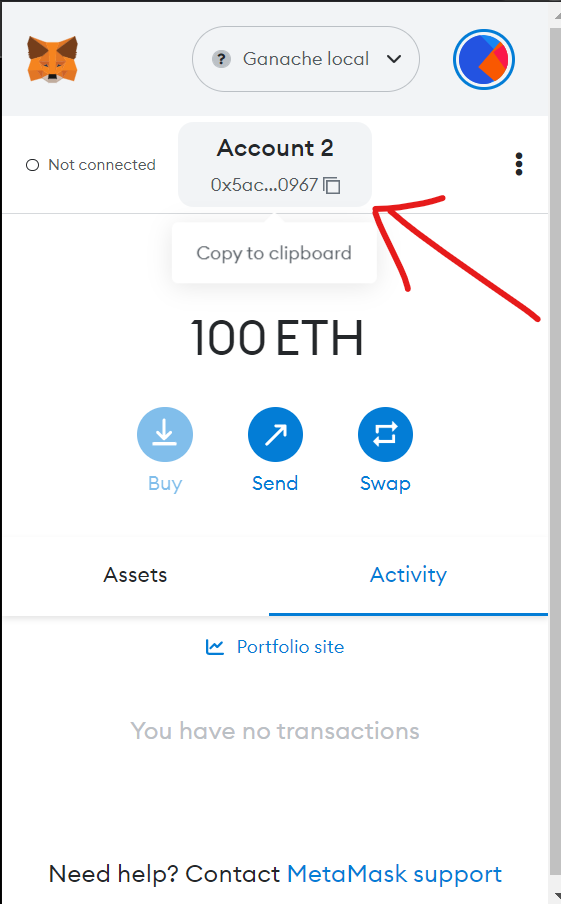
Copy address
Paste address
Paste code for account 2
<!–JSON-RPC API [eth_sendTransaction] connection–>
<script>
async function sendTransaction(){
let params = [
{
“from”: “0x5ac5b8D9Efb99b49176eBfcB1A78f8F85FcB0967”,
“to”: “0xFb30D953a3fE1298df870C390Cf75A506091C607”,
“gas”: Number(21000).toString(16),
“gasPrice”: Number(2500000).toString(16),
“value”: Number(1000000000000000000).toString(16),
}
]
let result = await window.ethereum.request({method: “eth_sendTransaction”, params}).catch((err)=>{
console.log(err)
})
}
</script>
These were some of the important parameters which must be included in your project file if you want to implement JSON-RPC API [eth_sendTransaction] in web3 projects.
The full code of our dummy example project is been implemented above. And the output of that particular code is shown below in the figure.
Output:
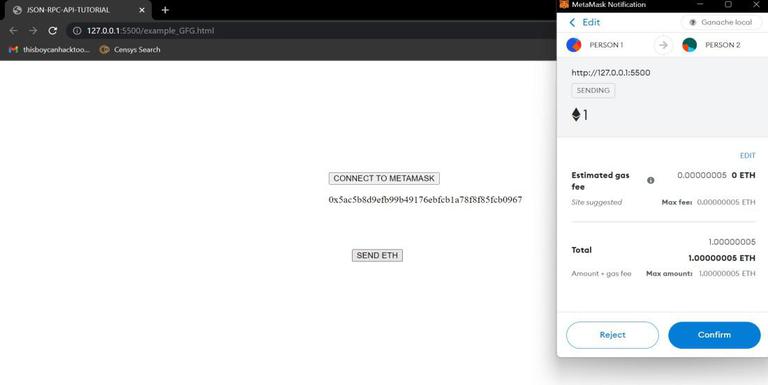
1. Clicking on connect to MetaMask button to connect our ETH account to the webpage from where we will do all of our transactions. Once you will click on the CONNECT TO MetaMask button a MetaMask pop-up will appear.
2. Now select the account to which you want to connect, here PERSON 1 account is selected. After that click next and move ahead. See figure.
3. Click on connect.
4. Once you click on Connect your account will be connected to the particular webpage and your account address will be visible as shown in the figure.
5. Click on SEND ETH button for sending your ETH currency. You will be again popped up with the MetaMask tab where you can see the transaction detail from PERSON 1 to PERSON 2. Click on confirm after checking whether the details entered are been correct or not.
Transaction 1
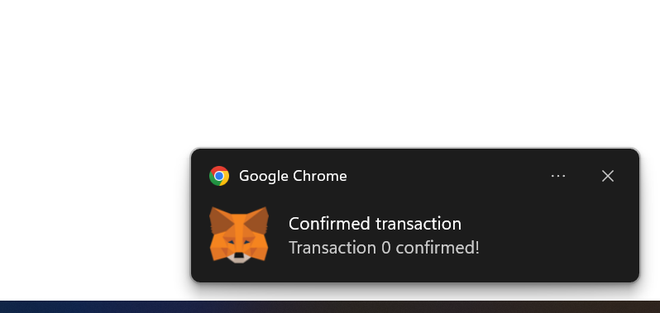
6. The transaction is been confirmed on the blockchain network successfully.
Transaction confirmed
7. It can be noticed that the ETH amount is been deducted from the PERSON 1 account and reflected in the PERSON 2 account.
8. Go to the PERSON 1 account transaction history and see the detailed proof of the transaction which is been done.
9. Also you can see the transaction proof and detail reflected on the GANACHE, for that see the steps below.
10. Click on the transactions tab.
11. Here you will see the detailed transaction information.
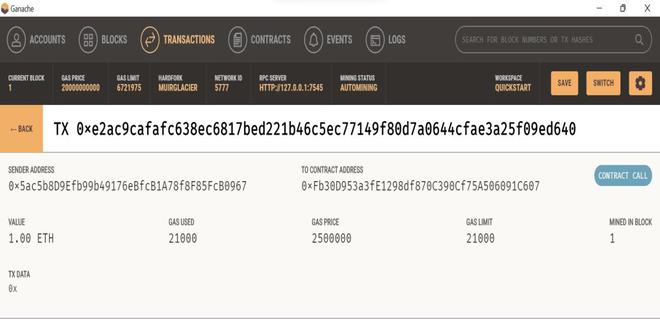
Transaction proof 5
In this way, JSON-RPC API [eth_sendTransaction] can be implemented in web3 projects.
Like Article
Suggest improvement
Share your thoughts in the comments
Please Login to comment...