How to Implement In-App Purchases in Android?
Last Updated :
26 Nov, 2021
In this article, we’ll look at how to use the billing library to make in-app purchases on Android smartphones. We’ll create an app as part of the process to help us learn how In-App purchases work. So, without further ado, let’s get started. We’ll start by creating an app with an Empty Activity as the first activity, naming it MainActivity, and naming the XML file activity main.xml.
Step by Step Implementation
Step #1
In your app’s build.gradle file, add the following line to the dependencies section:
dependencies {
    ...
    implementation 'com.android.billingclient:billing:2.0.1'
}
Step #2
You must also provide the billing permission in the Android manifest:
<uses-permission android:name="com.android.vending.BILLING" />
And now that we’ve finished setting up the permissions and dependencies, we must begin the implementation process by establishing a connection with Google Play.
Step #3
Two variables will be created in MainActivity.
Kotlin
class MainActivity : AppCompatActivity() {
private lateinit var myBilled: BillingClient
private val courseList = listOf("geeks_for_geeks_android_course", "geeks_for_geeks_dsa_course")
|
The first variable we’ve generated is of type BillingClient, which offers the main interface for communication between the library and user application code, and we’ve also established a list of courseList that defines the list of product IDs we need to buy.
Step #4
We’ll now set up the billing client using the onCreate() method.
Kotlin
class MainActivity : AppCompatActivity(), PurchasesUpdatedListener {
override fun onCreate(savedInstanceState: Bundle?) {
..........
doMyBiller()
}
private fun doMyBiller() {
myBiller = MyBiller.newBuilder(this)
.enablePendingPurchases()
.setListener(this)
.build()
myBiller.startConnection(object : MyBillerStateListener {
override fun onBillingSetupFinished(billingResult: BillingResult) {
if (billingResult.responseCode == MyBiller.BillingResponseCode.OK) {
}
}
override fun onBillingServiceDisconnected() {
}
})
}
|
Step #5
At this point, Let’s get our purchase product set up in our game console. To begin, log in to your game console and select CREATE APPLICATION from the menu. Set up your app like you would any other app, including providing information such as the App name, App description, and so on.
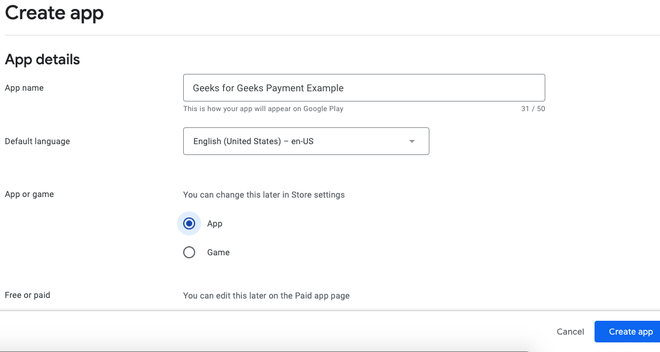
Image #1: Creating a new app in the play developer console
Gather all necessary information, such as store listings and ratings, and proceed to the point where you only need to submit the APK or AAB file. After you’ve completed the aforementioned procedures, we’ll need to develop PRODUCTS that we can buy. To accomplish this, when we’ve finished filling out the above information, we’ll need to scroll down to activate it and enter the product’s pricing.
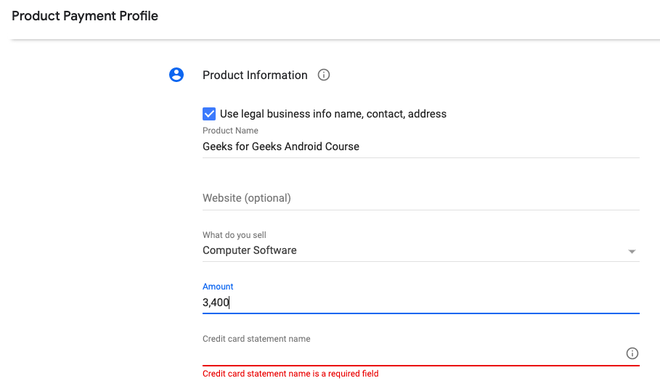
Image #2: Setting up in-app purchase
Press Save!
Step #6
When you are done with the amount and payments, the next step is to load the products, do this by:
Kotlin
private fun loadBillers() = if (myBiller.isReady) {
val params = Billers
.newBuilder()
.setSkusList(skuList)
.setType(MyBiller.SkuType.INAPP)
.build()
myBiller.queryLoadBillersAsync(params) { billingResult, loadBillersList ->
if (billingResult.responseCode == MyBiller.BillingResponseCode.OK && loadBillersList.isNotEmpty()) {
for (loadBillers in loadBillersList) {
}
}
}
} else {
println("Something Wrong")
}
|
Step #7
To complete the purchase, we’ll use the click listener. We’ll add a success callback for SKU fetching in step 06’s success callback.
Kotlin
if (myBiller.responseCode == BillingClient.BillingResponseCode.OK && myBiller.isNotEmpty()) {
for (myBillers in myBillers) {
if (myBiller.sku == "gfg_product_one")
buyCourseBtn.setOnClickListener {
val billingFlowParams = BillingFlowParams
.newBuilder()
.setSkuDetails(skuDetails)
.build()
myBiller.launchBillingFlow(this, billingFlowParams)
}
}
}
|
When the myBiller clicks, BillingFlowParams commences the buy flow with the precise SKU data, and the billingClient launches the billing flow to begin the purchase of the specified SKU.
Step #8
Now we create a mutable list, to get the list of all the purchasable items on the app, and then perform the in-app purchases
Kotlin
override fun onPurchasesUpdated(
myBiller: MyBiller?,
purchases: MutableList<Purchase>?
) {
if (myBiller?.replyCode == BillingClient.BillingReplyCode.OK && purchases != null) {
for (purchase in purchases) {
acknowledgePurchase(purchase.purchaseToken)
}
} else if (myBiller?.replyCode == BillingClient.BillingReplyCode.USER_CANCELED) {
} else {
}
}
private fun acknowledgePurchase(purchaseToken: String) {
val params = AcknowledgePurchaseParams.newBuilder()
.setPurchaseToken(purchaseToken)
.build()
billingClient.acknowledgePurchase(params) { myBiller ->
val replyCode = myBiller.replyCode
val debugMessage = myBiller.debugMessage
}
}
|
We’ve completed our task. Simply create a Signed APK and publish it to the Play Store, then wait for it to be accepted. After that, all we have to do is set up the card and buy it. That’s it for this article, hope you get the exact idea on how to implement in-app purchases in your app and start earning!
Like Article
Suggest improvement
Share your thoughts in the comments
Please Login to comment...