Excel Date and Time Formats With Examples
Last Updated :
21 Mar, 2024
Excel has a built-in time feature that is simple to use and can save you a lot of time. We can insert current Data and Time into a worksheet cell using Excel’s built-in functions. When you enter a date or time into a cell, the date and time are displayed in the cell’s default date and time format. The regional date and time settings entered in Control Panel determine this default format, which changes when those settings are changed in Control Panel. Numbers can be displayed in a variety of date and time formats, the majority of which are unaffected by Control Panel settings.
We can use Excel time features to
- Convert time to decimal numbers
- Add the time of two different units
- Calculate elapsed time
Note: Elapsed time is the amount of time between the start of an event or task to its end.
Date and Time Format in Excel
Microsoft Excel supports the 1900 Date System. In the 1900 data system, the first day supported is January 1, 1900. When we enter a date, excel converts it into a sequential number which represents the number of elapsed days starting from January 1, 1900. Microsoft Excel treats time as a portion of days, and internally it is stored as a decimal fraction.
For Example:
- 00:00:00 in Excel, stored as 0.0
- 23:59:59 in Excel, stored as 0.99999
- 12:00 PM in Excel, stored as 0.5
Decimal Representation of Time
In order to get the decimal representation of time in Excel:
- Select the Cell Containing Time and then Right-Click on it
- Select Format Cells (Here, we are using 2:32 PM as the time in the cell)
Note: We can also use shortcut to open formatting cell popup. For this we need to select the cell containing time and press ctrl + 1.

Fig1 – Format Cells
- Once we click on the Format Cells option, Excel will open a format cells dialog box
- Select Number tab and then click on General under Category, you will see the decimal in the Sample box.

Fig2 – Decimal representation of time
We can review the values in the Sample tab, which gives the decimal representation of the time we entered in the cell.
How To Change the Default Time Format
Microsoft Excel by default recognizes the time we enter into a cell, depending on our time zone.
For example:
If we enter 3:00 PM, excel will interpret it as time and display it as 3:00 PM, 15:00, or 15:00:00 depending upon our default time format.

Fig3 – Default time format
In order to change the Time format:
- Select a desired Cell
- Then press Ctrl + 1, to open the format cell dialog box
- Select Number tab, then in Category choose the Time option
- You can Choose Time Format as Per Requirement.

Fig4 – Changing default time format
Once we’ve selected our desired time format, we need to click on the OK button. Excel will change the default time format to our specified time format.

Fig5 – Time format output
How to Create a Custom Date and Time Format in Excel
Excel provides a lot of useful time format features, one of them is creating a custom time format. In order to create a custom time format, We need to open the time format cell tab.
- Select a desired Cell
- Press Ctrl + 1 to open Format Cells dialog box.
- Select Number tab and in Category select the Custom option
- Under Type, you can Fill the Desired Time Format.
- Review the Sample value to check if it’s formatted as desired.
- Click OK to save the changes.
For example:
To format a date time value like 1-Jan-2023 10:30 AM, utilize this code: d-mmm-yyyy h:mm AM/PM.
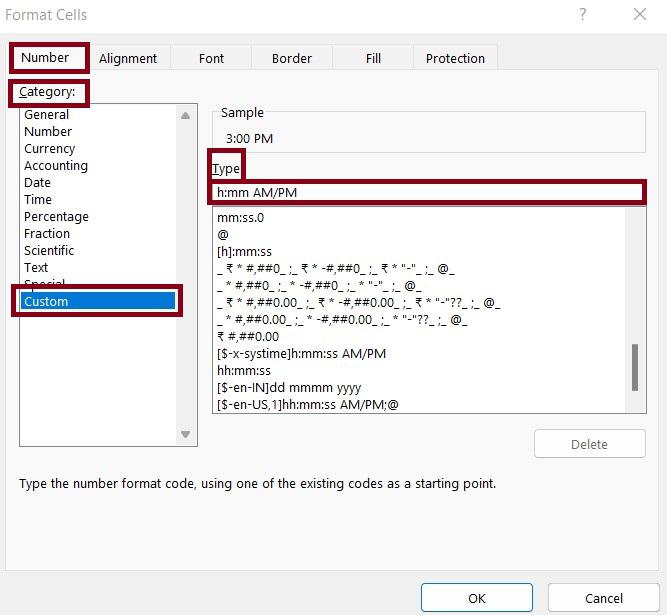
Fig6 – Custom time format
Once we fill in our desired custom time format (Here, we are using h:mm AM/PM), Excel will update the default time format to our specified time format.
The custom created time format will be in the Type list the next time you need it.

Fig7 – Custom time format output
Add Today’s Date & Current Time using NOW() Function
Excel provides an in-built NOW() function, which is used to retrieve today’s date and the current system time.
NOW() function features:
- NOW() function retrieves present date (today’s date)
- It retrieves the current system clock time.
- It is a volatile function that causes the cell with the NOW() function to recalculate the current date and time, every time the worksheet is re-opened.
- In order to force excel to recalculate the current time or date in an open worksheet, we can use F9 + Shift key to recalculate.

Fig8 – NOW() function
After writing the =NOW() function, we need to just press Enter key, Excel will automatically fetch the current date and time of the system.
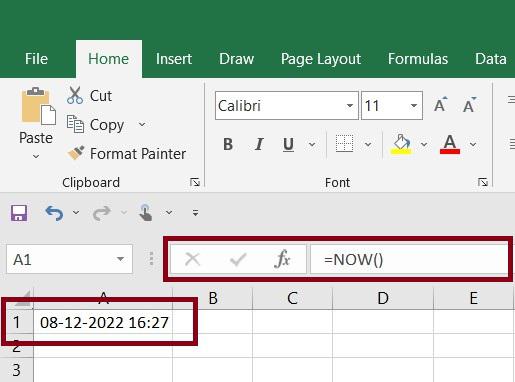
Fig9 – NOW() function output
Like Article
Suggest improvement
Share your thoughts in the comments
Please Login to comment...