How to Format a Write–Protected Pen Drive?
Last Updated :
10 May, 2020
When you receive the error “The disk is write-protected“, it means you tried formatting your Pendrive but were not able to. This may be due to external software or encryption that was probably used to lock the contents of the Pendrive and the contents within the drive are read-only. In this case, the computer does not allow you to format, edit, or modify contents of the Pendrive in any way.
Here are some ways to get around this problem and completely erase the contents of the Pendrive. Also, once you finish the necessary process, the Pendrive will be empty and open to modification and editing of all kinds. Before proceeding further, please check if your Pendrive has a switch at the side to enable its lock protection. If so, simply toggle the switch to “off” and the write protection is gone! However, if you’re using a normal USB Pendrive with no such switch, read on. There are 2 CMD based methods you can use, let’s see them one by one:
Method 1: Using Registry Edits
For this method, make sure you are logged in as an administrator on your system and follow the steps given below:
Step 1: Click “Start” or the windows icon on the bottom left corner, type: Regedit in the search box, click “Regedit.exe” to open the Registry editor when you see it is displayed at the top of the list.

Step 2: Then navigate to the following key:
Computer\HKEY_LOCAL_MACHINE\SYSTEM\CurrentControlSet\Control\StorageDevicePolicies
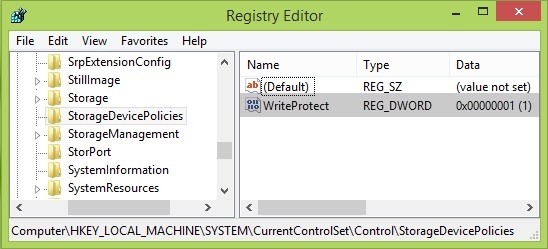
Please note, if you can’t find the StorageDevicePolicies Folder, then right-click the “Control” folder and create a new policy by right-clicking it. Name it “StorageDevicePolicies” (without spaces) and create a new DWORD as “WriteProtect”. Make sure the value data field is marked as “0”.
Step 3: Now double-click to open it and change the value data to “0”. Now quit this screen and your Pendrive is ready to format like you normally do – using right-click–>format.
Method 2: Using diskpart
For this method, make sure you are logged in as an administrator on your system and follow the steps given below:
Step 1: Firstly, connect the USB drive to the system and launch the Command Prompt application from the Start menu. Once it is launched, enter the “Diskpart” command to launch the utility tool.
Step 2: Enter the “list disk” command to view the attached drives. From here, identify the disk identifier from the list.
Step 3: Now, you need to pick your USB drive using the “select” command followed by its identifier. The identifier is the name of the disk as recognized by your PC. If you’re not sure what this is, go to My Computer and check the name. Let’s assume the name of your disk is disk 1, here’s how your cmd window should look by now:

Proceed to the next step only if you can see the message drive-name is now the selected disk.
Step 4: Then, type the “attributes disk clear read-only” command, press enter. This will clear the read-only feature from the USB drive.

Step 5: Once you see the message “Disk attributes cleared successfully“, your drive permissions are reset and you can exit the Command Prompt and format the Pendrive like you normally do – using right-click–>format.
Please note it is also possible to use some third party Softwares like EaseUs to format a write-protected Pendrive; However, they are not recommended as they can sometimes cause corruption of the Pendrive and you’ll not only lose all your data but be unable to safely store information on your Pendrive anymore.
Like Article
Suggest improvement
Share your thoughts in the comments
Please Login to comment...