How to embed images in New Google Sites ?
Last Updated :
10 Sep, 2020

Introduction: Images are very crucial in a well-developed website as they help to display something that even words can’t express. There are two ways to insert an image in Google sites:
- Through uploading it
- Using iframes to insert it
If you insert by the first method, there is not much you can edit in it but if you go with the second you can set the size of the image, add a border to it or even create a clickable image.
Method 1:
- First, click on images option from the insert panel. It will ask you to either upload or choose select upload.

- After that just select the image you want to upload from your PC and your image will get uploaded.
Now on this image, you can insert a link, add alternate or caption text or even resize it.

Method 2: Select embed option from the insert panel and then go to embed code division of the dialogue box appeared.
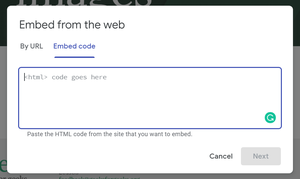
Write your code in the space provided.
- To insert a simple image just add the following code:
<img src="https://pbs.twimg.com/profile_images/1138375574726955008/1fNUyEdv.png" />

- To add height and width to the image just add the following code:
<img src="https://pbs.twimg.com/profile_images/1138375574726955008/1fNUyEdv.png"
width="300" height="300" />

- To add border-style just add the following code:
<img src="https://pbs.twimg.com/profile_images/1138375574726955008/1fNUyEdv.png"
style="border:4px solid green;" width="300" height="300" />
There are nine different styles of border available, they are – solid, double, groove, dotted, dashed, inset, outset, ridge, hidden.

Like Article
Suggest improvement
Share your thoughts in the comments
Please Login to comment...