Using the Microsoft PowerPoint tool, we can create professional presentations (including slides) that may be presented through a projector or on a screen (computer/Laptop). A PowerPoint presentation is an effective technique to transmit information. To a big audience, usually in the form of an outline. PowerPoint presentations are popular with users because they are simple to produce and modify. PowerPoint presentations are simple to create, modify and edit. Let us look at how can we edit the slides.
Edit and Format a Slide
The Microsoft PowerPoint tool lets you edit/modify the slides as well as format the data contained in them. The editing and formatting may include: adding the titles or subtitles to the slides, adding the text to the slides, change the background, adding Watermark, adding the headers and footers and slide numbers to the slides, etc. Let us discuss them one by one in detail:
1. Add Titles, Subtitles in a slide
When we start a new presentation, PowerPoint opens a blank Title Slide with a title and some text. So,
- Type the title in the Title box(as shown below) to add the title.
- To add a subtitle, click the Subtitle box and then add the subtitle.

Example:
In this example, we are adding the title: Geeksforgeeks and subtitle: Class IX.

2. Adding the New Slide
When we start a new presentation, PowerPoint opens a single blank slide it is the initial slide of any new presentation. But was cannot make any presentation using only a single slide so PowerPoint allows us to add new slides in your presentation according to your requirement using the following steps:
Step 1: Click on the new slide icon on the top.
Step 2: Select the type of slide (Example: blank) and click on it.

So this is how a new slide is added to the document.
3. Adding the text in a slide
We can also add text in our presentation using the following steps:
Step 1: Click on the insert tab at the top.
Step 2: Under it, click on the text box.

Step 3: Drag your mouse on the slide where you want to add the text box. Your text box will be added.

So this is how you can add text to your presentation.
4. Changing the Background
PowerPoint allows us to change the background color. So to change the background color follow the following steps:
Step 1: Click on the Design tab on the top.
Step 2: Then on the right-most side, click on background styles. Various styles will be shown. Select any of them (Example: style 7 here)

Step 3: After selecting, click Apply to all to apply to all the slides.
You can also format the background by following the following steps:
Step 1: Click on the Design tab on the top.
Step 2: Then on the right-most side, click on background styles. Then click on the format background option.

The format background window will pop up. You can select the options you want for formatting like – solid fill, gradient fill, present color, type, etc.

Example:
To change the color and fill we can:
Step 1: Select solid fill.
Step 2: Under color, we can choose any of the colors we want for the background of the slides.
Step 3: Click apply to all to apply the background to all the slides.

Your selected background will be applied.

5. Adding Watermark
We can also add watermark to the slides. So, follow the following steps:
Step 1: Click on the View tab on the right top
Step 2: Then click on the slide master icon

Step 3: Slide view will be shown. Then select and click on the text box icon on the top to insert the watermark.

Step 4: Drag cursor over the slide, text box will appear. Type the text (to set as a watermark) in that text box. To change the color of the text, you can go to the home tab and change the color as shown.

Step 5: Click on slideMaster on the top and then click on close Master View.

You will see the watermark on all the slides.

6. Adding Headers to the slides
In PowerPoint, we can also add a header to the slides. So, follow the following steps:
Step 1: Click on the insert tab at the top. Then click on the Header & footer icon.
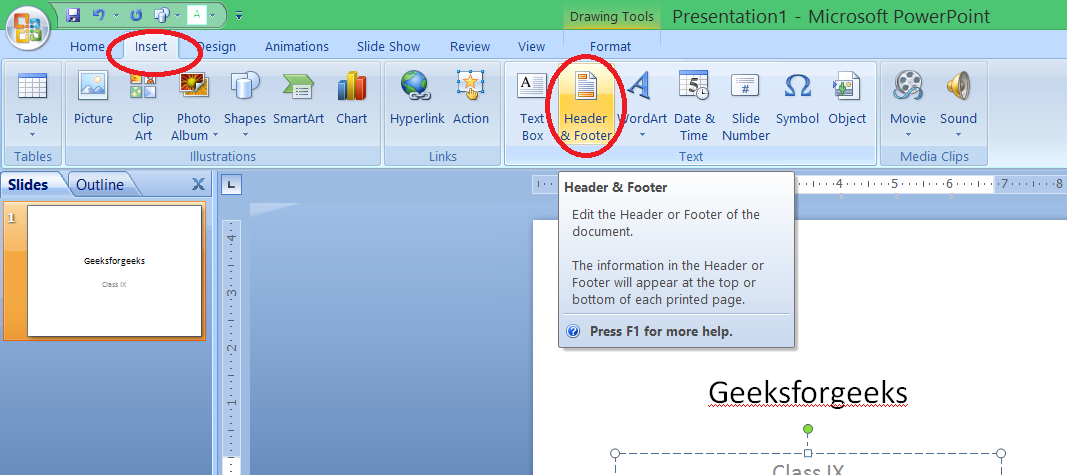
Step 2: The header and footer window will pop up. Go to the Notes and Handouts section to insert the header. Choose what is to be included on the page. Example: Here we chose the date and time of the fixed type. Also, you can give the header (Example: My Header here) you want by selecting the checkbox of the header.

Step 3: Now click Apply to All.
Note: You will not see any changes on the slide.
To view the changes, click on the view tab on the top and then click on the notes master icon.

You will see the header you set in this view.

7. Adding Footers on the slides
To add-footer follow these steps:
Step 1: Click on the insert tab at the top. Then click on the Header and footer icon.
Step 2: The header and footer window will pop up. Choose what is to be included in the footer of the page. Example: Here we chose the date and time of the fixed type. Also, you can give the footer (Example: My Footer here) you want by selecting the checkbox of the header.

Step 3: Now click Apply To All. And you will see the applied footers on each side.

8. Adding the Slide Numbers on each slide
In PowerPoint, we can also add slide numbers follow these steps:
Step 1: Click on the insert tab at the top. Then click on the Header and Footer icon.

Step 2: The header and footer window will pop up. Select slide number text box and then click Apply To All.

All the slides will have slide number in the footer.

Like Article
Suggest improvement
Share your thoughts in the comments
Please Login to comment...