How to display loading screen when navigating between routes using Angular?
Last Updated :
12 Mar, 2021
In this post, we will see how to display a loading screen when navigating from one component to another. When the user navigates through routes, the app may communicate with the backend to load some useful data, and it may produce some delay. At that time, if the user doesn’t see anything on the screen, he may think that either the app is broken or something is wrong with the client machine. Hence, it is necessary to keep the user engaged with the app with the help of some message or loading animation.
Prerequisites: NPM must be installed
Environment Setup: We will create a simple app that will simulate some delays while navigation and show a loading spinner while navigating through routes. Let’s quickly set up the environment:
npm install -g @angular/cli
ng new <project-name>
Project Structure: After executing the above commands, you will get a project structure like this:
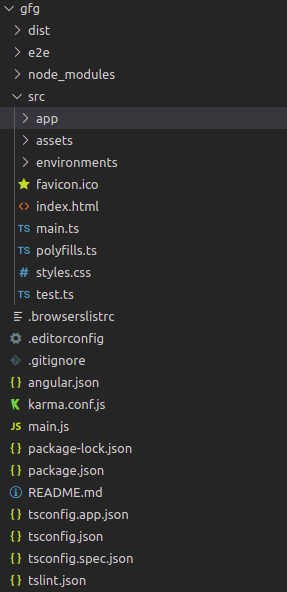
Project Structure
Now execute these commands:
cd <project-name>
ng serve -o
Output: Open http://localhost:4200 and check whether the default angular landing page is loading or not.
Follow the below steps:
-
Step 1: We will be loading data from a JSON file instead of an actual server. In src/assets/ create a new file data.json and add the following data.
data.json:
{
    "K.S. Williamson": 0,
    "S.P.D. Smith": 0,
    "M. Labuschagne": 0,
    "J.E. Root": 0,
    "V. Kohli": 0,
    "Babar Azam": 0,
    "H.M. Nicholls": 0,
    "C.A. Pujara": 0,
    "D.A. Warner": 0,
    "B.A. Stokes": 0,
    "Gerard Abood": 1,
    "Afzaal Ahmed": 1,
    "Mesbahuddin Ahmed": 1,
    "Tanvir Ahmed": 1,
    "Javed Akhtar": 1,
    "A. F. M. Akhtaruddin": 1,
    "Rizwan Akram": 1,
    "Jahangir Alam": 1,
    "Brian Aldridge": 1
}
-
Step 2: To read this data we will use HttpClient module of angular. We need to register it in the file app.module.ts.
app.module.ts
import { NgModule } from '@angular/core';
import { BrowserModule } from '@angular/platform-browser';
import { AppRoutingModule } from './app-routing.module';
import { AppComponent } from './app.component';
import {HttpClientModule} from '@angular/common/http';
@NgModule({
declarations: [
AppComponent,
],
imports: [
BrowserModule,
AppRoutingModule,
HttpClientModule
],
providers: [],
bootstrap: [AppComponent]
})
export class AppModule { }
|
-
Step 3: Now create two new components. We will navigate between these two.
ng generate component batsman
ng generate component umpire
It will generate 4 files for each component. We will understand the code of one of these. The other one will have similar working. In batsman.component.ts, add the following code.
batsman.component.ts
import { HttpClient } from '@angular/common/http';
import { Component, OnInit } from '@angular/core';
@Component({
selector: 'app-batsman',
templateUrl: './batsman.component.html',
styleUrls: ['./batsman.component.css']
})
export class BatsmanComponent implements OnInit {
constructor(private http:HttpClient) { }
batsman = []
ngOnInit(): void {
this.http.get('assets/data.json').subscribe(
result => {
setTimeout(() => {
for (let key in result) {
if (!result[key]) {
this.batsman.push(key);
}
}
}, 2000);
}
)
}
}
|
First, import the HttpClient class. We have created an HttpClient object in the constructor as a dependency injection. We have also initialized an empty batsman array. The get() method of HttpClient will return an Observable which returns the data as the first parameter in its subscribe(result_callback, error_callback) method. In the callback, we have simulated a 2000 ms delay and pushed the names with 0 value. This means that as soon as the page is loaded, there will be a 2 seconds delay and the batsman array will be populated. Now add the following code to batsman.component.html.
batsman.component.html
<div *ngIf="!batsman.length">
<div class="spinner-border m-5" role="status">
<span class="sr-only"></span>
</div>
</div>
<div *ngIf="batsman.length">
<table>
<tr *ngFor="let person of batsman">
<td>{{person}}</td>
</tr>
</table>
</div>
|
-
Step 4: There are two div tags. The first one is displayed when the batsman array is empty. The other one will be displayed when the array is populated. So until the data is not received, we will be viewing the first div which contains the loading animation. The spinner-border class exists in Bootstrap. So we need to add bootstrap to our project. Edit the index.html file as below.
index.html
<!DOCTYPE html>
<html lang="en">
<head>
<meta charset="utf-8" />
<title>Geeks For Geeks</title>
<base href="/" />
<meta name="viewport"
content="width=device-width, initial-scale=1" />
<link rel="icon" type="image/x-icon"
href="favicon.ico" />
<link href=
rel="stylesheet"
integrity=
"sha384-BmbxuPwQa2lc/FVzBcNJ7UAyJxM6wuqIj61tLrc4wSX0szH/Ev+nYRRuWlolflfl"
crossorigin="anonymous"/>
</head>
<body>
<app-root></app-root>
<script src=
integrity=
"sha384-KsvD1yqQ1/1+IA7gi3P0tyJcT3vR+NdBTt13hSJ2lnve8agRGXTTyNaBYmCR/Nwi"
crossorigin="anonymous">
</script>
<script src=
integrity=
"sha384-nsg8ua9HAw1y0W1btsyWgBklPnCUAFLuTMS2G72MMONqmOymq585AcH49TLBQObG"
crossorigin="anonymous">
</script>
</body>
</html>
|
-
Step 5: Now add the following codes to umpires.component.ts and umpires.component.html respectively.
umpires.component.ts
import { HttpClient } from '@angular/common/http';
import { Component, OnInit } from '@angular/core';
import { CricketService } from '../cricket.service';
@Component({
selector: 'app-umpires',
templateUrl: './umpires.component.html',
styleUrls: ['./umpires.component.css']
})
export class UmpiresComponent implements OnInit {
constructor(private http:HttpClient) { }
umpires = [];
ngOnInit(): void {
this.http.get('assets/data.json').subscribe(
result => {
setTimeout(() => {
for (let key in result) {
if (result[key]) {
this.umpires.push(key);
}
}
}, 2000);
}
)
}
}
|
umpires.component.html
<div *ngIf="!umpires.length">
<div class="spinner-border m-5" role="status">
<span class="sr-only"></span>
</div>
</div>
<div *ngIf="umpires.length">
<table>
<tr *ngFor="let person of umpires">
<td>{{person}}</td>
</tr>
</table>
</div>
|
-
Step 6: Create routes for these components in app-routing.module.ts as below:
app-routing.module.ts
import { NgModule } from '@angular/core';
import { RouterModule, Routes } from '@angular/router';
import { BatsmanComponent } from './batsman/batsman.component';
import { UmpiresComponent } from './umpires/umpires.component';
const routes: Routes = [
{path:'batsman', component:BatsmanComponent},
{path:'umpires', component:UmpiresComponent}
];
@NgModule({
imports: [RouterModule.forRoot(routes)],
exports: [RouterModule]
})
export class AppRoutingModule { }
|
-
Step 7: Add the path in ‘path‘ key and respective component in ‘component‘ key. Import the necessary Components. Now create the links for the user in app.component.html and the coding part is finished:
app.component.html
<div>
<a [routerLink]="['batsman']">Batsman</a> ||
<a [routerLink]="['umpires']">Umpires</a>
<router-outlet></router-outlet>
</div>
|
The above code creates two links that navigate to the respective components. The <router-outlet> tag displays the navigated component.
Run the below command:
ng serve -o
Output:

Like Article
Suggest improvement
Share your thoughts in the comments
Please Login to comment...