How to deploy a machine learning model using Node.js ?
Last Updated :
26 Jul, 2021
In this article, we will learn how to deploy a machine learning model using NodeJS. While doing so we will make a simple handwritten digit recognizer using NodeJS and tensorflow.js.
Tensorflow.js is an ML library for JavaScript. It helps to deploy machine learning models directly into node.js or a web browser.
Training the Model: For training the model we are going to use Google Colab. It is a platform where we can run all our python code, and it comes loaded with most of the machine learning libraries that are used.
Below is the code for the final model which we will create.
Python
from tensorflow.keras.datasets import mnist
import matplotlib.pyplot as plt
from keras.utils import np_utils
from keras import Sequential
from keras.layers import Dense
import tensorflowjs as tfjs
(X_train, y_train), (X_test, y_test) = mnist.load_data()
print ("X_train.shape: {}".format(X_train.shape))
print ("y_train.shape: {}".format(y_train.shape))
print ("X_test.shape: {}".format(X_test.shape))
print ("y_test.shape: {}".format(y_test.shape))
plt.subplot(161)
plt.imshow(X_train[3], cmap=plt.get_cmap('gray'))
plt.subplot(162)
plt.imshow(X_train[5], cmap=plt.get_cmap('gray'))
plt.subplot(163)
plt.imshow(X_train[7], cmap=plt.get_cmap('gray'))
plt.subplot(164)
plt.imshow(X_train[2], cmap=plt.get_cmap('gray'))
plt.subplot(165)
plt.imshow(X_train[0], cmap=plt.get_cmap('gray'))
plt.subplot(166)
plt.imshow(X_train[13], cmap=plt.get_cmap('gray'))
plt.show()
X_train = X_train / 255
X_test = X_test / 255
y_train = np_utils.to_categorical(y_train)
y_test = np_utils.to_categorical(y_test)
num_classes = 10
x_train_simple = X_train.reshape(60000, 28 * 28).astype('float32')
x_test_simple = X_test.reshape(10000, 28 * 28).astype('float32')
model = Sequential()
model.add(Dense(28 * 28, input_dim=28 * 28, activation='relu'))
model.add(Dense(num_classes, activation='softmax'))
model.compile(loss='categorical_crossentropy',
optimizer='adam', metrics=['accuracy'])
model.fit(x_train_simple, y_train,
validation_data=(x_test_simple, y_test))
|
Step 1: Training Data
For training the model, we will be using the MNIST database. This is a large database of handwritten digits which is available for free. In this data set, there are 60,000 images, all of them are of size 28 x 28 pixels in grayscale, with pixel values from 0 to 255.
Step 2: Data Pre-processing
We do the following steps to process our data:
- Normalize inputs: The inputs are in the range 0-255. We need to scale them to 0-1.
- One hot encode the outputs
Step 3: Machine Learning
For training the model we use a simple neural network with one hidden layer which is good enough to give about 98% accuracy.
Step 4: Converting the model using tensorflow.js
First, save the model using the following command:
model.save(“model.h5”)
Then install tensorflow.js and convert the model using the following command:
!pip install tensorflowjs
!tensorflowjs_converter --input_format keras
    ‘/content/model.h5’ ‘/content/mnist-model’
After running the above command, now refresh the files. Your content should look like the following.
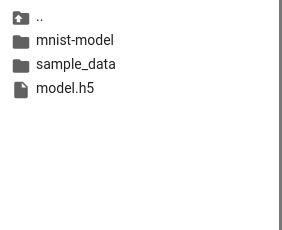
Note: Download the mnist-model folder we will be using it later.
Creating Express App and Installing Module:
Step 1: Create package.json using the following command:
npm init
Step 2: Now install the dependencies by following the command. We will be using express for server and ejs as template engines.
npm install express ejs
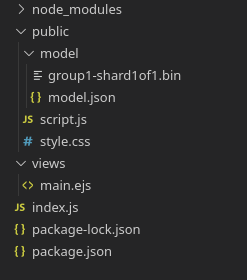
Project Structure: Now make sure you have the following file structure. Copy the files that we downloaded from Colab in the model folder.
Now write down the following code to your index.js file.
index.js
const express = require("express");
const app = express();
const path = require("path")
app.use(express.static('public'));
app.set('views', path.join(__dirname, '/views'))
app.set('view engine', 'ejs');
app.use(express.json());
app.use(express.urlencoded({ extended: false }));
app.get('/',(req,res)=>{
res.render('main')
})
app.listen(3000, () => {
console.log("The server started running on port 3000")
});
|
main.ejs
<!DOCTYPE html>
<html lang="en">
<head>
<script src=
</script>
<script src=
</script>
<link rel="stylesheet" href="style.css" />
</head>
<body>
<h1>Digit Recognition WebApp</h1>
<div id="paint">
<canvas id="myCanvas"></canvas>
</div>
<div id="predicted">
Recognized digit
<div id="number"></div>
<button id="clear">Clear</button>
</div>
<script src="script.js"></script>
</body>
</html>
|
style.css
body {
touch-action: none;
font-family: "Roboto";
}
h1 {
margin: 50px;
font-size: 70px;
text-align: center;
}
#paint {
border:3px solid red;
margin: auto;
}
#predicted {
font-size: 60px;
margin-top: 60px;
text-align: center;
}
#number {
border: 3px solid black;
margin: auto;
margin-top: 30px;
text-align: center;
vertical-align: middle;
}
#clear {
margin: auto;
margin-top: 70px;
padding: 30px;
text-align: center;
}
|
Writing the Script: Using the HTML5 canvas we define the mouse events. Then we capture the image on the mouse up and scale it to 28×28 pixels, so it matches our model, and then we pass it to our predict function.
script.js
canvas.addEventListener('mousedown', function (e) {
context.moveTo(mouse.x, mouse.y);
context.beginPath();
canvas.addEventListener('mousemove', onPaint, false);
}, false); var onPaint = function () {
context.lineTo(mouse.x, mouse.y);
context.stroke();
};
canvas.addEventListener('mouseup', function () {
$('#number').html('<img id="spinner" src="spinner.gif"/>');
canvas.removeEventListener('mousemove', onPaint, false);
var img = new Image();
img.onload = function () {
context.drawImage(img, 0, 0, 28, 28);
data = context.getImageData(0, 0, 28, 28).data;
var input = [];
for (var i = 0; i < data.length; i += 4) {
input.push(data[i + 2] / 255);
}
predict(input);
};
img.src = canvas.toDataURL('image/png');
}, false);
tf.loadLayersModel('model / model.json')
.then(function (model) {
window.model = model;
});
var predict = function (input) {
if (window.model) {
window.model.predict([tf.tensor(input)
.reshape([1, 28, 28, 1])])
.array().then(function (scores) {
scores = scores[0];
predicted = scores
.indexOf(Math.max(...scores));
$('#number').html(predicted);
});
} else {
setTimeout(function () { predict(input) }, 50);
}
}
|
Step to run the application: Run the index.js file using the following command.
node index.js
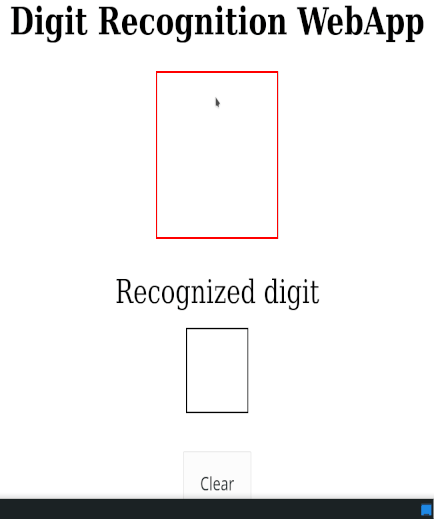
Output: Open the browser and go to http://localhost:3000, we will see the following output.
Like Article
Suggest improvement
Share your thoughts in the comments
Please Login to comment...