How to Debug Database in Android?
Last Updated :
11 Jul, 2021
The Android Debug Database library is a useful tool for troubleshooting databases and shared preferences in Android apps. In this article we would be looking forward to using this library and get our hand on it, so continue reading, and indulge. First thing’s first,
What’s Exactly an Android Debug Database?
Well, the answer to that is simple, In a very easy way, Android Debug Database allows you to examine databases and shared settings straight in your browser. Not only this, but the ADD also enables you to look at the structure of your database in a debuggable format, so that you could take action on your data, in a much more granular and sophisticated manner.
All these features work seamlessly, even without rooting your Android Device! Isn’t that great?
Let’s Dive in and See in Detail. What Android Debug Database is Capable of.
Here’s a List of it:
Sounds Great, to Begin With, Let’s Start!
Step #1: Adding the dependency to your Android Project
debugImplementation 'com.amitshekhar.android:debug-db:1.0.6'
Step #2: Setting the Authentication
debug {
    resValue("string", "DB_PASSWORD_GEEKSFORGEEKS", "password")
}
Note: If you wish to use another port than 8080, do so. Make the following changes to the buildTypes section of the app build.gradle file.
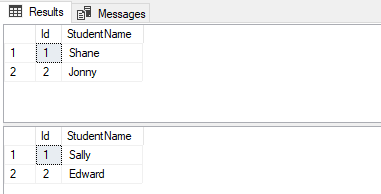
Figure 1. Running the Database Debugger.
In case you missed the address log in logcat to get the address with Toast. Because this library is auto-initialized, if you wish to retrieve the address log, add the following function and call it using reflection (we have to do this to avoid build errors in release builds because this library will not be included). Just simply pop out a toast by using this:
Kotlin
public static void showingDebug(Context context) {
if (BuildConfig.DEBUG) {
try {
Class<?> debugDB = Class.forName("com.GeeksforGeeks.DebugDB");
Method getAddressLog = debugDB.getMethod("getAddressLog");
Object value = getAddressLog.invoke(null);
Toast.makeText(context, (String) value, Toast.LENGTH_LONG).show();
} catch (Exception ignore) {
}
}
}
|
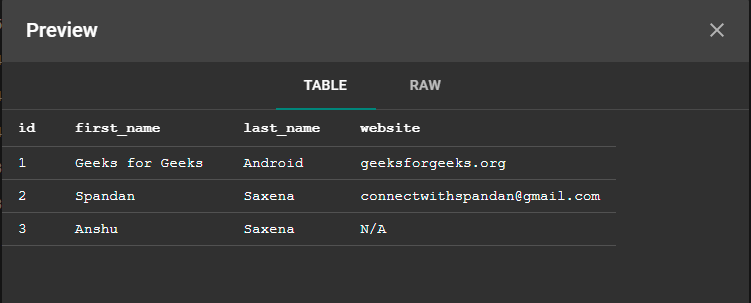
Figure 2. Viewing the Data.
If you want to add your own Database file then:
Kotlin
public static void applyCustomFileDBHere(Context c) {
if (BuildConfig.DEBUG) {
try {
Class<?> GeeksforGeeksDB = Class.forName("com.GeeksforGeeks.GeeksforGeeksDB");
Class[] argTypes = new Class[]{HashMap.class};
Method setCustomDatabaseFiles = GeeksforGeeksDB.getMethod("setCustomDatabaseFiles", argTypes);
HashMap<String, Pair<File, String>> customDatabaseFiles = new HashMap<>();
customDatabaseFiles.put(GfGDBHelper.DATABASE_NAME,
new Pair<>(new File(c.getFilesDir() + "/" + GfGDBHelper.DIR_NAME +
"/" + GfGDBHelper.DATABASE_NAME), ""));
setCustomDatabaseFiles.invoke(null, customDatabaseFiles);
} catch (Exception ignore) {
}
}
}
|
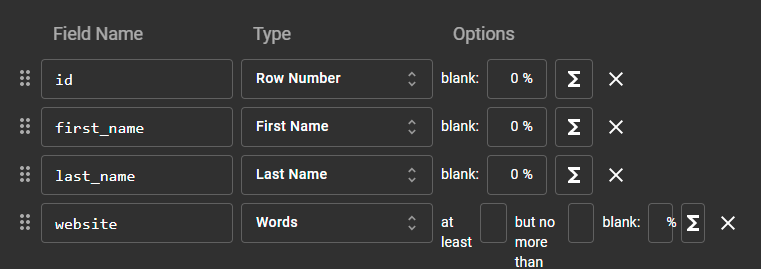
Figure 3. Editing the Data
And just like this, you’ve added your own Android Debug Database to Your Android Project, for more insight and information visit this GitHub repository here.
Like Article
Suggest improvement
Share your thoughts in the comments
Please Login to comment...