How to Create Observable data stream using fromEvent method in AngularJS ?
Last Updated :
01 Aug, 2021
In this article, we will learn how Observable supports data sharing between publishers and subscribers in an angular application. An Observable is referred to as a better technique for event handling, asynchronous programming, and handling multiple values as compared to techniques like promises.
-
Observable: Represents a stream or source of data that can arrive over time. But the observable is meaningless without a Subscriber.
-
Subscriber: Simply, it’s a piece of code that keeps an eye on the Observable and its data. It fetches the data and makes it usable for the component.
Prerequisite Knowledge:
- Angular v6.2.9 or above and RxJs v6.4.0 or above
- Node v10.15.3 or above and NPM v6.4.1 or above
(Note: RxJs is automatically installed with Angular, similarly NPM is automatically installed with Node)
You must have understood the basic concept of Observable and Subscribe in Angular. If not, please follow the article How to implement Observable-Subscribe in Angular application.
Project Structure: It will look like this

Most common and easiest way to create Observable: The most common and easiest way to create Observable is using methods provided by the RxJs library. It’s a 3rd party library that gets automatically installed when you create a new angular project. One such method is fromEvent. We will discuss other methods like Interval and Timer later.
FromEvent: FromEvent is a method provided by RxJs to create Observable. The best thing is that we can create Observable from DOM events directly. By DOM events, it means click event, key up events, scroll events, etc. that is a simple mouse click, we can create a stream of data, i.e. an Observable. FromEvent is going to help us with that.
Syntax:
fromEvent(target,eventName)
    .subscribe((res)=>{console.log(res)})
Let’s talk about the two parameters.
target: It can be any DOM EventTarget such as a button, radio button, slider, etc. Whatever DOM EventTarget we are using, it should have methods to register/unregister the event handler. The elements we discussed above are in-built mechanisms. We don’t have to write code for that.
eventName: It is the type of event we want to listen to.
Example: Click, mousedown, mouseup, click, dblclick, mousemove, mouseover, mousewheel, mouseout, touchstart, touchmove, touchend, touchcancel, keydown, keypress, keyup, etc.
Approach: We will create a simple button “Add Book” on the UI and with every single click on this button, we will create one data stream. To keep it simple, our data stream will contain only one hard-coded string, i.e. “Book”. With every click, we will keep on generating Book 1, Book 2, Book 3, and so on. To display this stream on the UI, we will create one empty <ul> and keep on adding each Book as one list item, i.e. <li> into <ul> in run time.
Preparation: To create an observable from any event fired by a DOM element, first, we need to get a reference to that DOM Element. This can be done using ViewChild and ElementRef. So, the code for this can be written as:
- HTML:
<button #addBtn>Add</button>
- TypeScript:
@ViewChild(‘addBtn’, {static: true}) addBtn: ElementRef;
Here this.addBtn.nativeElement returns the native DOM element. This is going to be our target (or EventTarget to be precise), which is the first argument for the fromEvent method. The second argument is ‘click’ because we are using a button click. So, the code becomes:
JavaScript:
fromEvent(this.addBtn.nativeElement, 'click')
    .subscribe((res)=>{console.log(res)}
One small question arises! Where do we put this line of code?
Well, the best place is ngAfterViewInit. This is because ViewChild will not initialize the addBtn element until and unless ngOnInit gets completed. Hence, we will put this code inside ngAfterViewInit because priority wise ngOnInit is the first method to be executed when the component loads.
JavaScript:
ngAfterViewInit() {
  fromEvent(this.addBtn.nativeElement, 'click')
    .subscribe((res) => {
      console.log(res);
    })
}
If we click on the button, we’ll get this on the console:
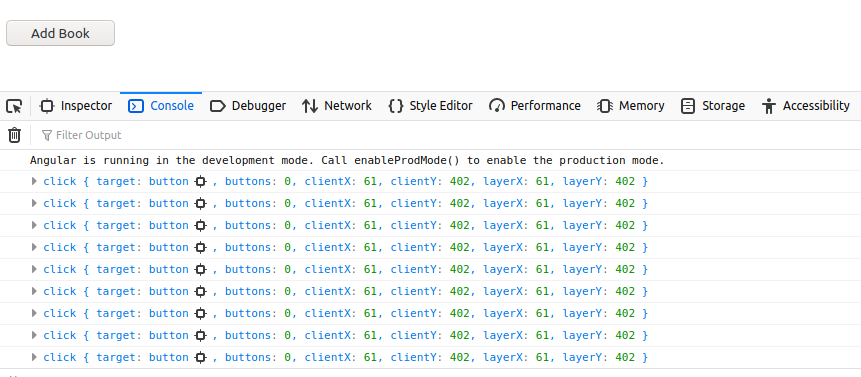
All these are data steams which are generated when we clicked the button.
Let’s get started by converting it into a working code.
-
Step 1: Create a new Angular project
ng new observable-app
-
Step 2: Create one component called FromEventComponent
ng g c from-event
4 new files should be created and app.module.ts should get updated;

All required files and changes
-
Step 3: Create a service PrintService
ng g s print-service
We can do this without service but to make our code more dynamic and meaningful. Let’s use a service. This is being done. Now let’s make the necessary changes to make it work.
from-event.component.html
<ul id="elementContainer"></ul>
<button #addBtn>Add Book</button>
|
print-service.service.ts
printStream(containerName, stream) {
let element = document.createElement('li');
element.innerText = stream;
document.getElementById(containerName).appendChild(element);
}
|
As we have created a method called printStream. It will accept two arguments. The first argument is the DOM element with reference to which data will be appended and the second argument is the data or stream that I want to append. Now we can inject this service into the component and use this method:
from-event.component.ts
ngAfterViewInit() {
let count = 1;
fromEvent(this.addBtn.nativeElement, "click")
.subscribe((res) => {
this._printService.printStream(
"elementContainer", "Book " + count++);
})
}
|
One count variable we’ve taken to distinguish between streams. It will keep on adding auto-incremented integer with “Book”. Here, at the line “this._printService.printStream(‘elementContainer’, ‘Book ‘ + count++)”, we are telling where to be appended and what to be appended.
Final Code:
from-event.component.html
<ul id="elementContainer"></ul>
<button #addBtn>Add Book</button>
|
from-event.component.ts
import { Component, ElementRef, OnInit, ViewChild } from "@angular/core";
import { fromEvent } from "rxjs";
import { PrintServiceService } from "../print-service.service";
@Component({
selector: "app-from-event",
templateUrl: "./from-event.component.html",
styleUrls: ["./from-event.component.css"],
})
export class FromEventComponent implements OnInit {
@ViewChild("addBtn", { static: true }) addBtn: ElementRef;
constructor(private _printService: PrintServiceService) {}
ngOnInit() {}
ngAfterViewInit() {
let count = 1;
fromEvent(this.addBtn.nativeElement, "click").subscribe((res) => {
this._printService.printStream("elementContainer", "Book " + count++);
});
}
}
|
print-service.service.ts
import { Injectable } from "@angular/core";
@Injectable({
providedIn: "root",
})
export class PrintServiceService {
constructor() {}
printStream(containerName, stream) {
let element = document.createElement("li");
element.innerText = stream;
document.getElementById(containerName).appendChild(element);
}
}
|
app.component.html
...
<app-from-event></app-from-event>
|
Output: You can see streams being treated with every mouse click. In upcoming articles, we will learn about Interval and Timer. Which is nothing but another way of creating Observable with added facilities. Hope this helps.

Like Article
Suggest improvement
Share your thoughts in the comments
Please Login to comment...