How to Create Menu Folder & Menu File in Android Studio?
Last Updated :
07 Mar, 2021
Menus are the common user interface component in almost all the application. This interface provides a few options from which the user can select an option. There are 3 types of menu types available in Android:
- Options menu and app bar
- Context menu and contextual action mode
- Popup menu
How to define Menu in XML?
In android, we can build the menu on our activity page but which is not standard practice, instead we define it in the menu resource then we inflate that menu resource into our activity. The reason why we should define menu in menu resource:
- The first and most important thing it separates from our activity so visualization and debugging is easy.
- Separating the menu gives us flexibility like for different platform versions, screen sizes we can make some changes to our menu resource file.
- Easy to manage as it’s separate from our activity.
Step by Step Implementation
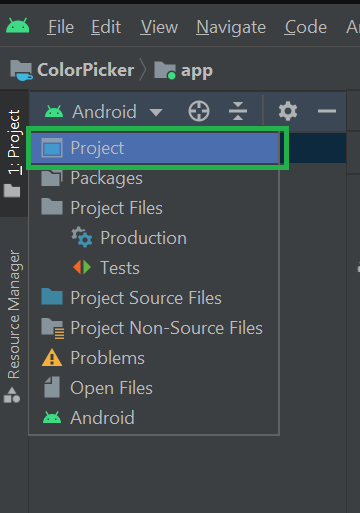
Step 1: Open your project in “Project” mode
Open your android project in “Project” mode If the project is already opened in the “Android” mode.
Step 2: In your project Go to the app > src > main > res as shown in the below image.

Step 3: Right-click on the res folder > New > Android Resource Directory as shown in the below image.

Step 4: Now you select the menu option from the values drop-down section.

After selecting you can see a screen like this.

And now just hit OK.
Step 4: Now you can see the menu folder inside the res folder.

Step 5: Now to create a menu file select the menu folder and right-click on it and select Menu Resource File.

Step 6: Give a name to your menu file, for instance here we have given the name as my_menu.

Then hit OK. Now you can see the my_menu.xml file inside the menu folder. Woah, you just create your menu file in android studio. So now we just write few lines of code to see that our menu file is working or not.
XML
<?xml version="1.0" encoding="utf-8"?>
<item android:id="@+id/new_game"
android:icon="@drawable/ic_baseline_local_see_24"
android:title="@string/new_game"/>
<item android:id="@+id/help"
android:icon="@drawable/ic_baseline_first_page_24"
android:title="@string/help" />
</menu>
|
Now look at the codes you see the menu tag i.e <menu>
- <menu>: It is just a container and it holds the menu items or group of menu items.
- <item>: It creates menu item
Title and icon properties are self-explanatory so I don’t think I have to explain them.
Note: Look at the above code, android: icon, those are the icon that we have created. In your case just look at your drawable folder and give your icon name there.
Ok, we just completed our 80% of work now just inflate our menu to our MainActvity.kt file
Kotlin
import androidx.appcompat.app.AppCompatActivity
import android.os.Bundle
import android.view.Menu
import android.view.MenuInflater
class MainActivity : AppCompatActivity() {
override fun onCreate(savedInstanceState: Bundle?) {
super.onCreate(savedInstanceState)
setContentView(R.layout.activity_main)
}
override fun onCreateOptionsMenu(menu: Menu?): Boolean {
val inflater: MenuInflater = menuInflater
inflater.inflate(R.menu.my_menu,menu)
return super.onCreateOptionsMenu(menu)
}
}
|
Just focus on the codes after the comment line that block of codes used to inflate our menu in our app. Now run your app and you can see the result.
Output:


Like Article
Suggest improvement
Share your thoughts in the comments
Please Login to comment...