How to create basic text input in React Native ?
Last Updated :
02 Dec, 2022
Text input is a basic component that allows users to input text through the keyboard. It is widely used in mobile applications for taking usernames, passwords, user details, and much more.
In React Native, we have a TextInput component to achieve this. It comes with many props that help us to modify the component according to our needs.
Some of the essential props are listed below:
- placeholder: The string that will be rendered before the user entered any text.
- value: The actual value to show for the text input.
- defaultValue: Provides an initial value that will change when the user starts typing.
- keyboardType: Determines which keyboard to open. e.g.numeric, phone-pad, email-address.
- maxLength: Limits the maximum number of characters that can be entered by the user.
- multiline: If true, the text input can be multiple lines, the default value is false.
- onChangeText: Callback that is called when the text input’s text changes. Changed text is passed as a single string argument to the callback handler.
- onSubmitEditing: Callback that is called when the user presses the text input’s submit button.
- secureTextEntry: If true, the input string will be encrypted. You can use this for password fields.
Apart from these essential props, React Native provides many other props. You can check that on React Native official documentation. But these are the most important to create a basic text input.
Approach: We will see 2 examples of the TextInput component. In the first example, we create a simple TextInput that takes input text from the user and displays that text in an alert box.
In the second example, we will create a Login Screen in which user can enter their email address and password for logging in.
Creating React Application:
Step 1: Open your Terminal and run the below command. It will install Expo CLI globally in your system.
npm install -g expo-cli
Step 2: Now, create a new React Native Project by running the below command.
expo init "Your_Project_Name"
Step 3: You’ll be asked to choose a template. Select blank template.
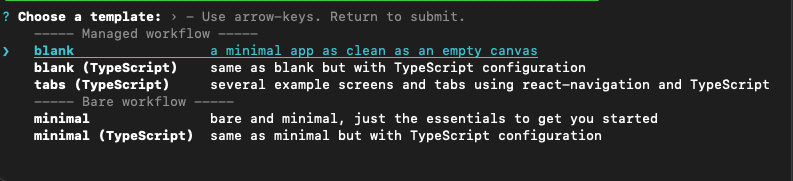
blank template
Step 4: Now go to the project folder and run the below command to start the server.
cd "Your_Project_Name"
npm start
Project Structure: It will look like the following.
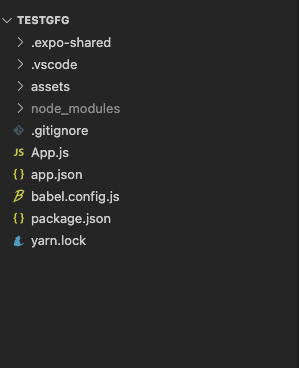
Project Structure
Example 1: Open the App.js file and write the below code in that file.
App.js is the main file that renders first when you run your app. Here we will use the TextInput component provided by React Native. We will pass 4 props placeholder, value, onChangeText, and onSubmitEditing in this component.
We will also create a state to store the string inserted by the user. We use the onChangeText prop to set the input string to message state. And when the user presses the submit button on the keyboard, an alert will be invoked with the message.
Javascript
import { StyleSheet, SafeAreaView, TextInput } from "react-native";
import { useState } from "react";
export default function App() {
const [message, setMessage] = useState("");
return (
<SafeAreaView style={styles.container}>
<TextInput
placeholder="enter your message here"
value={message}
onChangeText={(text) => setMessage(text)}
onSubmitEditing={() => alert(`Welcome to ${message}`)}
/>
</SafeAreaView>
);
}
const styles = StyleSheet.create({
container: {
flex: 1,
backgroundColor: "#fff",
alignItems: "center",
justifyContent: "center",
},
});
|
Output:

TextInput Component
Example 2: Open the App.js file and write the below code in that file.
in this file, we will create 2 TextInput components, email, and password. Users can enter their email and passwords to log in. We will also use secureTextEntry prop for the password field. And when the user presses the submit button on the keyboard, an alert will show.
We will also apply styling to the TextInput component.
Javascript
import { StyleSheet, SafeAreaView, TextInput, Text } from "react-native";
import { useState } from "react";
export default function App() {
const [email, setEmail] = useState("");
const [password, setPassword] = useState("");
return (
<SafeAreaView style={styles.container}>
<Text style={styles.title}>GeeksforGeeks</Text>
<TextInput
placeholder="Email"
value={email}
onChangeText={(text) => setEmail(text)}
keyboardType="email-address"
style={styles.input}
/>
<TextInput
placeholder="Password"
value={password}
onChangeText={(text) => setPassword(text)}
keyboardType="visible-password"
secureTextEntry
style={styles.input}
onSubmitEditing={() => alert("Welcome to GeeksforGeeks")}
/>
</SafeAreaView>
);
}
const styles = StyleSheet.create({
container: {
flex: 1,
backgroundColor: "#228B22",
alignItems: "center",
justifyContent: "center",
},
title: {
fontSize: 40,
color: "#fff",
marginBottom: 20,
fontWeight: "bold",
},
input: {
backgroundColor: "#fff",
padding: 10,
width: "80%",
marginTop: 15,
color: "#000",
},
});
|
Output:

TextInput Component
Like Article
Suggest improvement
Share your thoughts in the comments
Please Login to comment...