Dive into the world of web development with Python by exploring the versatile Django framework. Django is a go-to for many developers due to its popularity, open-source license, and robust security features. It enables fast and efficient project development. In this tutorial, we will guide you through the process of installing Django on a Windows machine using pip, verifying the installation, creating a new project, and launching a Django development server. Get ready to enhance your web development skills and experience the power of Django.
Create a Project in Django
Before you begin, you will need to have the following:
- Windows 10 or later
- Python 3.6 or later
- Python pip
Step 1: Opening PowerShell
The first step is to open PowerShell. To do this, press the Windows key and type PowerShell. Right-click on the PowerShell icon and select Run as Administrator.

PowerShell

open PowerShell
Step 2: Verifying Python Installation
Once PowerShell is open, you can verify that Python is installed by typing python –version. This will display the version of Python that is installed.
Terminal command:
python --version
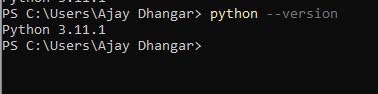
Python is installed
Step 3: Upgrading PIP
Next, you will need to upgrade pip. To do this, type python -m pip install –upgrade pip. This will ensure that you have the latest version of pip installed.

upgrade pip
Step 4: Creating a Project Directory
Now, you will need to create a project directory. To do this, type mkdir myproject. This will create a directory called myproject.
(i) Create the directory by utilizing the mkdir command. This command is a powerful tool that allows you to quickly and easily create a directory in your system. With this command, you can create a directory in seconds, making it a great time-saver for any user.
mkdir django_project

Create the directory
(ii) Navigate to the Django_Project directory using the `cd` command. Here, you’ll find all the necessary components to get your project up and running.
cd django_project
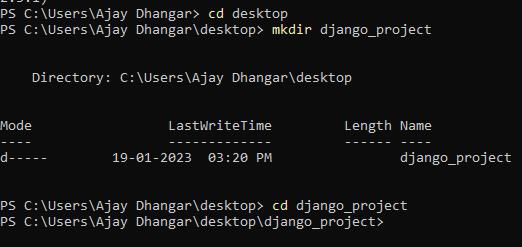
Django_Project directory
Step 5: Creating the Virtual Environment
Next, you will need to create a virtual environment. To create a virtual environment called myproject.
To do this, type in terminal
python -m venv myproject
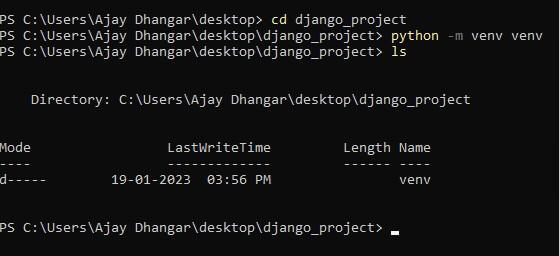
python -m venv myproject and ls
Step 6: Activating the Virtual Environment
Now, you will need to activate the virtual environment. To do this, type
venv\Scripts\activate

activate the virtual environment
Step 7: Installing Django
This section will teach you how to install Django on your system using pip. To do this, run the following command:
pip install Django
This will install the latest version of Django, allowing you to start building powerful web applications easily.

Installing Django
If you wish to install a different version of Django, you can easily specify the version you desire by following these steps:
pip install django

version of Django
Once the installation is complete, you must verify that Django has been successfully installed. To do this, enter the following command:
django-admin --version

Django version
Step 8: Create the Django Project
Now it’s time to create a project. According to the Django documentation, a project is a Python package – i.e. a directory of code – that contains all the settings for an instance of Django. This includes database configuration, Django-specific options, and application-specific settings.
To create the project, use the command-line utility django-admin that comes with Django. This command will generate files where you can configure the settings for your database, add third-party packages, and more.
Create the project using the following command:
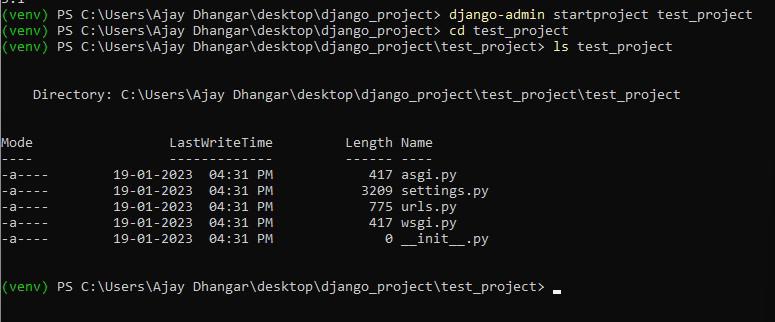
django-admin startproject test_project
Change into the test_project directory:
cd test_project
Type the following command to see the contents in the project directory:
ls test_project
Output:
output
The directory test_project contains Django configuration files. The manage.py file is especially useful when starting a development server, which is what you will do in the next step.
Step 9: Running the Development Server
Now that the project has been created, it’s time to start the Django development server.Start the development server using the manage.py runserver command:
Note: Make sure sure you are in the same directory as manage.py file after to run manage.py runserver
python manage.py runserver

Start
Now, Go to http://127.0.0.1:8000/ in your web browser. You should see a page similar to the following screenshot:
.png)
Conclusion:
You have come to the end of this article. You learned how to install Django on Windows, verify the installation, and you also learned how to create a Django project and start a development server.
Step 10: Create app in django
Now as we created the project in django and our django server is up and running and if now to create app in django project we can achieve it b by using django inbuit command which will initiate the django app for us.
Note: Make sure before running the command we must inside our project directory if not then run the below command
cd test_project
now we are inside the test_project and we are ready to create django app
django-admin startapp test_app
Now this command will create app inside our project and we ready to go with the django project and to know more about django app you can refer to the article – How to create app in django.
Like Article
Suggest improvement
Share your thoughts in the comments
Please Login to comment...