How to Create a Desktop Window Application in Flutter?
Last Updated :
15 Mar, 2022
The flutter team recently release Flutter version 2.10 with Desktop support. Desktop support allows you to compile Flutter source code to a native Windows, macOS, or Linux desktop app. Flutter’s desktop support also extends to plugins—you can install existing plugins that support the Windows, macOS, or Linux platforms, or you can create your own.
Requirement
As know Desktop support is available in flutter version 2.10 or higher. so you need version 2.10 or higher. Upgrade Flutter SDK from the command line:
flutter upgrade
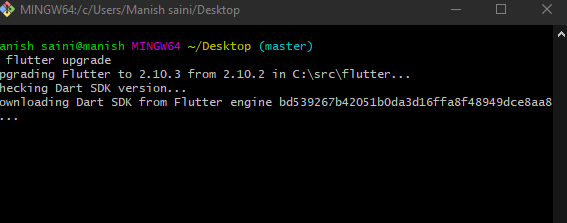
flutter upgrade
Create New Project
You can use the following article to create a new project in Flutter.
Set up
On Windows, desktop support is enabled on Flutter 2.10 or higher. On macOS and Linux, desktop support is disabled by default in the stable channel. You can manually enable it with one of these commands, depending on which platform you are running:
flutter config --enable-macos-desktop flutter config --enable-linux-desktop
Note: You only need to execute flutter config –enable-<platform>-desktop once.
To test that desktop support is configured, use the flutter devices command to list the available targets.
flutter devices
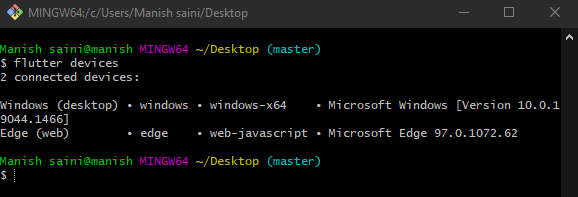
flutter devices
This will show you the available devices in your system. You might also run flutter doctor to see if there are any unresolved issues. You should see a checkmark for each successfully configured area. It should look something like the following on Windows, with an entry for “develop for Windows”:
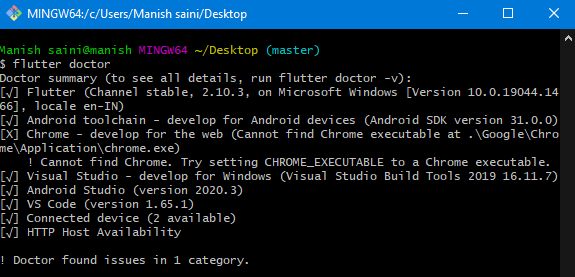
flutter doctor
Create and Run
Creating a windows desktop app is simple as creating a flutter project for another platform like Android. Once you’ve configured your environment for desktop support, you can create and run a desktop application either in the IDE or from the command line. Don’t remove the default code, we are going to run the default code of flutter.
Dart
import 'package:flutter/material.dart';
void main() {
runApp(const MyApp());
}
class MyApp extends StatelessWidget {
const MyApp({Key? key}) : super(key: key);
@override
Widget build(BuildContext context) {
return MaterialApp(
title: 'Flutter Demo',
theme: ThemeData(
primarySwatch: Colors.blue,
),
home: const MyHomePage(title: 'Flutter Demo Home Page'),
);
}
}
class MyHomePage extends StatefulWidget {
const MyHomePage({Key? key, required this.title}) : super(key: key);
final String title;
@override
State<MyHomePage> createState() => _MyHomePageState();
}
class _MyHomePageState extends State<MyHomePage> {
int _counter = 0;
void _incrementCounter() {
setState(() {
_counter++;
});
}
@override
Widget build(BuildContext context) {
return Scaffold(
appBar: AppBar(
title: Text(widget.title),
),
body: Center(
child: Column(
mainAxisAlignment: MainAxisAlignment.center,
children: <Widget>[
const Text(
'You have pushed the button this many times:',
),
Text(
'$_counter',
style: Theme.of(context).textTheme.headline4,
),
],
),
),
floatingActionButton: FloatingActionButton(
onPressed: _incrementCounter,
tooltip: 'Increment',
child: const Icon(Icons.add),
),
);
}
}
|
Run From IDE
From IDE you have to click on Start Debugging in the right top corner as shown below image.
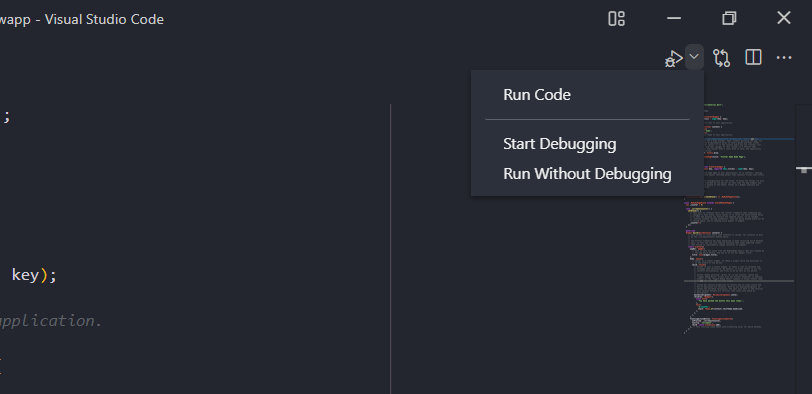
Start Debugging
This will take 3 -4 minutes,

Run From Command Line
cd project-name
flutter run -d windows

Build a release app
To generate the release build, run the following in the command line,
PS flutter build windows
flutter build macos
flutter build linux
Share your thoughts in the comments
Please Login to comment...