How to create a basic application in Java Spring Boot
Last Updated :
08 Nov, 2023
Spring Boot is the most popular Java framework that is used for developing RESTful web applications. In this article, we will see how to create a basic Spring Boot application.
Spring Initializr is a web-based tool using which we can easily generate the structure of the Spring Boot project. It also provides various different features for the projects expressed in a metadata model. This model allows us to configure the list of dependencies that are supported by JVM. Here, we will create the structure of an application using Spring Initializr and then use an IDE to create a sample GET route.
Therefore, to do this, the following steps are followed:
Step 1: Go to Spring Initializr
Fill in the details as per the requirements. For this application:
Project: Maven
Language: Java
Spring Boot: 3.1.5
Packaging: JAR
Java: 17
Dependency: Spring Web
IDE: IntelliJ IDEA
NOTE: For creating a simple application in Java Spring Boot we can import our code directly into various IDEs:
- Spring Tool Suite(STS)
- IntelliJ IDEA
- VSCode
Here, we have used IntelliJ IDEA for creating a basic Spring Boot application
Step 2: Specify Group Id and Artifact Id. Here we have provided the Group name as “com.gfg” and the Artifact ID as “Spring Boot app”.
Step 3: Click on Generate which will download the starter project.

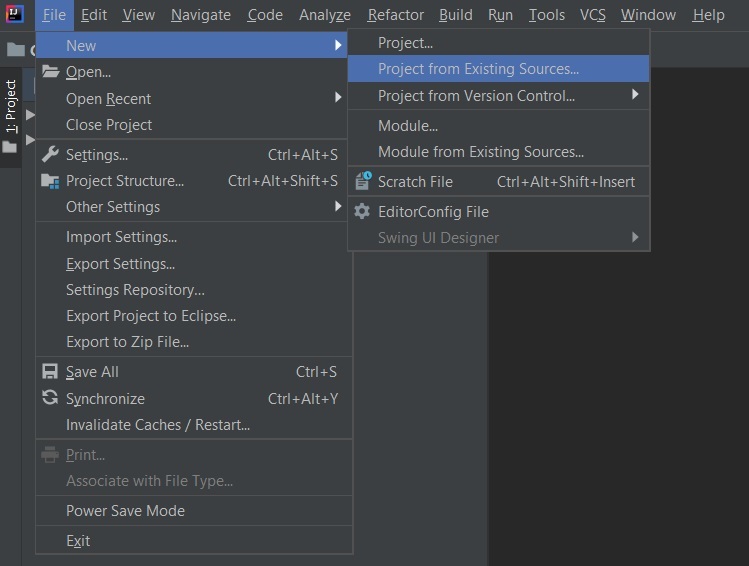
Step 4: Extract the zip file. Now open a suitable IDE and then go to File->New->Project from existing sources->Spring-boot-app and select pom.xml. Click on import changes on prompt and wait for the project to sync.

Note: In the Import Project for Maven window, make sure you choose the same version of JDK which you selected while creating the project.
Step 5: Go to src->main->java->com.gfg.Spring.boot.app, create a java class with name as Controller and add the annotation @RestController. Now create a GET API as shown below:
Java
@RestController
public class Controller {
@GetMapping("/")
public String home()
{
String str
= "<html><body><font color=\"green\">"
+ "<h1>WELCOME To GeeksForGeeks</h1>"
+ "</font></body></html>";
return str;
}
@RequestMapping(
method = { RequestMethod.GET },
value = { "/gfg" })
public String info()
{
String str2
= "<html><body><font color=\"green\">"
+ "<h2>GeeksForGeeks is a Computer"
+ " Science portal for Geeks. "
+ "This portal has been "
+ "created to provide well written, "
+ "well thought and well explained "
+ "solutions for selected questions."
+ "</h2></font></body></html>";
return str2;
}
}
|
Step 6: This application is now ready to run. Run the SpringBootAppApplication class and wait for the Tomcat server to start.

Note: The default port of the Tomcat server is 8080 and can be changed in the application.properties file.
Step 7: Now go to the browser and enter the URL localhost:8080. Observe the output and now do the same for localhost:8080/gfg
Output
On running the above application, the following output is generated:
Conclusion
By following the above steps, we have created a simple RESTful route with some message in it. In order to make a more complex application, more RESTful routes are added to perform the CRUD operations on the server.
Like Article
Suggest improvement
Share your thoughts in the comments
Please Login to comment...