How to Convert Java Code to Kotlin Code in Android Studio?
Last Updated :
31 Jan, 2021
In Google I/O 2017, Kotlin has been declared as an official language for Android app development. This language gains popularity among developers very quickly because of its similarities as well as interoperable with Java language. One can mix code of Java and Kotlin while designing an Android project. Some of the major challenges faced by developers like avoiding null pointer exceptions are easily handled by Kotlin. Because of all these reasons, it became essential to learn Kotlin. However, Android Studio takes care of this need. Developers can easily convert their Java code into Kotlin in Android Studio. There can be 2 scenarios in front of developers:
- Converting a complete Java File/Class into Kotlin File/Class
- Add a new Kotlin file/class in the project and convert a piece of Java code.
This article broadly describes the steps involved in performing code conversion in both cases.

Code Conversion
Method 1: Converting a Complete Class/File into Kotlin
Step 1: Open source code file
Open the java source code file that is to be converted. Consider the given code of the MainActivity file that is to be converted into Kotlin.
Java
import androidx.appcompat.app.AppCompatActivity;
import android.os.Bundle;
import android.view.View;
import android.widget.TextView;
public class MainActivity extends AppCompatActivity {
private TextView textView;
private int count;
@Override
protected void onCreate( Bundle savedInstanceState ) {
super.onCreate(savedInstanceState);
setContentView(R.layout.activity_main);
textView = findViewById(R.id.textView2);
count = 0;
}
public void buttonOnClick( View view){
count++;
textView.setText(Integer.toString(count));
}
}
|
Step 2: Select the option
From the left-hand side Option menu, select Android Project and right-click on the source code file. Select the option “Convert Java File to Kotlin File”. One can also use the shortcut command “Ctrl+Alt+Shift+K” while the file is opened in Android Studio.
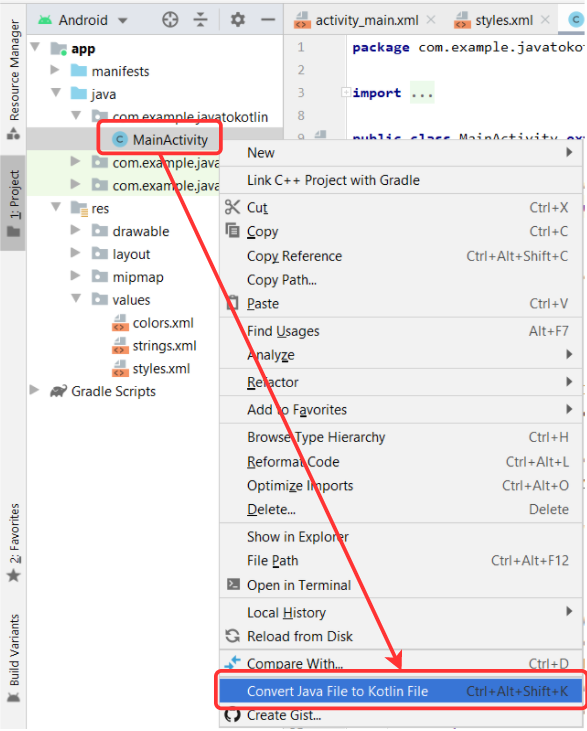
A dialog box will appear that asks permission to configure Kotlin in Project. To carry out the code conversion it is necessary to grant this permission. Further, select the “All modules” option and choose the latest Kotlin compiler installed on the computer. After clicking “OK”, Android Studio will make some changes in the app module build.gradle file to perform code conversion successfully.


Step 3: Produce Kotlin file
Again select the “Convert Java File to Kotlin File” option by right click on the java class/file. This time the required conversion will happen and the file extension will get changed from .java to .kt. Below is the equivalent Kotlin code produced on converting the above mentioned MainActivity.java file.
Kotlin
import android.os.Bundle
import android.view.View
import android.widget.TextView
import androidx.appcompat.app.AppCompatActivity
class MainActivity : AppCompatActivity() {
private var textView: TextView? = null
private var count = 0
override fun onCreate(savedInstanceState: Bundle?) {
super.onCreate(savedInstanceState)
setContentView(R.layout.activity_main)
textView = findViewById(R.id.textView2)
count = 0
}
fun buttonOnClick(view: View?) {
count++
textView!!.text = Integer.toString(count)
}
}
|
Method 2: Adding a Separate Kotlin File into the Project
Android Studio allows the mixing of Java and Kotlin code in a project. If there is a requirement to reuse a piece of Java code by writing it in Kotlin, one can follow the below-mentioned steps.
Step 1: Create a Kotlin Class/File
Create a new Class/File of Kotlin extension inside the java folder of the application’s project file. Give it a desired name. Once the file is created, Android Studio will show an alert message that “Kotlin is not configured”.

Step 2: Configure Kotlin into the Project
Click on the “configure” option present on the alert message. A dialog box will appear, select “All modules” and choose the latest Kotlin compiler installed on the computer. Click “OK” and let the changes take place in build.gradle files.
Step 3: Copy and Paste
Once Android Studio finished the build of project files, open the created Kotlin Class/File. Copy the Java code which is to be converted. Paste that code in the created file/class having Kotlin extension. That Java code will get converted automatically into Kotlin by the Android Studio.
Advantages of Kotlin Over Java
- Kotlin codes are more concise than Java.
- It is interoperable(compatible) with Java.
- Kotlin resolves nullability issues by placing “Null” in its type system.
- Cleaner and safer code.
Like Article
Suggest improvement
Share your thoughts in the comments
Please Login to comment...