How to Connect to Mysql Server Using VS Code and Fix errors?
Last Updated :
21 Jul, 2023
MySQL is a relational database management system based on SQL-Structured Query Language used for accessing and managing records in a database. It can be easily connected with programming languages such as Python, Java, and PHP to serve various purposes that require CRUD ( Create,Read,Update,Delete) operations. MySQL is based on a client – server architecture which follows a request – response cycle. Clients make requests through the GUI screen or command prompt by using specific SQL expressions on MySQL. The server application responds with the requested expressions and produces the desired result on the client-side.
Steps to Connect to MySQL Server using VSCode:
Step 1: Open Visual Studio Code.
Step 2: Go to -> Extensions, to search for MySQL extension, type : MySQL
Step 3: Open the extension called MySQL Management Tool and install it.
Step 4: Now click on the Explorer option or press ( Ctrl + Shift + E ), MySQL is added to this section.
Step 5: Click on Add Connection to create a new connection.
Step 6:Here we have to provide the server address. The MySQL server is installed on your computer so the host name is, ‘localhost’.
Step 7: Then provide a user name and the default username is ‘root’.
Step 8: Provide the password that you created for this user at the time of MySQL installation and then provide the port number i.e; 3306.
Step 9: Now you’ll see a connection is added to MySQL section from which databases can be accessed. You may see an authentication error. This error means that you are using the version 8 of MySQL server. This version defines and uses a new authentication method instead of old MySQL native password. If the MySQL Client does not use this new authentication method this error would be displayed.
Step 10: The solution is to create a new SQL user that uses old authentication method. Go to the folder where MySQL is installed.
Step 11: Open the bin folder. Select the file path and type ‘cmd‘.
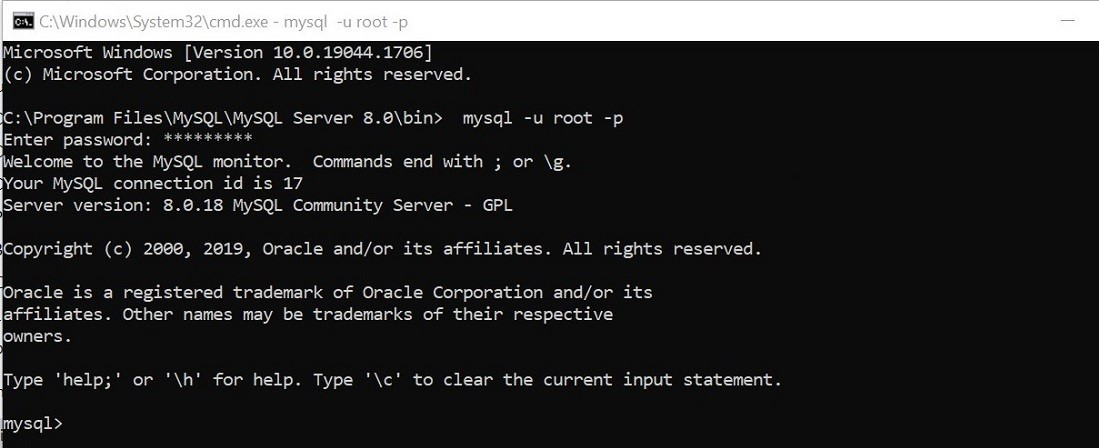
Step 12: Now to connect to the server, type the following command:
mysql -u root -p
Here -u means that you’ve to provide the username that is ‘root’ and -p means you have give the password.
Errors:
If you face any errors regarding connection like, ( ERROR 2003 (HY000): Can’t connect to MySQL server on ‘localhost:3306’ (10061) )
Go to Services, then search for MySQL or MYSQL80 and right-click, click on the start button to start the service.
Step 13: Create a new user:
CREATE USER 'sqluser'@'%' IDENTIFIED
WITH mysql_native_password BY 'password' ;
A new user is created by the name ‘sqluser’ with password ‘password’. Provide this user with all the privileges :
GRANT ALL PRIVILEGES ON *.* TO 'sqluser'@'%' ;
We need to validate these privileges :
FLUSH PRIVILEGES;
Step 14: Delete the previous connection.
Step 15: Add a new connection by providing the following details:
- Host: localhost
- User: sqluser
- Password: password
- Port number : 3306
Step 16: The connection is established and you can see the existing databases.To create a new database, right click on localhost and create a new query.
Step 17: Type the following commands to create a new database and table inside it.
CREATE DATABASE myrestaurant ;
CREATE TABLE IF NOT EXISTS myrestaurant.users(
    id INT(10) NOT NULL PRIMARY KEY AUTO_INCREMENT,
    name VARCHAR(200) NOT NULL,
    phone VARCHAR(200),
    address VARCHAR(200),
    password VARCHAR(200) NOT NULL
);
INSERT INTO myrestaurant.users(name,phone,address,password)
VALUES
('Gaurav','123456789','Mumbai,India','pass134'),
('Sakshi','987654321','Chennai,India','pass456');
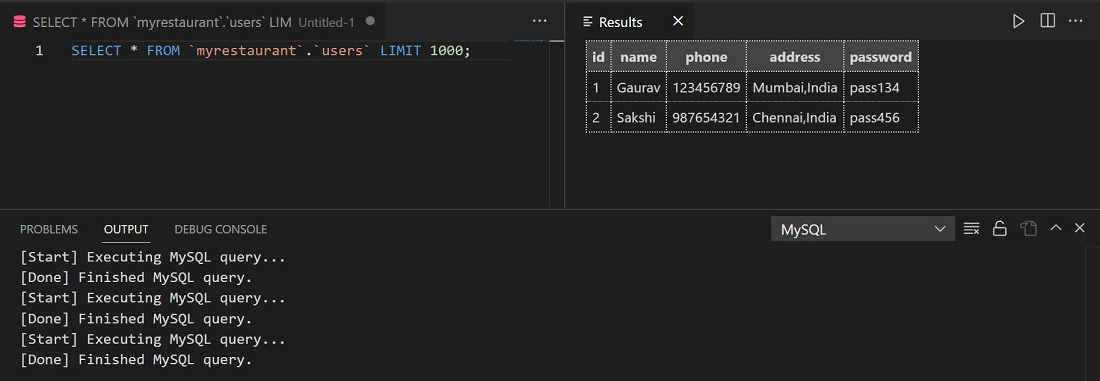
Step 18: Run this MySQL query.
Step 19: Refresh the connection to see the new table named ‘users’ added to this database.Right click on ‘users’ and ‘select top 1000’.
Step 20: Run this MySQL query and see the results.
In this way databases can be accessed and queries can be executed through VSCode. Since VSCode supports other programming languages also, it is easier to do database management through it.
Like Article
Suggest improvement
Share your thoughts in the comments
Please Login to comment...