How to Configure SSH on Cisco Routers and Switches?
Last Updated :
16 Aug, 2021
Overview :
SSH is a security mechanism, which can be used to access the privilege and configuration mode of a Router and a Switch from a remote location to perform the required action. The primary aim to configure SSH is to access devices deployed in a network from a remote location so that the required configuration can be performed and resources can be provided in a seamless manner. To learn about the SSH configuration, the Cisco Packet Tracer tool is used to demonstrate the steps to be followed and associated commands to be executed for this purpose. In addition to this, syntax and explanation of each command are provided along with screen-grabs.
SSH Configuration on Cisco Router :
Below listed steps will be followed to configure the SSH as follows.
Step-1 :
Cisco Packet Tracer is opened and network topology is created between a computer system and a router.
Step-2 :
Desktop settings of the Computer System need to be accessed to assign it with IP address, associated subnet mask and gateway address of the network.

Assigning IP address, subnet mask, and default gateway address to PC.
Step-3 :
Further, the Command Line Interface of the router needs to be accessed to assign an IP address to the connected interface (Fast Ethernet 0/0 in this scenario).
Step-4 :
Configuration mode is accessed using configure terminal command through Router’s CLI. IP address 192.168.16.1 is assigned to interface with subnet mask of 255.255.255.0. In addition to this, no shutdown command is executed to change the interface state to up. With successful configuration of assigning IP addresses, a communication channel is established between the computer system and Router.
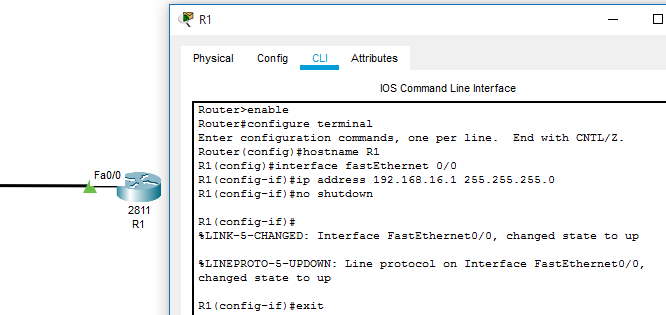
An IP address is assigned to Router’s interface
Step-5 :
SSH Command Execution –
- All the commands used to enable the SSH is highlighted in the below-provided screen-grab of the Cisco Packet Tracer.
- At first, domain name is set using ‘ip domain-name domain-name command.
- Then, to maintain a secure SSH connection, a crypto key is generated using ‘crypto key generate RSA’ command. A value of ‘1024’ is input and enter is clicked to successfully generate the key.
- ‘enable password password’ command is executed to maintain security and to allow only authorized users to access the router command-line interface.
- Further, the ‘username password’ command is used to set the username to establish an SSH connection with the network device.
- ‘IP ssh version 2’ command is used to define the version of SSH, which will be configured on this router.
- Further, ‘line vty 0 15’ is executed, so that router can be accessed from a remote system connected to the network.
- Then, ‘transport input ssh’ and ‘login local’ commands are executed for the successful configuration of SSH on the Cisco Router.
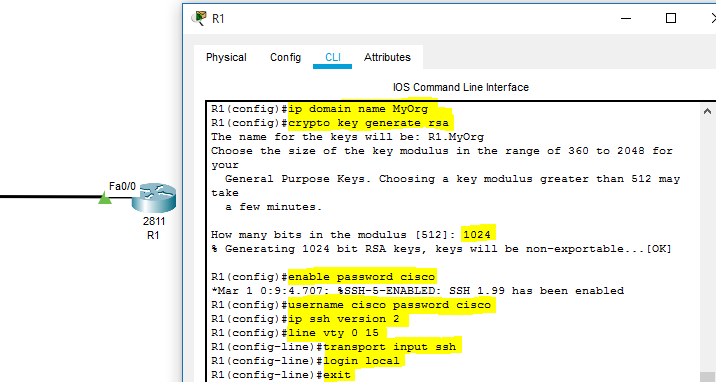
SSH configuration
Step-6 :
To test the SSH configured on Cisco Router, Command Prompt is opened on Computer System and the ‘ssh -l username IP-address’ command is executed.
Command –
ssh -l cisco 192.168.16.1

SSH Testing
Like Article
Suggest improvement
Share your thoughts in the comments
Please Login to comment...