How to Change Default User and Password in Spring Security?
Last Updated :
30 Nov, 2021
Spring Security is a powerful and highly customizable authentication and access-control framework. It is the de-facto standard for securing Spring-based applications. Spring Security is a framework that focuses on providing both authentication and authorization to Java applications. Like all Spring projects, the real power of Spring Security is found in how easily it can be extended to meet custom requirements. Some of the key features of Spring Security are:
- Comprehensive and extensible support for both Authentication and Authorization
- Protection against attacks like session fixation, clickjacking, cross-site request forgery, etc
- Servlet API integration
- Optional integration with Spring Web MVC
In this article, we will discuss how to change the default user and password in spring security. There are two ways to change the default user and password in the spring security
- Method 1: Changing in the application properties file
- Method 2: Creating custom annotated EnableWebSecurity class
Changing the application properties of the spring project is one of the easiest ways to override the default user name and the password. Let’s discuss
Note: First we need to establish the spring application in our project.
Spring Initializr is a web-based tool using which we can easily generate the structure of the Spring Boot project. It also provides various different features for the projects expressed in a metadata model. This model allows us to configure the list of dependencies that are supported by JVM. Here, we will create the structure of an application using a spring initializer.
Step 1: Go to Spring Initializr
Fill in the details as per the requirements. For this application:
Project: Maven
Language: Java
Spring Boot: 2.4.12
Packaging: JAR
Java: 8
Dependencies: Spring Web, Spring Security

Click on Generate which will download the starter project.
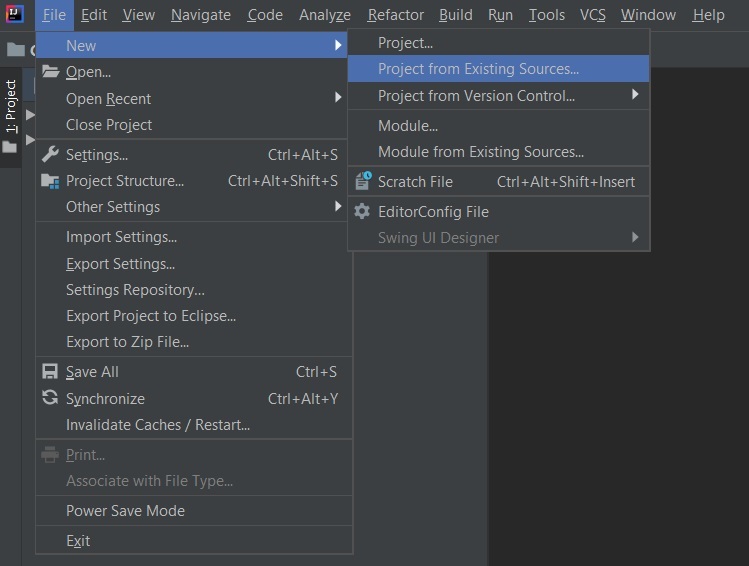
Step 2: Extract the zip file. Now open a suitable IDE and then go to File > New > Project from existing sources > Spring-boot-app and select pom.xml. Click on import changes on prompt and wait for the project to sync as pictorially depicted below as follows,

Note: In the Import Project for Maven window, make sure you choose the same version of JDK which you selected while creating the project.
Step 3: Go to src > main > java > com.gfg.Spring.boot.app and run the main application
SpringBootAppApplication.java
Java
@SpringBootApplication
public class SpringBootAppApplication {
public static void main(String[] args) {
SpringBootAppApplication.run(SpringBootAppApplication.class, args);
}
}
|
Terminal Output:

Method 1: Changing in the application properties file
Spring security generated default passwords in order to override we have to configure our own username and password in the applications.properties file
applications.properties
spring.security.user.name=Aayush
spring.security.user.password=12
Now Run the main application
Terminal Output:

We can see there is no default password is generated in this case because we have already override the default password. Now go to any browser and type localhost:8080 and try to access any local API we cannot access the API first we have to bypass the security.

The user name and password are the same as we mention in the application.properties file.
Method 2: Creating custom annotated EnableWebSecurity class
Go to the src > main > java > com.gfg.Spring.boot.app and create two java files one is controller.java and the other is config.java
controller.java
Java
@RestController
public class controller {
@GetMapping("/delete")
public String delete()
{
return "This is the delete request";
}
}
|
The above java file is used to set the controller for handling the incoming request from the client-side. Now we have to configure the request for that we will use the config.java file.
config.java
Java
@EnableWebSecurity
public class config extends WebSecurityConfigurerAdapter {
@Override
protected void configure(AuthenticationManagerBuilder auth) throws Exception {
auth.inMemoryAuthentication()
.withUser("Zack")
.password("aayush")
.roles("admin_role")
.and()
.withUser("Aayush")
.password("Saini")
.roles("student_role");
}
@Override
protected void configure(HttpSecurity http) throws Exception {
http.
httpBasic()
.and()
.authorizeRequests()
.antMatchers("/delete").hasRole("admin_role")
.and()
.formLogin();
}
@Bean
public PasswordEncoder getPasswordEncoder(){
return NoOpPasswordEncoder.getInstance();
}
}
|
The WebSecurityConfigureAdapter class is used for configuration the incoming requests mainly two methods are used for configurations. The first method is used for adding the roles for a spring application server and the other method is used to distinguish the request according to the roles. Now run the main application of the spring application

Note: There is no default password is generated because we have already used external configuration for handling the user credentials.
Testing the API in Postman
Go to the postman and type localhost:8080/delete
Using the admin roles:

Like Article
Suggest improvement
Share your thoughts in the comments
Please Login to comment...